Yamaha MO8 Owner's Manual - Page 91
Transforming the recorded data and other, operations-Song Job mode, Editing/Deleting Existing Events
 |
UPC - 641018006938
View all Yamaha MO8 manuals
Add to My Manuals
Save this manual to your list of manuals |
Page 91 highlights
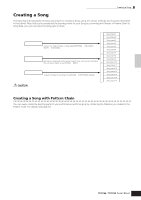
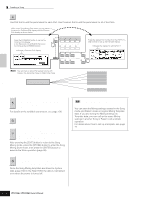
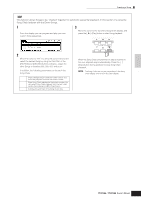
Creating a Song on the MO Quick Guide 4 Edit the MIDI events of the Song. ● Editing/Deleting Existing Events To edit data in the Event List, use the up/down cursor buttons to highlight the specific event you want to edit, and use the left/right cursor buttons to highlight the data type or parameter to be edited. Then, change the value as needed by using the [INC/YES] and [DEC/NO] buttons or the data dial. The entire line of the edited event will flash on the display. Press the [ENTER] button to actually enter the edited data (the entire line of the edited event will stop flashing). To abort an edit simply highlight to a new event location without pressing the [ENTER] button. Press the [F6] button to delete the event at the current location. When changing the value, the entire line will flash on the display indicating this is being edited and not fixed yet. Creating a Song In the Event List display, you can edit various types of events such as Voice, volume, and pan as well as note events. This means that you could, for example, enter Voice changes to the middle of a track, even if the track was recorded using only one Voice. n For details about the MIDI events handled in the Event List display, see page 182. n If you find the display too cluttered, you can filter out certain event types with the View Filter. Simply press the [F2] VIEW FLT button and select the event types you want to be displayed. For details, see page 182. 5 Press the [F] (Play) button to hear your edited data. Since the Song can be played back from within the Song Edit mode, you can instantly hear and check the changes you've made while editing. If you want to hear just the track being edited, use the Solo function (page 75). 6 Edit other tracks as required by repeating steps 3 through 5 as desired. [ENTER] button The line stops flashing and the value is actually entered. Press the [F6] button to delete the event at the current location. ● Inserting New Events To insert an event, use the up/down cursor buttons to highlight an event at the desired point in the track measure, beat, clock)-this is the location to which the new event will be inserted. Then, follow the steps below. 7 After editing, press the [SONG] button to return to the Song Play mode. 8 Save the edited Song data to a USB storage device (page 98) before turning the power off. ■ Transforming the recorded data and other operations-Song Job mode The Song Job mode has a wide variety of operations for changing and working with Song data. Virtually all of the Jobs share the same procedure, so we'll explain only one of them here-Quantize, which lets you clean up the timing of a previously recorded track. In the following example, this musical passage has been written with exact quarter-note and eighth-note values. Press the [F1] button or [EXIT] button to abort and return to the main Event List display. [F5] button [F1] button ENTER EXECUTE Press the [F6] SET button to actually insert the event shown in the display and remain in display. If you wish to insert the event type currently shown in the display several times, use [F6] SET and press the [F1] or [EXIT] button to return to the main Event List display. Press the [ENTER] button to actually insert the event and return to the main Event List display. Even though you think you may have recorded the passage accurately, your actual performance may be slightly ahead of or behind the beat (or both!). Quantize allows you to align all the notes in a track so that the timing is absolutely accurate to the specified note value. Press the [SONG] button to enter the Song 1 Play mode, then select a Song for which the Job is to be applied. Owner's Manual 91
-
 1
1 -
2
-
3
-
4
-
5
-
6
-
7
-
8
-
9
-
10
-
11
-
12
-
13
-
14
-
15
-
16
-
17
-
18
-
19
-
20
-
21
-
22
-
23
-
24
-
25
-
26
-
27
-
28
-
29
-
30
-
31
-
32
-
33
-
34
-
35
-
36
-
37
-
38
-
39
-
40
-
41
-
42
-
43
-
44
-
45
-
46
-
47
-
48
-
49
-
50
-
51
-
52
-
53
-
54
-
55
-
56
-
57
-
58
-
59
-
60
-
61
-
62
-
63
-
64
-
65
-
66
-
67
-
68
-
69
-
70
-
71
-
72
-
73
-
74
-
75
-
76
-
77
-
78
-
79
-
80
-
81
-
82
-
83
-
84
-
85
-
 86
86 -
 87
87 -
 88
88 -
 89
89 -
 90
90 -
 91
91 -
 92
92 -
 93
93 -
 94
94 -
 95
95 -
 96
96 -
97
-
98
-
99
-
100
-
101
-
102
-
103
-
104
-
105
-
106
-
107
-
108
-
109
-
110
-
111
-
112
-
113
-
114
-
115
-
116
-
117
-
118
-
119
-
120
-
121
-
122
-
123
-
124
-
125
-
126
-
127
-
128
-
129
-
130
-
131
-
132
-
133
-
134
-
135
-
136
-
137
-
138
-
139
-
140
-
141
-
142
-
143
-
144
-
145
-
146
-
147
-
148
-
149
-
150
-
151
-
152
-
153
-
154
-
155
-
156
-
157
-
158
-
159
-
160
-
161
-
162
-
163
-
164
-
165
-
166
-
167
-
168
-
169
-
170
-
171
-
172
-
173
-
174
-
175
-
176
-
177
-
178
-
179
-
180
-
181
-
182
-
183
-
184
-
185
-
186
-
187
-
188
-
189
-
190
-
191
-
192
-
193
-
194
-
195
-
196
-
197
-
198
-
199
-
200
-
201
-
202
-
203
-
204
-
205
-
206
-
207
-
208
-
209
-
210
-
211
-
212
-
213
-
214
-
215
-
216
-
217
-
218
-
219
-
220
-
221
-
222
-
223
-
224
-
225
-
226
-
227
-
228
-
229
-
230
-
231
-
232
-
233
-
234
-
235
-
236
-
237
-
238
-
239
-
240
 |
 |
