Yamaha PSR-5700 Owner's Manual (feature Reference) - Page 11
Delete All Tracks
 |
View all Yamaha PSR-5700 manuals
Add to My Manuals
Save this manual to your list of manuals |
Page 11 highlights
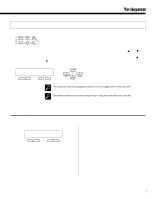
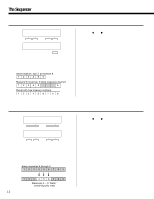
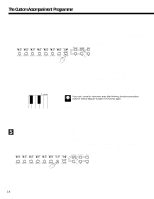
The Sequencer E5 DELETE ALL TRACKS DELETE ALL TRACKS ‡ TopMeas= 4 LastMeas= 6 - + - + † DELETE from 4 to 6 Execute + Purpose: Deletes the specified measure or range of measures from all tracks (including the accompaniment track). Delete Measures 4 through 6. 1 23 4 5 6789 Measure 4 through 6 deleted. 1 23 789 Subsequent measures moved back. 1 23 4 5 6 Procedure: Use the [] buttons to switch between the two display screens, and the left or right [-] and [+] buttons in the first display screen to specify the number of the first measure in the range to be deleted (TopMeas) and the number of the last measure in the range to be deleted (LastMeas). Once the top and last measure numbers have been selected, press the [+] button below "Execute" on the right side of the second display screen to actually execute the delete operation. "Sequencer Executing!" will appear on the lower line of the display while the operation is in progress, and "Completed!" will appear briefly when the operation has finished. Notes: It's important to remember that a delete operation affects all tracks simultaneously, and that measures following the deleted range are moved back to take the place of the deleted measures. This differentiates the delete job from the erase job (described later), which replaces data in the specified range with rests. Be careful when deleting measures that contain effect on/ off events - e.g. pitch bend, modulation, sustain, harmony, etc. If, for example, you delete a measure that contains a pitch bend off event, the pitch bend applied in a previous measure will remain in effect until the next pitch bend event is encountered. The delete operation has no "undo" function, so be absolutely sure you want to delete the selected material before actually executing the delete operation. 11
-
 1
1 -
2
-
3
-
4
-
5
-
 6
6 -
 7
7 -
 8
8 -
 9
9 -
 10
10 -
 11
11 -
 12
12 -
 13
13 -
 14
14 -
 15
15 -
 16
16 -
17
-
18
-
19
-
20
-
21
-
22
-
23
-
24
-
25
-
26
-
27
-
28
-
29
-
30
-
31
-
32
-
33
-
34
-
35
-
36
-
37
-
38
-
39
-
40
-
41
-
42
-
43
-
44
-
45
-
46
-
47
-
48
-
49
-
50
-
51
-
52
-
53
-
54
-
55
-
56
-
57
-
58
-
59
-
60
-
61
-
62
-
63
-
64
-
65
-
66
-
67
-
68
-
69
-
70
-
71
-
72
-
73
-
74
-
75
-
76
-
77
-
78
-
79
 |
 |
