Yamaha PSR-5700 Owner's Manual (feature Reference) - Page 24
Creating Intro, Fill-in, & Ending Patterns
 |
View all Yamaha PSR-5700 manuals
Add to My Manuals
Save this manual to your list of manuals |
Page 24 highlights
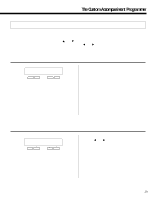
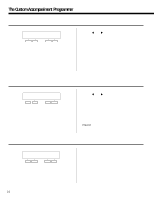
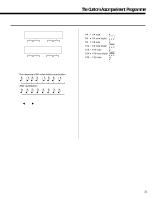
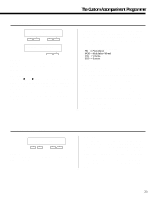
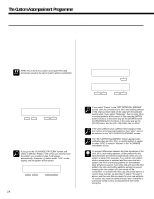
The Custom Accompaniment Programmer q CREATING INTRO, FILL-IN, & ENDING PATTERNS The custom accompaniment programmer allows you to create one set of intro, fill-in, and ending patterns that can be saved and later used with custom accompaniments Cus0 ... 5 (see "SET INTRO/FILL/ENDING" in step 7 for more details). s EDITING A PRESET INTRO, FILL-IN, OR ENDING PATTERN 1. Select the preset style that your custom accompaniment is to be based on. 2. Go to the "5 SAVE TO ACCOMP" screen and save the accompaniment to a custom accompaniment number (Cus0 ... 5). When this is done any custom accompaniment data previously saved in the same location will be overwritten! IMPORTANT 3. Use the [CUSTOM] and [NUMBER] buttons to select the custom accompaniment you saved in the preceding step. 4. Go to the "9 CHANGE PATTERN" screen and use the left [-] and [+] buttons to select "I/F/E", then use the right [-] and [+] buttons to select "Intro," "FillIn," or "Ending." »CHANGE PATTERN Pattern=I/F/E: Intro - + - + 5. After selecting the type of pattern to be programmed, go to any other custom edit screen and program the pattern using the standard custom accompaniment programming procedure. 6. When the pattern is complete, go to the "5 SAVE TO ACCOMP" screen and save the pattern. If you go to the "9 CHANGE PATTERN" screen and select a different "Pattern," the screen you need to save DETAIL the pattern you created in step 5 will appear automatically. Press the [+] button under "YES" on the display and the pattern will be saved. SAVE TO ACCOMP. Set to:I/F/E No Yes - + - + 7. At this point the "SET INTRO/FILL/ENDING" screen will appear. Shift to the second screen and use the left and right [-] and [+] buttons to select "User" for the custom accompaniment numbers with which you want to use your original intro/fill/ending patterns. Shift back to the first screen and press the [+] button under "RETURN" on the display to return to the "5 SAVE TO ACCOMP" screen. SET INTRO/FILL/ENDING‡ Return + † SET INTRO/FILL/ENDING Style=Cus0 = User - + - + 8. Repeat steps 4 through 7 to create other patterns. If you select "Preset" in the "SET INTRO/FILL/ENDING" screen, then the un-edited intro, fill-in and ending patterns DETAIL of the original preset style will be used with the selected custom style. If you select "NoAssign", then no intro, fill-in, or ending patterns will be used. In this case the [INTRO] button functions in the same way as the [START] button, the [ENDING] button functions in the same way as the [STOP] button, and the [FILL IN] button has no effect. If the user patterns have a different time signature than the custom accompaniment patterns, then "User" cannot DETAIL be selected in the "SET INTRO/FILL/ENDING" screen. The "SET INTRO/FILL/ENDING" screen appears automatically when an intro, fill-in, or ending pattern is saved, DETAIL or when "I/F/E" is reset to "Normal" in the "9 CHANGE PATTERN" screen. To prevent differences between the time signatures of the intro, fill-in, and ending patterns, all the patterns for the HINT selected styles are saved simultaneously when any one pattern is saved. For example, if you edit an intro pattern while a preset style is selected and then save the intro pattern, the fill-in and ending patterns for the selected style will also be saved. If you then edit and save the fill-in pattern, the intro and ending patterns will also be saved, meaning the intro pattern you just saved will be overwritten. To prevent this, first copy the preset style to a custom style number, as described in steps 1 through 3, above, and then use this as a basis for your new patterns. Of course, you must be careful that you don't overwrite a previously saved custom accompaniment style when doing this. 24
-
 1
1 -
2
-
3
-
4
-
5
-
6
-
7
-
8
-
9
-
10
-
11
-
12
-
13
-
14
-
15
-
16
-
17
-
18
-
 19
19 -
 20
20 -
 21
21 -
 22
22 -
 23
23 -
 24
24 -
 25
25 -
 26
26 -
 27
27 -
 28
28 -
 29
29 -
30
-
31
-
32
-
33
-
34
-
35
-
36
-
37
-
38
-
39
-
40
-
41
-
42
-
43
-
44
-
45
-
46
-
47
-
48
-
49
-
50
-
51
-
52
-
53
-
54
-
55
-
56
-
57
-
58
-
59
-
60
-
61
-
62
-
63
-
64
-
65
-
66
-
67
-
68
-
69
-
70
-
71
-
72
-
73
-
74
-
75
-
76
-
77
-
78
-
79
 |
 |
