Yamaha PSR-5700 Owner's Manual (feature Reference) - Page 12
Erase, Insert All Tracks
 |
View all Yamaha PSR-5700 manuals
Add to My Manuals
Save this manual to your list of manuals |
Page 12 highlights
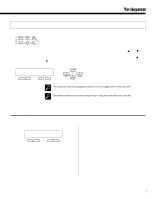
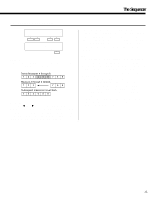
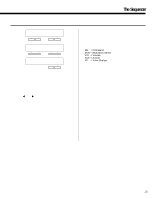
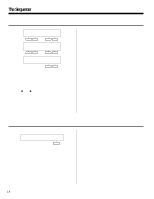
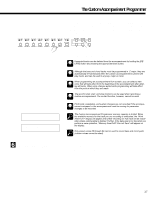
The Sequencer E6 INSERT ALL TRACKS ⁄INSERT ALL TRACKS ‡ TopMeas= 6 Size= 3 - + - + † ⁄INSERT from 6size 3 Execute + Purpose: Inserts a specified number of blank measures in all tracks (including the accompaniment track) at the specified measure number. Insert measure, size 3, at measure 6. 1 23 4 5 6 Measure 6 moved up; 3 blank measures inserted. 1 23 4 5 6 Result with new measure numbers. 1 23 4 5 6789 Procedure: Use the [] buttons to switch between the two display screens, and the left or right [-] and [+] buttons in the first display screen to specify the number of the measure at which the blank measures are to be inserted (TopMeas) and the number of blank measures to be inserted (Size). Once the top measure number and size have been selected, press the [+] button below "Execute" on the right side of the second display screen to actually execute the insert operation. "Sequencer Executing!" will appear on the lower line of the display while the operation is in progress, and "Completed!" will appear briefly when the operation has finished. Notes: Insert affects all tracks simultaneously. The specified number of blank measures is inserted before the existing data beginning at the specified insert measure number. The insert operation has no "undo" function. E7 ERASE ƒERASE ‡ Track=Tr1 TopMeas= 4 - + - + † ƒERASE Tr1 LastMeas= 6 - + from 4 Execute - + Purpose: Erases all note and event (pitch bend, volume changes, etc.) data from the specified measure or range of measures in the specified track (accompaniment track not available), leaving blank measures. Erase measures 4 through 6. TRACK 1 1 2 3 4 5 6 7 8 9 TRACK 1 1 2 3 4 5 6 7 8 9 Measures 4 - 6 "blank, " containing only rests. 12 Procedure: Use the [] buttons to switch between the two display screens, and the left or right [-] and [+] buttons to set the track number (Track), the number of the first measure in the range to be erased (TopMeas), and the number of the last measure in the range to be erased (LastMeas). Once the track and measure numbers have been selected, press the [+] button below "Execute" on the right side of the display to actually execute the erase operation. "Sequencer Executing!" will appear on the lower line of the display while the operation is in progress, and "Completed!" will appear briefly when the operation has finished. Immediately after execution "Undo" will appear above the right [-] button, and that button can be used to undo the erase operation if it was executed by mistake. The undo function is only available until the next operation is performed. Notes: An erase operation leaves the specified measures intact but blank.
-
 1
1 -
2
-
3
-
4
-
5
-
6
-
 7
7 -
 8
8 -
 9
9 -
 10
10 -
 11
11 -
 12
12 -
 13
13 -
 14
14 -
 15
15 -
 16
16 -
 17
17 -
18
-
19
-
20
-
21
-
22
-
23
-
24
-
25
-
26
-
27
-
28
-
29
-
30
-
31
-
32
-
33
-
34
-
35
-
36
-
37
-
38
-
39
-
40
-
41
-
42
-
43
-
44
-
45
-
46
-
47
-
48
-
49
-
50
-
51
-
52
-
53
-
54
-
55
-
56
-
57
-
58
-
59
-
60
-
61
-
62
-
63
-
64
-
65
-
66
-
67
-
68
-
69
-
70
-
71
-
72
-
73
-
74
-
75
-
76
-
77
-
78
-
79
 |
 |
