Yamaha PSR-S950 Owner's Manual - Page 36
Expanding Voices, Installing an Expansion Pack - free styles
 |
View all Yamaha PSR-S950 manuals
Add to My Manuals
Save this manual to your list of manuals |
Page 36 highlights
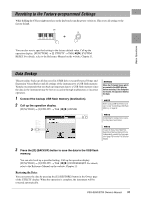
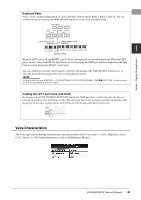
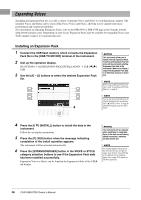
Expanding Voices Installing an Expansion Pack lets you add a variety of optional Voices and Styles to each Expansion category. The installed Voices and Styles can be selected like Preset Voices and Styles, allowing you to expand your music performance and creation possibilities. For information on obtaining Expansion Packs, refer to the PSR-S950 or PSR-S750 page at the Yamaha website (http://www.yamaha.com/). Depending on your locale, Expansion Packs may be available for expanding Voices and Styles unique or native to your particular area. Installing an Expansion Pack 1 Connect the USB flash memory which contains the Expansion Pack file to the [USB TO DEVICE] terminal of the instrument. 2 Call up the operation display. [FUNCTION] [J] EXPANSION PACK INSTALLATION TAB [E][F] USB 3 Use the [A] - [J] buttons to select the desired Expansion Pack file. 4 NOTICE This instrument allows you to install only one Expansion Pack. Installing an Expansion Pack will erase all the previously existing Expansion Pack data in the instrument. Make sure to keep a copy of the Expansion Pack data in a USB flash memory for future use. NOTE Before using a USB flash memory, be sure to read "Connecting a USB Flash Memory" on page 92. NOTE You can call up the information for the selected Expansion Pack by pressing the [7 ] (INFO.) button. To close the information display, press the [EXIT] button. 4 Press the [6 ] (INSTALL) button to install the data to the instrument. Follow the on-display instructions. 5 Press the [F] (YES) button when the message indicating completion of the install operation appears. The instrument will be restarted automatically. 6 Press the [EXPANSION/USER] button in the VOICE or STYLE category selection buttons to see if the Expansion Pack data has been installed successfully. Expansion Voices or Styles can be found in the Expansion folder of the USER tab display. NOTICE The instrument will be restarted when installation is completed. Save all the data currently being edited beforehand, otherwise the data will be lost. NOTE If a message appears indicating that the drive does not have enough free space, move the files in the USER tab to the USB tab, then try installing again. Refer to page 28 for details on the Move operations. 36 PSR-S950/S750 Owner's Manual
-
 1
1 -
2
-
3
-
4
-
5
-
6
-
7
-
8
-
9
-
10
-
11
-
12
-
13
-
14
-
15
-
16
-
17
-
18
-
19
-
20
-
21
-
22
-
23
-
24
-
25
-
26
-
27
-
28
-
29
-
30
-
 31
31 -
 32
32 -
 33
33 -
 34
34 -
 35
35 -
 36
36 -
 37
37 -
 38
38 -
 39
39 -
 40
40 -
 41
41 -
42
-
43
-
44
-
45
-
46
-
47
-
48
-
49
-
50
-
51
-
52
-
53
-
54
-
55
-
56
-
57
-
58
-
59
-
60
-
61
-
62
-
63
-
64
-
65
-
66
-
67
-
68
-
69
-
70
-
71
-
72
-
73
-
74
-
75
-
76
-
77
-
78
-
79
-
80
-
81
-
82
-
83
-
84
-
85
-
86
-
87
-
88
-
89
-
90
-
91
-
92
-
93
-
94
-
95
-
96
-
97
-
98
-
99
-
100
-
101
-
102
-
103
-
104
-
105
-
106
-
107
-
108
-
109
-
110
 |
 |
