ZyXEL NBG-418N v2 User Guide - Page 81
Advanced Screen
 |
View all ZyXEL NBG-418N v2 manuals
Add to My Manuals
Save this manual to your list of manuals |
Page 81 highlights
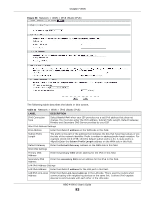
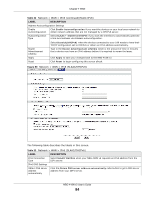
Chapter 7 WAN Table 29 Network > WAN > Internet Connection: PPPoE Encapsulation (continued) LABEL MTU Size Connection Type DESCRIPTION Enter the MTU or the largest packet size per frame that your NBG-418N v2 can receive and process. Select Continuous if you do not want the connection to time out. Select Connection on Demand if you want to connect for a certain amount of time before the router automatically disconnects from the PPPoE server. If you select this you will need to enter the number of minutes in the Idle timeout field. Connect/ Disconnect DNS Servers Attain DNS Automatically/ Set DNS Manually First DNS Server Select Manual if want to make the connection manually. Click Connect button to establish the connection with above settings or Click Disconnect to stop the connection. Click Attain DNS Automatically radio button if your ISP dynamically assigns DNS server information (and the NBG-418N v2's WAN IP address). Or click Set DNS Manually if you have if you have the IP address of a DNS server. Enter the first and second DNS server's IP address in the fields. Second DNS Server WAN MAC Address Factory default Clone the computer's MAC address - MAC Address Set WAN MAC Address Apply Reset The MAC address section allows users to configure the WAN port's MAC address by using the NBG-418N v2's MAC address, copying the MAC address from a computer on your LAN or manually entering a MAC address. Select Factory default to use the factory assigned default MAC Address. Select this option to clone the MAC address of the computer (displaying in the screen) from which you are configuring the NBG-418N v2. Once it is successfully configured, the address will be copied to the rom file. It will not change unless you change the setting or upload a different ROM file. Select this option and enter the MAC address you want to use. Click Apply to save your changes back to the NBG-418N v2. Click Reset to begin configuring this screen afresh. 7.4 Advanced Screen Use this screen to set up multicast configurations. Click Network > WAN > Advanced. Figure 56 Network > WAN > Advanced NBG-418N v2 User's Guide 81
-
 1
1 -
2
-
3
-
4
-
5
-
6
-
7
-
8
-
9
-
10
-
11
-
12
-
13
-
14
-
15
-
16
-
17
-
18
-
19
-
20
-
21
-
22
-
23
-
24
-
25
-
26
-
27
-
28
-
29
-
30
-
31
-
32
-
33
-
34
-
35
-
36
-
37
-
38
-
39
-
40
-
41
-
42
-
43
-
44
-
45
-
46
-
47
-
48
-
49
-
50
-
51
-
52
-
53
-
54
-
55
-
56
-
57
-
58
-
59
-
60
-
61
-
62
-
63
-
64
-
65
-
66
-
67
-
68
-
69
-
70
-
71
-
72
-
73
-
74
-
75
-
 76
76 -
 77
77 -
 78
78 -
 79
79 -
 80
80 -
 81
81 -
 82
82 -
 83
83 -
 84
84 -
 85
85 -
 86
86 -
87
-
88
-
89
-
90
-
91
-
92
-
93
-
94
-
95
-
96
-
97
-
98
-
99
-
100
-
101
-
102
-
103
-
104
-
105
-
106
-
107
-
108
-
109
-
110
-
111
-
112
-
113
-
114
-
115
-
116
-
117
-
118
-
119
-
120
-
121
-
122
-
123
-
124
-
125
-
126
-
127
-
128
-
129
-
130
-
131
-
132
-
133
-
134
-
135
-
136
-
137
-
138
-
139
-
140
-
141
-
142
-
143
-
144
-
145
-
146
-
147
-
148
-
149
-
150
-
151
-
152
-
153
-
154
-
155
-
156
-
157
-
158
-
159
-
160
-
161
-
162
-
163
-
164
-
165
-
166
-
167
-
168
-
169
-
170
-
171
-
172
-
173
-
174
-
175
-
176
-
177
-
178
-
179
-
180
-
181
-
182
-
183
-
184
-
185
-
186
-
187
-
188
-
189
-
190
-
191
-
192
-
193
-
194
-
195
-
196
-
197
-
198
-
199
-
200
-
201
-
202
-
203
-
204
-
205
-
206
-
207
-
208
-
209
-
210
-
211
-
212
-
213
-
214
-
215
-
216
-
217
-
218
-
219
-
220
-
221
-
222
-
223
-
224
-
225
-
226
-
227
-
228
 |
 |
