ZyXEL P-660HW-D1 v2 User Guide - Page 115
Wireless LAN Advanced Setup
 |
View all ZyXEL P-660HW-D1 v2 manuals
Add to My Manuals
Save this manual to your list of manuals |
Page 115 highlights
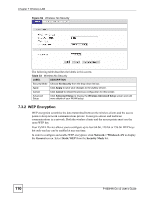
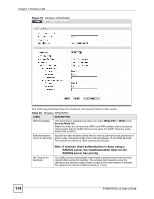
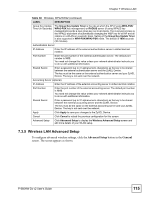
Chapter 7 Wireless LAN Table 36 Wireless: WPA/WPA2 (continued) LABEL DESCRIPTION Group Key Update Timer (In Seconds) The Group Key Update Timer is the rate at which the AP (if using WPA-PSK/ WPA2-PSK key management) or RADIUS server (if using WPA(2) key management) sends a new group key out to all clients. The re-keying process is the WPA(2) equivalent of automatically changing the WEP key for an AP and all stations in a WLAN on a periodic basis. Setting of the Group Key Update Timer is also supported in WPA-PSK/WPA2-PSK mode. The default is 1800 seconds (30 minutes). Authentication Server IP Address Enter the IP address of the external authentication server in dotted decimal notation. Port Number Enter the port number of the external authentication server. The default port number is 1812. You need not change this value unless your network administrator instructs you to do so with additional information. Shared Secret Enter a password (up to 31 alphanumeric characters) as the key to be shared between the external authentication server and the ZyXEL Device. The key must be the same on the external authentication server and your ZyXEL Device. The key is not sent over the network. Accounting Server (optional) IP Address Enter the IP address of the external accounting server in dotted decimal notation. Port Number Enter the port number of the external accounting server. The default port number is 1813. You need not change this value unless your network administrator instructs you to do so with additional information. Shared Secret Enter a password (up to 31 alphanumeric characters) as the key to be shared between the external accounting server and the ZyXEL Device. The key must be the same on the external accounting server and your ZyXEL Device. The key is not sent over the network. Apply Click Apply to save your changes to the ZyXEL Device. Cancel Click Cancel to reload the previous configuration for this screen. Advanced Setup Click Advanced Setup to display the Wireless Advanced Setup screen and edit more details of your WLAN setup. 7.3.5 Wireless LAN Advanced Setup To configure advanced wireless settings, click the Advanced Setup button in the General screen. The screen appears as shown. P-660HW-Dx v2 User's Guide 115
-
 1
1 -
2
-
3
-
4
-
5
-
6
-
7
-
8
-
9
-
10
-
11
-
12
-
13
-
14
-
15
-
16
-
17
-
18
-
19
-
20
-
21
-
22
-
23
-
24
-
25
-
26
-
27
-
28
-
29
-
30
-
31
-
32
-
33
-
34
-
35
-
36
-
37
-
38
-
39
-
40
-
41
-
42
-
43
-
44
-
45
-
46
-
47
-
48
-
49
-
50
-
51
-
52
-
53
-
54
-
55
-
56
-
57
-
58
-
59
-
60
-
61
-
62
-
63
-
64
-
65
-
66
-
67
-
68
-
69
-
70
-
71
-
72
-
73
-
74
-
75
-
76
-
77
-
78
-
79
-
80
-
81
-
82
-
83
-
84
-
85
-
86
-
87
-
88
-
89
-
90
-
91
-
92
-
93
-
94
-
95
-
96
-
97
-
98
-
99
-
100
-
101
-
102
-
103
-
104
-
105
-
106
-
107
-
108
-
109
-
 110
110 -
 111
111 -
 112
112 -
 113
113 -
 114
114 -
 115
115 -
 116
116 -
 117
117 -
 118
118 -
 119
119 -
 120
120 -
121
-
122
-
123
-
124
-
125
-
126
-
127
-
128
-
129
-
130
-
131
-
132
-
133
-
134
-
135
-
136
-
137
-
138
-
139
-
140
-
141
-
142
-
143
-
144
-
145
-
146
-
147
-
148
-
149
-
150
-
151
-
152
-
153
-
154
-
155
-
156
-
157
-
158
-
159
-
160
-
161
-
162
-
163
-
164
-
165
-
166
-
167
-
168
-
169
-
170
-
171
-
172
-
173
-
174
-
175
-
176
-
177
-
178
-
179
-
180
-
181
-
182
-
183
-
184
-
185
-
186
-
187
-
188
-
189
-
190
-
191
-
192
-
193
-
194
-
195
-
196
-
197
-
198
-
199
-
200
-
201
-
202
-
203
-
204
-
205
-
206
-
207
-
208
-
209
-
210
-
211
-
212
-
213
-
214
-
215
-
216
-
217
-
218
-
219
-
220
-
221
-
222
-
223
-
224
-
225
-
226
-
227
-
228
-
229
-
230
-
231
-
232
-
233
-
234
-
235
-
236
-
237
-
238
-
239
-
240
-
241
-
242
-
243
-
244
-
245
-
246
-
247
-
248
-
249
-
250
-
251
-
252
-
253
-
254
-
255
-
256
-
257
-
258
-
259
-
260
-
261
-
262
-
263
-
264
-
265
-
266
-
267
-
268
-
269
-
270
-
271
-
272
-
273
-
274
-
275
-
276
-
277
-
278
-
279
-
280
-
281
-
282
-
283
-
284
-
285
-
286
-
287
-
288
-
289
-
290
-
291
-
292
-
293
-
294
-
295
-
296
-
297
-
298
-
299
-
300
-
301
-
302
-
303
-
304
-
305
-
306
-
307
-
308
-
309
-
310
-
311
-
312
-
313
-
314
-
315
-
316
-
317
-
318
-
319
-
320
-
321
-
322
-
323
-
324
-
325
-
326
-
327
-
328
-
329
-
330
-
331
-
332
-
333
-
334
-
335
-
336
-
337
-
338
-
339
-
340
-
341
-
342
-
343
-
344
-
345
-
346
-
347
-
348
-
349
-
350
-
351
-
352
-
353
-
354
-
355
-
356
-
357
-
358
 |
 |