1995 Oldsmobile 88 Owner's Manual - Page 258
1995 Oldsmobile 88 Manual
Page 258 highlights
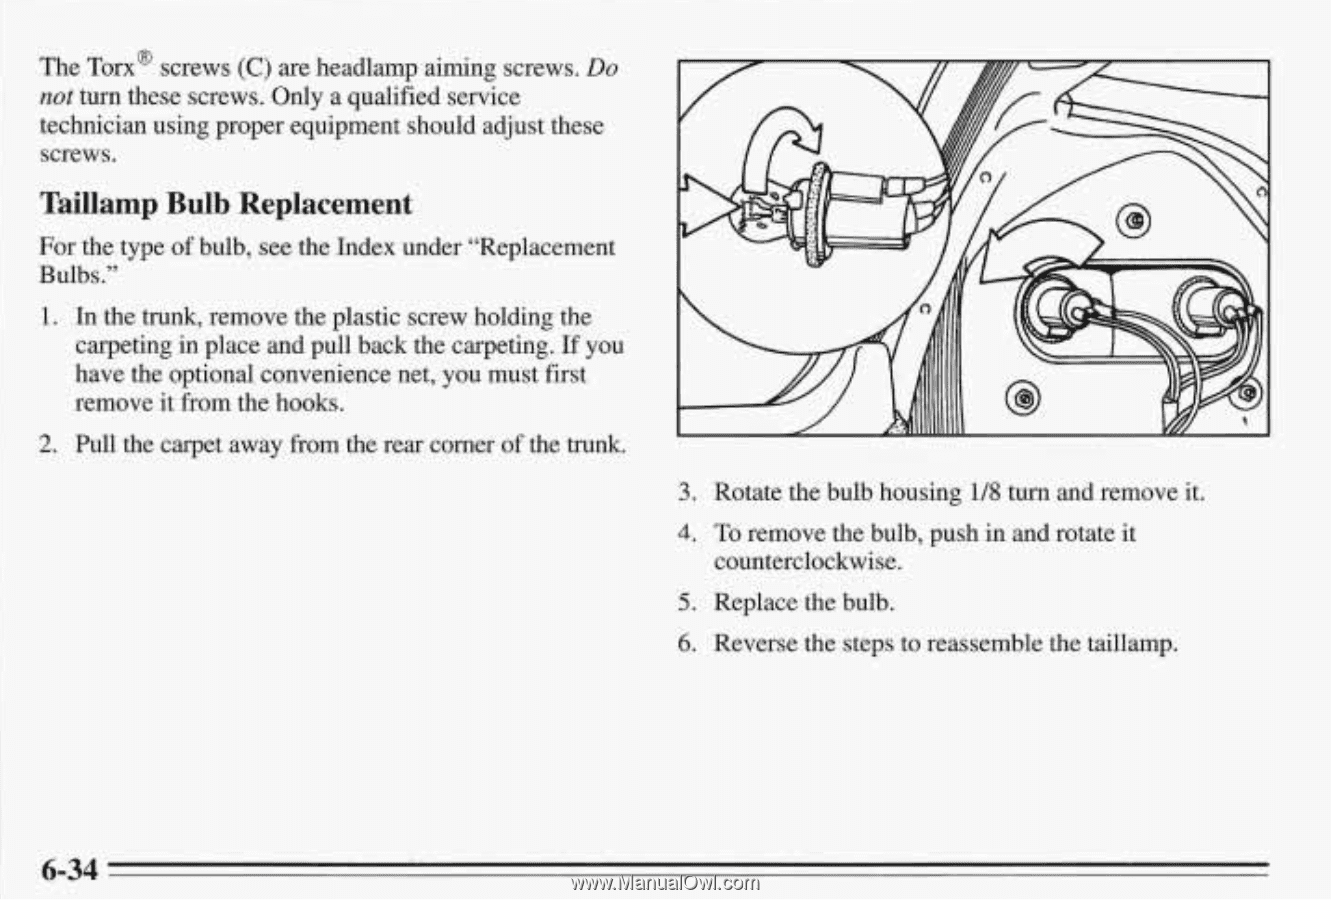
The Torx@ screws are headlamp aiming screws. (C) Do not t r these screws. Only a qualified service un technician using proper equipment should adjust these screws. Taillamp Bulb Replacement For the typeof bulb, see the Index under "Replacement Bulbs." 1. In the trunk, remove the plastic screw holding the carpeting in place and pull back the carpeting. If you have the optional convenience net, you must first remove it from the hooks. 2. Pull the carpet away from the rear corner the trunk. of 3. Rotate the bulb housing1/8 turn and remove it. 4. To remove the bulb, push in rotate it and counterclockwise. 5. Replace the bulb. 6. Reverse the steps to reassemble the taillamp. 6-34
-
 1
1 -
2
-
3
-
4
-
5
-
6
-
7
-
8
-
9
-
10
-
11
-
12
-
13
-
14
-
15
-
16
-
17
-
18
-
19
-
20
-
21
-
22
-
23
-
24
-
25
-
26
-
27
-
28
-
29
-
30
-
31
-
32
-
33
-
34
-
35
-
36
-
37
-
38
-
39
-
40
-
41
-
42
-
43
-
44
-
45
-
46
-
47
-
48
-
49
-
50
-
51
-
52
-
53
-
54
-
55
-
56
-
57
-
58
-
59
-
60
-
61
-
62
-
63
-
64
-
65
-
66
-
67
-
68
-
69
-
70
-
71
-
72
-
73
-
74
-
75
-
76
-
77
-
78
-
79
-
80
-
81
-
82
-
83
-
84
-
85
-
86
-
87
-
88
-
89
-
90
-
91
-
92
-
93
-
94
-
95
-
96
-
97
-
98
-
99
-
100
-
101
-
102
-
103
-
104
-
105
-
106
-
107
-
108
-
109
-
110
-
111
-
112
-
113
-
114
-
115
-
116
-
117
-
118
-
119
-
120
-
121
-
122
-
123
-
124
-
125
-
126
-
127
-
128
-
129
-
130
-
131
-
132
-
133
-
134
-
135
-
136
-
137
-
138
-
139
-
140
-
141
-
142
-
143
-
144
-
145
-
146
-
147
-
148
-
149
-
150
-
151
-
152
-
153
-
154
-
155
-
156
-
157
-
158
-
159
-
160
-
161
-
162
-
163
-
164
-
165
-
166
-
167
-
168
-
169
-
170
-
171
-
172
-
173
-
174
-
175
-
176
-
177
-
178
-
179
-
180
-
181
-
182
-
183
-
184
-
185
-
186
-
187
-
188
-
189
-
190
-
191
-
192
-
193
-
194
-
195
-
196
-
197
-
198
-
199
-
200
-
201
-
202
-
203
-
204
-
205
-
206
-
207
-
208
-
209
-
210
-
211
-
212
-
213
-
214
-
215
-
216
-
217
-
218
-
219
-
220
-
221
-
222
-
223
-
224
-
225
-
226
-
227
-
228
-
229
-
230
-
231
-
232
-
233
-
234
-
235
-
236
-
237
-
238
-
239
-
240
-
241
-
242
-
243
-
244
-
245
-
246
-
247
-
248
-
249
-
250
-
251
-
252
-
 253
253 -
 254
254 -
 255
255 -
 256
256 -
 257
257 -
 258
258 -
 259
259 -
 260
260 -
 261
261 -
 262
262 -
 263
263 -
264
-
265
-
266
-
267
-
268
-
269
-
270
-
271
-
272
-
273
-
274
-
275
-
276
-
277
-
278
-
279
-
280
-
281
-
282
-
283
-
284
-
285
-
286
-
287
-
288
-
289
-
290
-
291
-
292
-
293
-
294
-
295
-
296
-
297
-
298
-
299
-
300
-
301
-
302
-
303
-
304
-
305
-
306
-
307
-
308
-
309
-
310
-
311
-
312
-
313
-
314
-
315
-
316
-
317
-
318
-
319
-
320
-
321
-
322
-
323
-
324
-
325
-
326
-
327
-
328
-
329
-
330
-
331
-
332
-
333
-
334
-
335
-
336
-
337
-
338
-
339
-
340
-
341
-
342
-
343
-
344
-
345
-
346
-
347
-
348
-
349
-
350
-
351
-
352
-
353
-
354
-
355
-
356
 |
 |
The Torx@
screws
(C)
are
headlamp
aiming
screws.
Do
not
turn
these
screws.
Only
a
qualified
service
technician
using
proper
equipment
should
adjust
these
screws.
Taillamp
Bulb
Replacement
For the
type of bulb, see the
Index
under
“Replacement
Bulbs.”
1.
In the
trunk,
remove
the
plastic
screw
holding
the
carpeting
in
place
and
pull
back
the
carpeting.
If
you
have
the
optional
convenience
net,
you
must
first
remove it from
the
hooks.
2.
Pull
the
carpet
away
from
the
rear
corner
of
the
trunk.
3.
Rotate
the
bulb
housing
1/8
turn
and
remove
it.
4.
To
remove
the
bulb,
push
in
and rotate
it
counterclockwise.
5.
Replace
the
bulb.
6.
Reverse
the
steps
to
reassemble
the
taillamp.
6-34