AIWA LX-70 Operating Instructions - Page 10
To power outlet
 |
View all AIWA LX-70 manuals
Add to My Manuals
Save this manual to your list of manuals |
Page 10 highlights
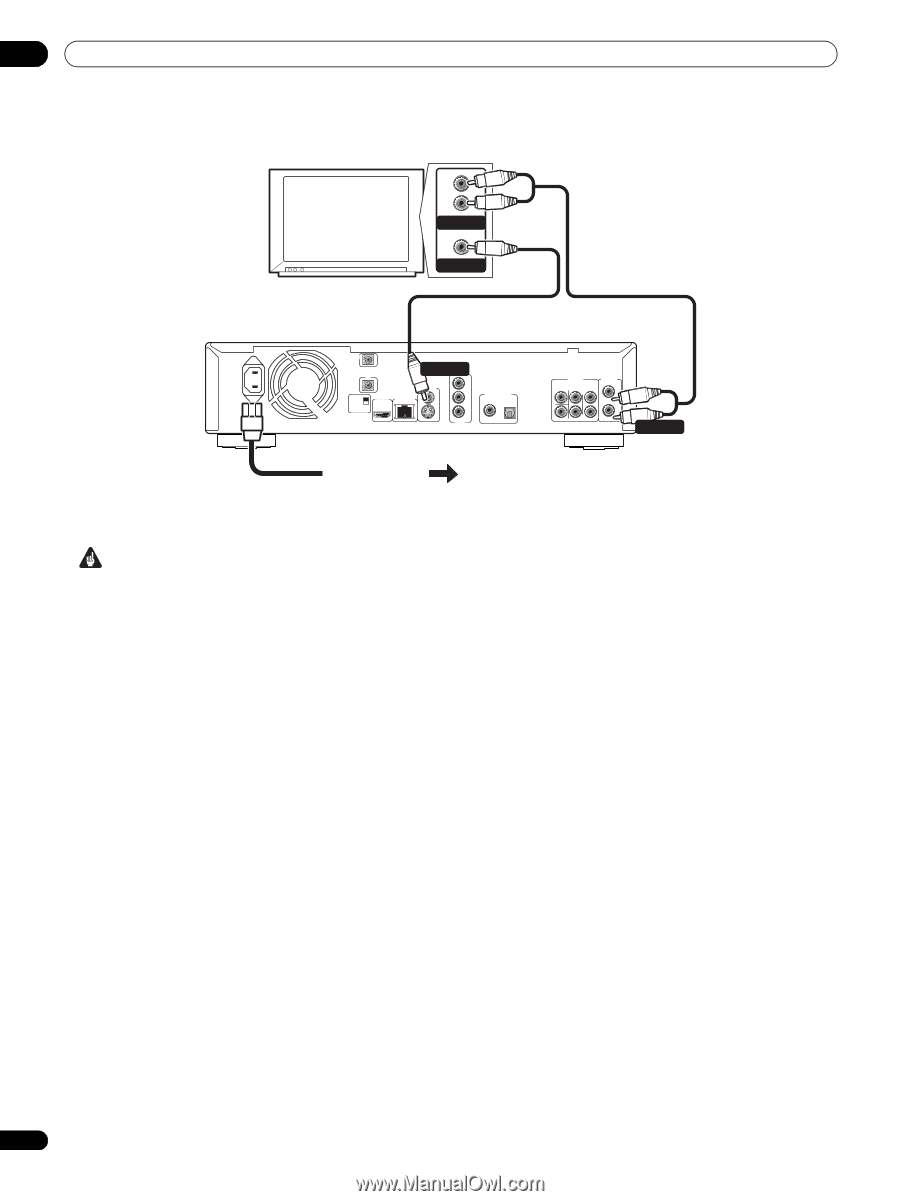
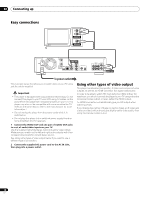
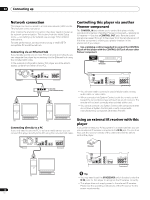
02 Connecting up Easy connections TV L R AUDIO IN VIDEO IN AC IN CONTROL IN IR IN SETTING 2 SETTING 1 IR RECEIVER HDMI OUT LAN(10/100) VIDEO OUT Y VIDEO OUT PB S PR COMPONENT VIDEO OUT DIGITAL AUDIO OUT COAXIAL OPTICAL AUDIO OUT (5.1ch) CENTER SURROUND FRONT L AUDIO OUT (2ch) L R R SUB WOOFER AUDIO OUT To power outlet This is a basic setup that allows you to watch discs on your TV using just the cables supplied. Important • This player is equipped with copy protection technology. Do not connect this player to your TV via a VCR using AV cables, as the picture from this player will not appear properly on your TV. (This player may also not be compatible with some combination TV/ VCRs for the same reason; refer to the manufacturer for more information.) • Do not unplug the player from the power outlet while it is switched on. • Do not plug this player into a switched power supply found on some amplifiers and AV receivers. 1 Connect the VIDEO OUT and one pair of AUDIO OUT jacks to a set of audio/video inputs on your TV. Use the supplied red/white stereo audio and yellow video cables. Make sure you match up the left and right audio outputs with their corresponding inputs for correct stereo sound. See Using other types of video output below if you want to use a different type of connection. 2 Connect the supplied AC power cord to the AC IN inlet, then plug into a power outlet. Using other types of video output This player has standard (composite), S-Video and component video outputs, as well as an HDMI connector (for digital video/audio). In order to be able to watch HD (high definition) BDs at their full resolution, you should connect the player to your TV using either the component video output, or (even better) the HDMI output. An HDMI connection will additionally give you HD output when watching DVDs. If your display has neither of these connection types, an S-Video jack is also provided, which should give slightly better video quality than using the standard video output. 10 En
-
 1
1 -
2
-
3
-
4
-
 5
5 -
 6
6 -
 7
7 -
 8
8 -
 9
9 -
 10
10 -
 11
11 -
 12
12 -
 13
13 -
 14
14 -
 15
15 -
16
-
17
-
18
-
19
-
20
-
21
-
22
-
23
-
24
-
25
-
26
-
27
-
28
-
29
-
30
-
31
-
32
-
33
-
34
-
35
-
36
-
37
-
38
-
39
-
40
-
41
-
42
-
43
-
44
-
45
-
46
-
47
-
48
-
49
-
50
-
51
-
52
-
53
-
54
-
55
-
56
-
57
-
58
-
59
-
60
-
61
-
62
-
63
-
64
 |
 |