AIWA LX-70 Operating Instructions - Page 15
Controls and displays
 |
View all AIWA LX-70 manuals
Add to My Manuals
Save this manual to your list of manuals |
Page 15 highlights
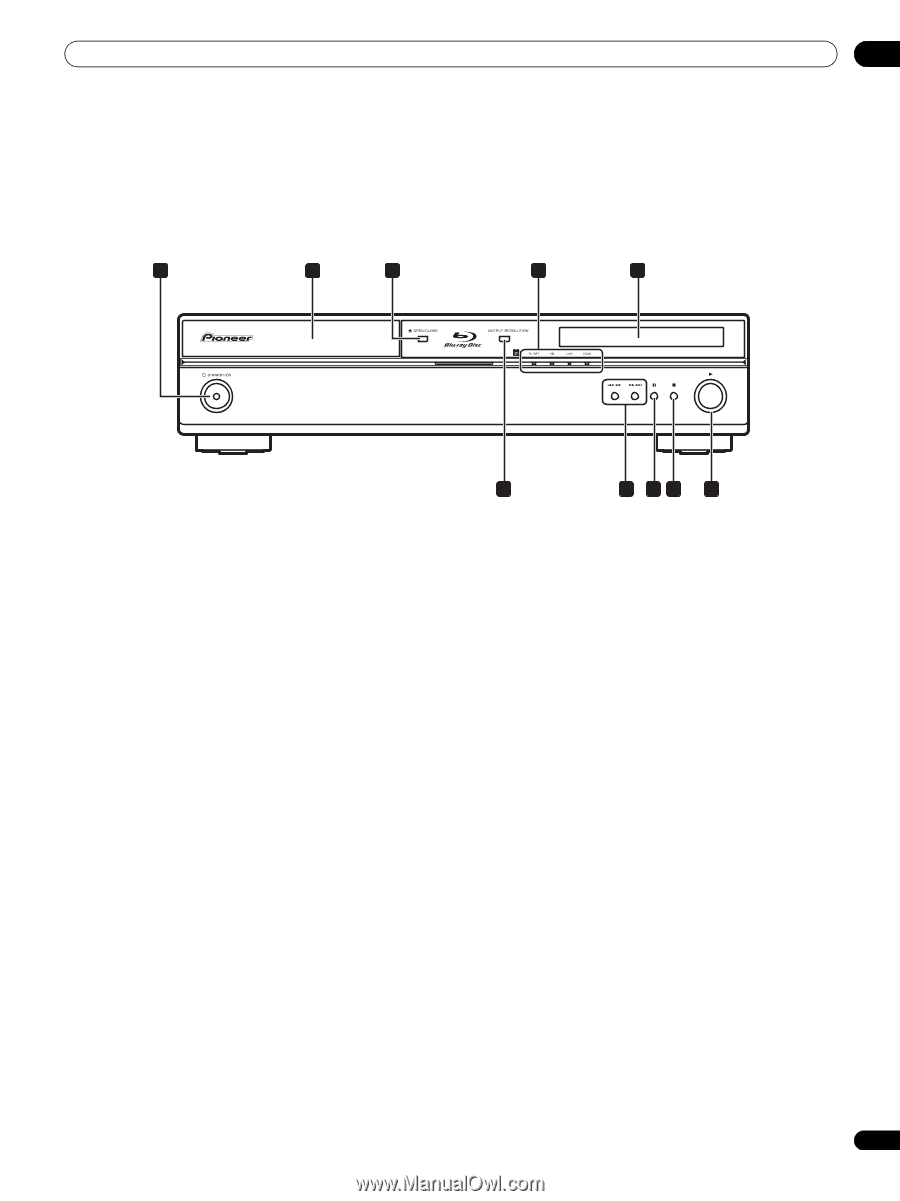
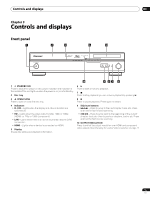
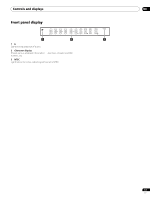
Controls and displays 03 Chapter 3 Controls and displays Front panel 1 2 3 4 5 1 STANDBY/ON Press to switch the player on (the power indicator and indicator in the middle of the unit light up when the power is on) or into standby. 2 Disc tray 3 OPEN/CLOSE Press to open or close the disc tray. 4 Indicators • FL OFF - Lights when the display and other indicators are switched off. • HD - Lights when the video output is 720p, 1080i or 1080p (HDMI), or 720p or 1080i (component). • LAN - Lights when there is an active local area network (LAN) connection. • HDMI - Lights when a device is connected via HDMI. 5 Display Shows disc status and playback information. 10 9 87 6 6 Press to start or resume playback. 7 Press to stop playback (you can resume playback by pressing ). 8 Press to pause playback. Press again to restart. 9 Skip/scan buttons Press to jump to the next chapter, track, etc. Press and hold for fast forward scanning. Press to jump back to the beginning of the current chapter, track, etc. then to previous chapters, tracks, etc. Press and hold for fast reverse scanning. 10 OUTPUT RESOLUTION Press to switch the output resolution over HDMI and component video outputs. See Changing the output video resolution on page 12. 15 En
-
 1
1 -
2
-
3
-
4
-
5
-
6
-
7
-
8
-
9
-
 10
10 -
 11
11 -
 12
12 -
 13
13 -
 14
14 -
 15
15 -
 16
16 -
 17
17 -
 18
18 -
 19
19 -
 20
20 -
21
-
22
-
23
-
24
-
25
-
26
-
27
-
28
-
29
-
30
-
31
-
32
-
33
-
34
-
35
-
36
-
37
-
38
-
39
-
40
-
41
-
42
-
43
-
44
-
45
-
46
-
47
-
48
-
49
-
50
-
51
-
52
-
53
-
54
-
55
-
56
-
57
-
58
-
59
-
60
-
61
-
62
-
63
-
64
 |
 |