AIWA LX-70 Operating Instructions - Page 13
Digital Audio Out
 |
View all AIWA LX-70 manuals
Add to My Manuals
Save this manual to your list of manuals |
Page 13 highlights
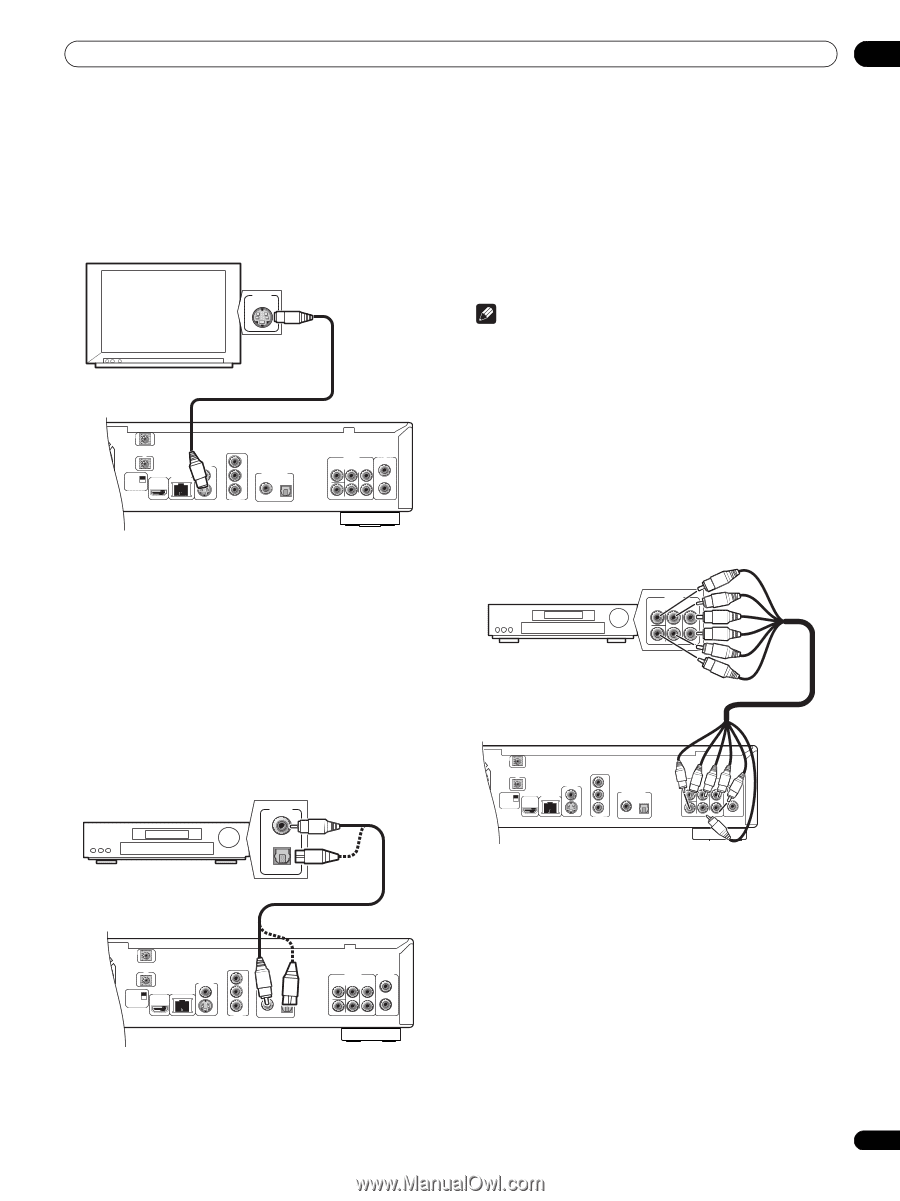
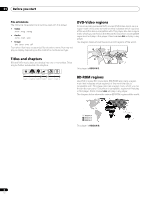
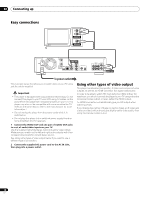
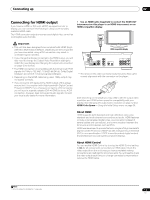
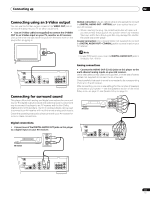
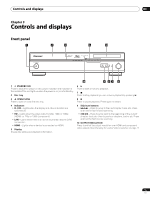
Connecting up 02 Connecting using an S-Video output You can use the S-Video output instead of the VIDEO OUT jack to connect this player to your TV (or other equipment). • Use an S-Video cable (not supplied) to connect the S-VIDEO OUT to an S-Video input on your TV, monitor or AV receiver. Line up the small triangle above the jack with the same mark on the plug before plugging in. S-VIDEO IN Optical connection: Use an optical cable (not supplied) to connect the DIGITAL AUDIO OUT - OPTICAL jack to an optical input on your AV receiver. • When inserting the plug, the protective shutter will open and you should hear the plug click into position when fully inserted. Take care not to force the plug as this may damage the shutter, the cable and/or the player. Coaxial connection: Use a coaxial cable (not supplied) to connect the DIGITAL AUDIO OUT - COAXIAL jack to a coaxial input on your AV receiver. Note • Linear PCM audio output over the DIGITAL AUDIO OUT jacks is limited to 2ch, 48 kHz. TV CONTROL IN IR IN SETTING 2 SETTING 1 IR RECEIVER HDMI OUT LAN(10/100) VIDEO OUT S Y PB PR COMPONENT VIDEO OUT DIGITAL AUDIO OUT COAXIAL OPTICAL AUDIO OUT (5.1ch) CENTER SURROUND FRONT L AUDIO OUT (2ch) L R R SUB WOOFER Analog connections • Connect the AUDIO OUT (5.1ch) jacks on this player to the multi-channel analog inputs on your AV receiver. Use a dedicated six-way cable (not supplied), or three sets of stereo cables (not supplied) to connect the six channels. Check carefully that each channel is connected to its corresponding channel on the AV receiver. After connecting, you can make settings for the number of speakers connected to your system - see the Speakers section of the Initial Setup menu on page 41 and Speaker Setup on page 43. Connecting for surround sound This player offers both analog and digital connections for surround sound. The digital outputs (coaxial and optical) provide a convenient way to connect this player to an AV receiver with built-in Dolby Digital and/or DTS decoders. The 5.1ch analog outputs can be used to connect to an AV receiver with multi-channel analog audio inputs. Check the operating instructions that came with your AV receiver for more on these connections. AV receiver AUDIO IN (5.1ch) CENTER SURROUND FRONT L R SUB WOOFER Digital connections • Connect one of the DIGITAL AUDIO OUT jacks on this player to a digital input on your AV receiver. DIGITAL AUDIO IN COAXIAL AV receiver OPTICAL CONTROL IN IR IN SETTING 2 SETTING 1 IR RECEIVER HDMI OUT LAN(10/100) VIDEO OUT S Y PB PR COMPONENT VIDEO OUT DIGITAL AUDIO OUT COAXIAL OPTICAL AUDIO OUT (5.1ch) CENTER SURROUND FRONT L AUDIO OUT (2ch) L R R SUB WOOFER CONTROL IN IR IN SETTING 2 SETTING 1 IR RECEIVER HDMI OUT LAN(10/100) VIDEO OUT S Y PB PR COMPONENT VIDEO OUT DIGITAL AUDIO OUT COAXIAL OPTICAL AUDIO OUT (5.1ch) CENTER SURROUND FRONT L AUDIO OUT (2ch) L R R SUB WOOFER 13 En
-
 1
1 -
2
-
3
-
4
-
5
-
6
-
7
-
 8
8 -
 9
9 -
 10
10 -
 11
11 -
 12
12 -
 13
13 -
 14
14 -
 15
15 -
 16
16 -
 17
17 -
 18
18 -
19
-
20
-
21
-
22
-
23
-
24
-
25
-
26
-
27
-
28
-
29
-
30
-
31
-
32
-
33
-
34
-
35
-
36
-
37
-
38
-
39
-
40
-
41
-
42
-
43
-
44
-
45
-
46
-
47
-
48
-
49
-
50
-
51
-
52
-
53
-
54
-
55
-
56
-
57
-
58
-
59
-
60
-
61
-
62
-
63
-
64
 |
 |