AIWA LX-70 Operating Instructions - Page 45
Screen sizes and disc formats, Resetting the player, Setting up the remote to control your
 |
View all AIWA LX-70 manuals
Add to My Manuals
Save this manual to your list of manuals |
Page 45 highlights
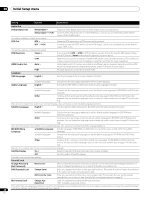
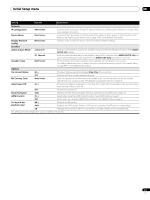
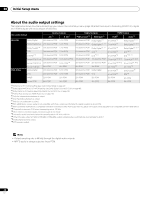
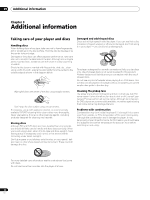
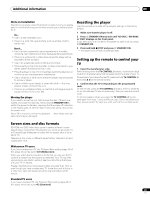
Additional information 09 Hints on installation We want you to enjoy using this product for years to come, so please bear in mind the following points when choosing a suitable location for it: Do... • Use in a well-ventilated room. • Place on a solid, flat, level surface, such as a table, shelf or stereo rack. Don't... • Use in a place exposed to high temperatures or humidity, including near radiators and other heat-generating appliances. • Place on a window sill or other place where the player will be exposed to direct sunlight. • Use in an excessively dusty or damp environment. • Place directly on top of an amplifier, or other component in your stereo system that becomes hot in use. • Place the player on top of or immediately next to the television or monitor as you may experience interference. • Use in a kitchen or other room where the player may be exposed to smoke or steam. • Use on a thick rug or carpet, or cover with cloth - this may prevent proper cooling of the unit. • Place on an unstable surface, or one that is not large enough to support all four of the unit's feet. Moving the player If you need to move this unit, first remove the disc, if there's one loaded, and close the disc tray. Next, press STANDBY/ON to switch the power to standby, checking that the power off indication in the display goes off. Wait at least 10 seconds. Lastly, disconnect the power cord. Never lift or move the unit during playback - discs rotate at a high speed and may be damaged. Resetting the player Use this procedure to reset all the player's settings to the factory default. 1 Make sure that the player is off. 2 Press STANDBY/ON and wait until 'NO DISC,' 'BD-ROM,' or 'DVD' displays on the front panel. It can take up to one minute for the system to start once you press STANDBY/ON. 3 Press and hold STOP and press STANDBY/ON. • The player turns off with all settings reset. Setting up the remote to control your TV 1 Input the manufacturer code. While holding down the TV CONTROL button, input the two digit code from the table below that corresponds to the make of your TV. For example, if you have a Pioneer TV, press and hold TV CONTROL , then press 0, 0 on the remote control. 2 Confirm that the TV is responding to the programmed code. On the remote, press the TV CONTROL button. If the TV switches on (or into standby if it was on previously), then you have the correct code. If nothing happens when you press the TV CONTROL button, start again from step 1 using a different code. Some manufacturers have several codes. Try each one until you find the one that works. Screen sizes and disc formats BD-ROM and DVD-Video discs come in several different screen aspect ratios, ranging from TV programmes, which are generally 4:3, to CinemaScope widescreen movies, with an aspect ratio of up to about 7:3. Televisions, too, come in different aspect ratios; 'standard' 4:3 and 'widescreen' 16:9. Widescreen TV users If you have a widescreen TV, the TV Aspect Ratio setting (page 39) of this player should be set to 16:9 (Widescreen). When you watch discs recorded in 4:3 format, you can use the TV controls to select how the picture is presented. Your TV may offer various zoom and stretch options; see the instructions that came with your TV for details. Please note that some movie aspect ratios are wider than 16:9, so even though you have a widescreen TV, these discs will still play in a 'letter box' style with black bars at the top and bottom of the screen. Standard TV users If you have a standard TV, the TV Aspect Ratio setting (page 39) of this player should be set to 4:3 (Standard). 45 En
-
 1
1 -
2
-
3
-
4
-
5
-
6
-
7
-
8
-
9
-
10
-
11
-
12
-
13
-
14
-
15
-
16
-
17
-
18
-
19
-
20
-
21
-
22
-
23
-
24
-
25
-
26
-
27
-
28
-
29
-
30
-
31
-
32
-
33
-
34
-
35
-
36
-
37
-
38
-
39
-
 40
40 -
 41
41 -
 42
42 -
 43
43 -
 44
44 -
 45
45 -
 46
46 -
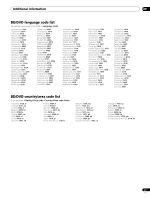 47
47 -
 48
48 -
 49
49 -
 50
50 -
51
-
52
-
53
-
54
-
55
-
56
-
57
-
58
-
59
-
60
-
61
-
62
-
63
-
64
 |
 |