AIWA LX-70 Operating Instructions - Page 50
Network troubleshooting
 |
View all AIWA LX-70 manuals
Add to My Manuals
Save this manual to your list of manuals |
Page 50 highlights
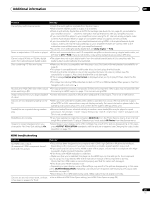
09 Additional information Problem No HDMI audio output. HDMI Control does not function. Remedy • If you have connected to an HDCP-compatible DVI component, there won't be any audio output from the HDMI terminal. Connect using the optical/coaxial digital outputs (or the analog outputs). • This player does not output multi-channel 192 kHz audio. Press AUDIO during playback to switch between the available audio streams. •Verify that the HDMI cable is firmly connected. •Make sure that this unit's HDMI Control is set to On (see HDMI Control on page 41). •Make sure that the HDMI Control for the connected components is set to On. For more information, refer to the operating manual for the connected component. •This function may not work properly if you have multiple components connected to a single plasma television, AV system (amplifier or AV receiver etc.), or HD AV Converter. For more information refer to the operating manual of your plasma television, AV system, or HD AV Converter. •You can enable HDMI Control by turning the HDMI Control setting to On for all components connected via HDMI cable. Check the video output from this unit once you have completed making connections and settings for all components. You will need to check the video output each time you change connected components or remove the HDMI cable. •Check whether the connected component supports HDMI Control or not. For more information refer to the operating manual of your plasma television, AV system (amplifier or AV receiver etc.), or HD AV Converter. •Certain functions are not supported on some plasma televisions. •This player does not support HDMI Control-compatible components other than those made by Pioneer. •This unit will not function properly with components that do not support HDMI Control, or when connected with components other than those made by Pioneer. Network troubleshooting Problem Remedy Home Media Gallery is not available. • LAN indicator is unlit: - Check the physical connections (hub, 100BASE-TX/10BASE-T or crossed cable and other cable quality when cabled directly to a PC). - If the player is connected to a network via a hub, make sure that the Ethernet (CAT-5 LAN) cable you're using is a 'standard' or 'straight through' type. - If the player is connected directly to a PC, make sure that the Ethernet (CAT-5 LAN) cable you're using is a 'crossed' or 'crossover' type. • LAN indicator is lit: - If this player's IP address is set automatically, make sure that the media server's address is also set automatically. If the IP address of the media server has been set manually, set the IP address of the player manually too (see Network settings page 41). - Check the logical connections (IP address setup, DHCP, etc.). Confirm that the IP address is correct if acquired using DHCP or Auto-IP in the Network Config. screen that follows the Initial Setup menu (see Network settings page 41). - Confirm that the media server is on and not in standby or sleep mode. - Check the network and other settings on the media server. - Check that this player and the media server are on the same Local Area Network (LAN). - Check if the media server (Windows Media Connect or DLNA-compliant) is running. Restart if necessary. - Check if the media server is setup correctly for file sharing, if the target folder has been deleted or if one or more folders has become corrupted on the server. - Check if the PC is operating properly. Reboot the PC after confirming its specifications and setup. A connected media server does not show up in the source list in the Home Media Gallery. • Confirm that the media server is on and not in standby or sleep mode. • Check the network and other settings on the media server. • Check that this player and the media server are on the same Local Area Network (LAN). • Check if the media server (Windows Media Connect or DLNA-compliant) is running. Restart if necessary. • Check if the media server is setup correctly for file sharing, if the target folder has been deleted or if one or more folders has become corrupted on the server. • Check if the PC is operating properly. Reboot the PC after confirming its specifications and setup. • Check that there are playable files on the media server. • After adding a new media server, exit the Home Media Gallery then, after a few moments, re-enter it. A media server shows up in the source list • Check the media server setup. If a client is registered (authorized) manually, the setup procedure but is not available (a lock icon ( ) may have to be run again. appears). • Check that there are playable files on the media server. • After adding a new media server, exit the Home Media Gallery then, after a few moments, re-enter it. 50 En
-
 1
1 -
2
-
3
-
4
-
5
-
6
-
7
-
8
-
9
-
10
-
11
-
12
-
13
-
14
-
15
-
16
-
17
-
18
-
19
-
20
-
21
-
22
-
23
-
24
-
25
-
26
-
27
-
28
-
29
-
30
-
31
-
32
-
33
-
34
-
35
-
36
-
37
-
38
-
39
-
40
-
41
-
42
-
43
-
44
-
 45
45 -
 46
46 -
 47
47 -
 48
48 -
 49
49 -
 50
50 -
 51
51 -
 52
52 -
 53
53 -
 54
54 -
 55
55 -
56
-
57
-
58
-
59
-
60
-
61
-
62
-
63
-
64
 |
 |