Asus USB-N13 User Manual - Page 16
Connecting via the PIN code - 802 11n
 |
View all Asus USB-N13 manuals
Add to My Manuals
Save this manual to your list of manuals |
Page 16 highlights
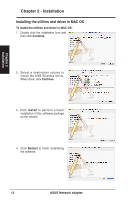
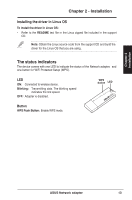
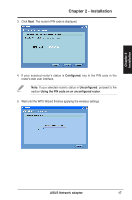
Chapter 2 Installation Chapter 2 - Installation 3. The 802.11n network adapter searches for the wireless router. When done, click Next and follow the succeeding onscreen instructions. Note: If WPS configuration failed, move your computer closer to the router then try again. Connecting via the PIN code 1. From the WPS Wizard, select Use the PIN code. Click Next. 2. Select the router that you want to connect to. The router's status is displayed as either Configured (with security settings) or Unconfigured (without security settings). 16 ASUS Network adapter
-
 1
1 -
2
-
3
-
4
-
5
-
6
-
7
-
8
-
9
-
10
-
 11
11 -
 12
12 -
 13
13 -
 14
14 -
 15
15 -
 16
16 -
 17
17 -
 18
18 -
 19
19 -
 20
20 -
 21
21 -
22
-
23
-
24
-
25
-
26
-
27
-
28
-
29
-
30
-
31
-
32
-
33
-
34
-
35
-
36
-
37
-
38
-
39
-
40
-
41
-
42
-
43
-
44
-
45
-
46
-
47
-
48
-
49
-
50
-
51
-
52
-
53
-
54
-
55
-
56
-
57
-
58
-
59
-
60
-
61
-
62
-
63
-
64
-
65
-
66
-
67
-
68
-
69
 |
 |
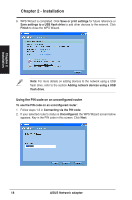
3. The 802.11n network adapter searches for the wireless router. When done,
click
Next
and follow the succeeding onscreen instructions.
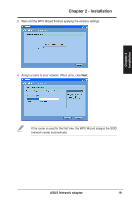
Connecting via the PIN code
1.
From the WPS Wizard, select
Use the PIN code
. Click
Next
.
2. Select the router that you want to connect to. The router's status is displayed
as either
Configured
(with security settings) or
Unconfigured
(without security
settings).
Note
: If WPS configuration failed, move your computer closer to the
router then try again.
Chapter 2
16
ASUS Network adapter
Chapter 2 - Installation
Installation