Asus USB-N13 User Manual - Page 18
Using the PIN code on an unconfigured router - not connecting
 |
View all Asus USB-N13 manuals
Add to My Manuals
Save this manual to your list of manuals |
Page 18 highlights
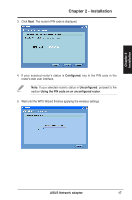
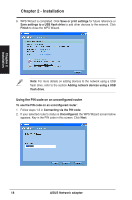
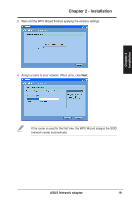
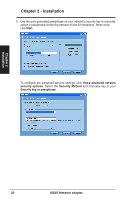
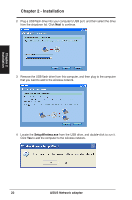
Chapter 2 Installation Chapter 2 - Installation 6. WPS Wizard is completed. Click Save or print settings for future reference or Save settings to a USB flash drive to add other devices to the network. Click Finish to close the WPS Wizard. Note: For more details on adding devices to the network using a USB flash drive, refer to the section Adding network devices using a USB flash drive. Using the PIN code on an unconfigured router To use the PIN code on an unconfigured router: 1. Follow steps 1-3 in Connecting via the PIN code. 2. If your selected router's status is Unconfigured, the WPS Wizard screen below appears. Key in the PIN code in this screen. Click Next. 18 ASUS Network adapter
-
 1
1 -
2
-
3
-
4
-
5
-
6
-
7
-
8
-
9
-
10
-
11
-
12
-
 13
13 -
 14
14 -
 15
15 -
 16
16 -
 17
17 -
 18
18 -
 19
19 -
 20
20 -
 21
21 -
 22
22 -
 23
23 -
24
-
25
-
26
-
27
-
28
-
29
-
30
-
31
-
32
-
33
-
34
-
35
-
36
-
37
-
38
-
39
-
40
-
41
-
42
-
43
-
44
-
45
-
46
-
47
-
48
-
49
-
50
-
51
-
52
-
53
-
54
-
55
-
56
-
57
-
58
-
59
-
60
-
61
-
62
-
63
-
64
-
65
-
66
-
67
-
68
-
69
 |
 |

6. WPS Wizard is completed. Click
Save or print settings
for future reference or
Save settings to a USB flash drive
to add other devices to the network. Click
Finish
to close the WPS Wizard.
Note
: For more details on adding devices to the network using a USB
flash drive, refer to the section
Adding network devices using a USB
flash drive
.
Using the PIN code on an unconfigured router
To use the PIN code on an unconfigured router:
1. Follow steps 1-3 in
Connecting via the PIN code
.
2. If your selected router's status is
Unconfigured
, the WPS Wizard screen below
appears. Key in the PIN code in this screen. Click
Next
.
Chapter 2
18
ASUS Network adapter
Chapter 2 - Installation
Installation