Belkin F5D8232-4 User Manual - Page 48
Configuring your WAN Media Access Controller MAC Address, Cloning your MAC Address, Entering
 |
UPC - 722868630921
View all Belkin F5D8232-4 manuals
Add to My Manuals
Save this manual to your list of manuals |
Page 48 highlights
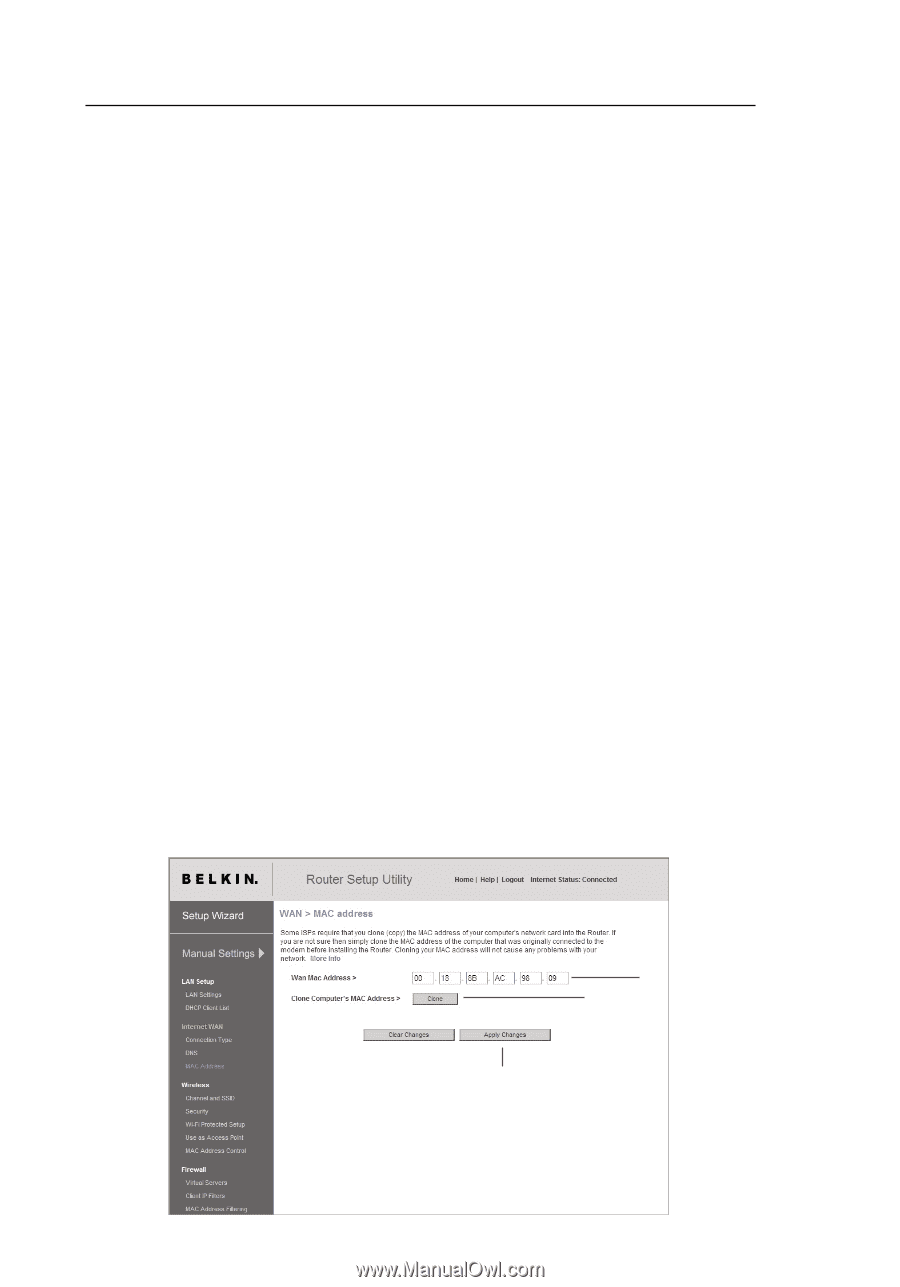
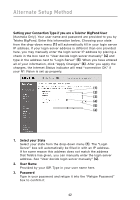
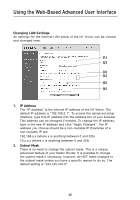
Alternate Setup Method Configuring your WAN Media Access Controller (MAC) Address All network components including cards, adapters, and routers, have a unique "serial number" called a MAC address. Your Internet Service Provider (ISP) may record the MAC address of your computer's adapter and only let that particular computer connect to the Internet service. When you install the N1 Vision, its own MAC address will be "seen" by the ISP and may cause the connection not to work. Belkin has provided the ability to clone (copy) the MAC address of the computer into the N1 Vision. This MAC address, in turn, will be seen by the ISP's system as the original MAC address and will allow the connection to work. If you are not sure whether your ISP needs to see the original MAC address, simply clone the MAC address of the computer that was originally connected to the modem. Cloning the address will not cause any problems with your network. Cloning your MAC Address To clone your MAC address, make sure that you are using the computer that was ORIGINALLY CONNECTED to your modem before the N1 Vision was installed. Click the "Clone" button (1). Click "Apply Changes" (3). Your MAC address is now cloned to the N1 Vision. Entering a Specific MAC Address In certain circumstances you may need a specific WAN MAC address. You can manually enter one in the "MAC Address" page. Type in a MAC address in the spaces provided (2) and click "Apply Changes" (3) to save the changes. The N1 Vision's WAN MAC address will now be changed to the MAC address you specified. (2) (1) (3) 44
-
 1
1 -
2
-
3
-
4
-
5
-
6
-
7
-
8
-
9
-
10
-
11
-
12
-
13
-
14
-
15
-
16
-
17
-
18
-
19
-
20
-
21
-
22
-
23
-
24
-
25
-
26
-
27
-
28
-
29
-
30
-
31
-
32
-
33
-
34
-
35
-
36
-
37
-
38
-
39
-
40
-
41
-
42
-
 43
43 -
 44
44 -
 45
45 -
 46
46 -
 47
47 -
 48
48 -
 49
49 -
 50
50 -
 51
51 -
 52
52 -
 53
53 -
54
-
55
-
56
-
57
-
58
-
59
-
60
-
61
-
62
-
63
-
64
-
65
-
66
-
67
-
68
-
69
-
70
-
71
-
72
-
73
-
74
-
75
-
76
-
77
-
78
-
79
-
80
-
81
-
82
-
83
-
84
-
85
-
86
-
87
-
88
-
89
-
90
-
91
-
92
-
93
-
94
-
95
-
96
-
97
-
98
-
99
-
100
-
101
-
102
-
103
-
104
-
105
-
106
-
107
-
108
-
109
-
110
-
111
-
112
-
113
-
114
 |
 |