Belkin F5D8232-4 User Manual - Page 67
Setting up an Allow Access List, Setting up a Deny Access List
 |
UPC - 722868630921
View all Belkin F5D8232-4 manuals
Add to My Manuals
Save this manual to your list of manuals |
Page 67 highlights
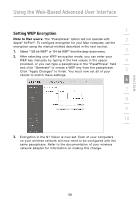
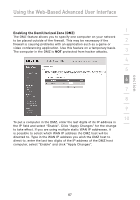
section Using the Web-Based Advanced User Interface 1 Setting up an Allow Access List 1. Select the "Allow" radio button (1) to begin setting up a list of computers allowed to connect to the wireless network. 2 2. Next, in the "MAC Address" field that is blank (3), type in the MAC address of the wireless computer to which you want to give 3 access to the wireless network. 3. Continue to do this until all of the computers you want to add have been entered. 4 4. Click "Apply Changes" (4) to finish. 5 Setting up a Deny Access List The "Deny Access" list lets you specify computers that you DO NOT 6 want to access the network. Any computer in the list will not be allowed access to the wireless network. All others will. 7 1. Select the "Deny" radio button (2) to begin setting up a list of computers to be denied access to the wireless network. 2. Next, in the "MAC Address" field that is blank (3), type in the 8 MAC address of the wireless computer to which you want to deny access to the wireless network. 9 3. Continue to do this until all of the computers you want to deny access to have been entered. 10 4. Click "Apply Changes" (4) to finish. (1) (2) (3) (4) 63
-
 1
1 -
2
-
3
-
4
-
5
-
6
-
7
-
8
-
9
-
10
-
11
-
12
-
13
-
14
-
15
-
16
-
17
-
18
-
19
-
20
-
21
-
22
-
23
-
24
-
25
-
26
-
27
-
28
-
29
-
30
-
31
-
32
-
33
-
34
-
35
-
36
-
37
-
38
-
39
-
40
-
41
-
42
-
43
-
44
-
45
-
46
-
47
-
48
-
49
-
50
-
51
-
52
-
53
-
54
-
55
-
56
-
57
-
58
-
59
-
60
-
61
-
 62
62 -
 63
63 -
 64
64 -
 65
65 -
 66
66 -
 67
67 -
 68
68 -
 69
69 -
 70
70 -
 71
71 -
 72
72 -
73
-
74
-
75
-
76
-
77
-
78
-
79
-
80
-
81
-
82
-
83
-
84
-
85
-
86
-
87
-
88
-
89
-
90
-
91
-
92
-
93
-
94
-
95
-
96
-
97
-
98
-
99
-
100
-
101
-
102
-
103
-
104
-
105
-
106
-
107
-
108
-
109
-
110
-
111
-
112
-
113
-
114
 |
 |