Belkin F5D8232-4 User Manual - Page 65
Using the Access Point Mode - wireless bridge
 |
UPC - 722868630921
View all Belkin F5D8232-4 manuals
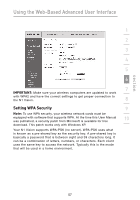
Add to My Manuals
Save this manual to your list of manuals |
Page 65 highlights
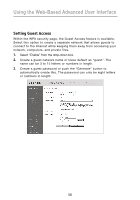
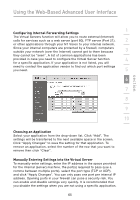
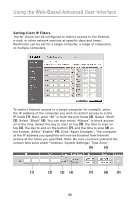
section Using the Web-Based Advanced User Interface 1 Using the Access Point Mode 2 Note: This advanced feature should be employed by advanced users only. The N1 Vision can be configured to work as a wireless network access point. Using this mode will defeat the NAT IP sharing feature 3 and DHCP server. In Access Point (AP) mode, the N1 Vision will need to be configured with an IP address that is in the same subnet as the rest of the network that you will bridge to. The default IP address 4 is 192.168.2.254 and subnet mask is 255.255.255.0. These can be customized for your need. 5 1. Enable the AP mode my selecting "Enable" (1) in the "Use as Access Point only" page. When you select this option, you will be able to change the IP settings. 6 2. Set your IP settings to match your network. Click "Apply Changes" (2). 7 3. Connect a cable from the "Modem" port on the N1 Vision to your existing network. 8 The N1 Vision is now acting as an access point. To access the N1 Vision's Web-Based Advanced User Interface again, type the IP address you specified into your browser's navigation bar. You can set 9 the encryption settings, MAC address filtering, SSID, and channel normally. 10 (1) (2) 61
-
 1
1 -
2
-
3
-
4
-
5
-
6
-
7
-
8
-
9
-
10
-
11
-
12
-
13
-
14
-
15
-
16
-
17
-
18
-
19
-
20
-
21
-
22
-
23
-
24
-
25
-
26
-
27
-
28
-
29
-
30
-
31
-
32
-
33
-
34
-
35
-
36
-
37
-
38
-
39
-
40
-
41
-
42
-
43
-
44
-
45
-
46
-
47
-
48
-
49
-
50
-
51
-
52
-
53
-
54
-
55
-
56
-
57
-
58
-
59
-
 60
60 -
 61
61 -
 62
62 -
 63
63 -
 64
64 -
 65
65 -
 66
66 -
 67
67 -
 68
68 -
 69
69 -
 70
70 -
71
-
72
-
73
-
74
-
75
-
76
-
77
-
78
-
79
-
80
-
81
-
82
-
83
-
84
-
85
-
86
-
87
-
88
-
89
-
90
-
91
-
92
-
93
-
94
-
95
-
96
-
97
-
98
-
99
-
100
-
101
-
102
-
103
-
104
-
105
-
106
-
107
-
108
-
109
-
110
-
111
-
112
-
113
-
114
 |
 |