Bernina Bernette 340 deco User Guide - Page 26
Key Operations - bernette deco 340 hoops
 |
View all Bernina Bernette 340 deco manuals
Add to My Manuals
Save this manual to your list of manuals |
Page 26 highlights
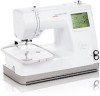
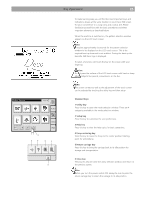
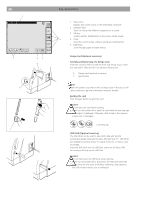
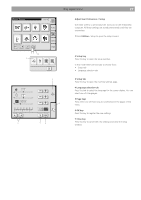
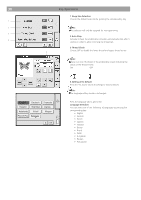
1 2 3 4 5 6 Key Operations 25 To make learning easy you will find the most important keys and indications always at the same location on your Deco 340 screen. For your convenience it is using icons and a status line. Please familiarize yourself first with the basic procedures and these important elements as described below. When the machine is switched on, the pattern selection window appears on the LCD touch screen. Note: It requires approximately six seconds for the pattern selection window to be displayed on the LCD touch screen. This is the required boot up time and is not a defect. During the boot up the bernette 340 Deco logo is displayed. To select a function, just touch the key on the screen with your finger tip. Caution: Do not press the surface of the LCD touch screen with hard or sharp pointed objects like pencils, screwdrivers, or the like. Note: The screen contrast as well as the adjustment of the touch screen can be adjusted by touching the utility key and then setup Standard Keys 1 Utility key Press this key to open the mode selection window. There are 4 categories available in the mode selection window. 2 Setup key Press this key to customize the user preferences. 3 Help key Press this key to view the help topics for basic operations. 4 Hoop centering key Press this key to move the hoop to the center position (starting point for embroidery). 5 Return carriage key Press this key to bring the carriage back to its idle position for storage and transportation. 6 Close key Pressing this key will close the utility selection window and return to the previous screen. Note: Before you turn the power switch OFF, always be sure to press the return carriage key to return the carriage to its idle position.
-
 1
1 -
2
-
3
-
4
-
5
-
6
-
7
-
8
-
9
-
10
-
11
-
12
-
13
-
14
-
15
-
16
-
17
-
18
-
19
-
20
-
 21
21 -
 22
22 -
 23
23 -
 24
24 -
 25
25 -
 26
26 -
 27
27 -
 28
28 -
 29
29 -
 30
30 -
 31
31 -
32
-
33
-
34
-
35
-
36
-
37
-
38
-
39
-
40
-
41
-
42
-
43
-
44
-
45
-
46
-
47
-
48
-
49
-
50
-
51
-
52
-
53
-
54
-
55
-
56
-
57
-
58
-
59
-
60
-
61
-
62
-
63
-
64
-
65
-
66
-
67
-
68
-
69
-
70
-
71
-
72
-
73
-
74
-
75
 |
 |
