Bernina Bernette 340 deco User Guide - Page 5
Embroidery Computer Overview - optional accessories
 |
View all Bernina Bernette 340 deco manuals
Add to My Manuals
Save this manual to your list of manuals |
Page 5 highlights
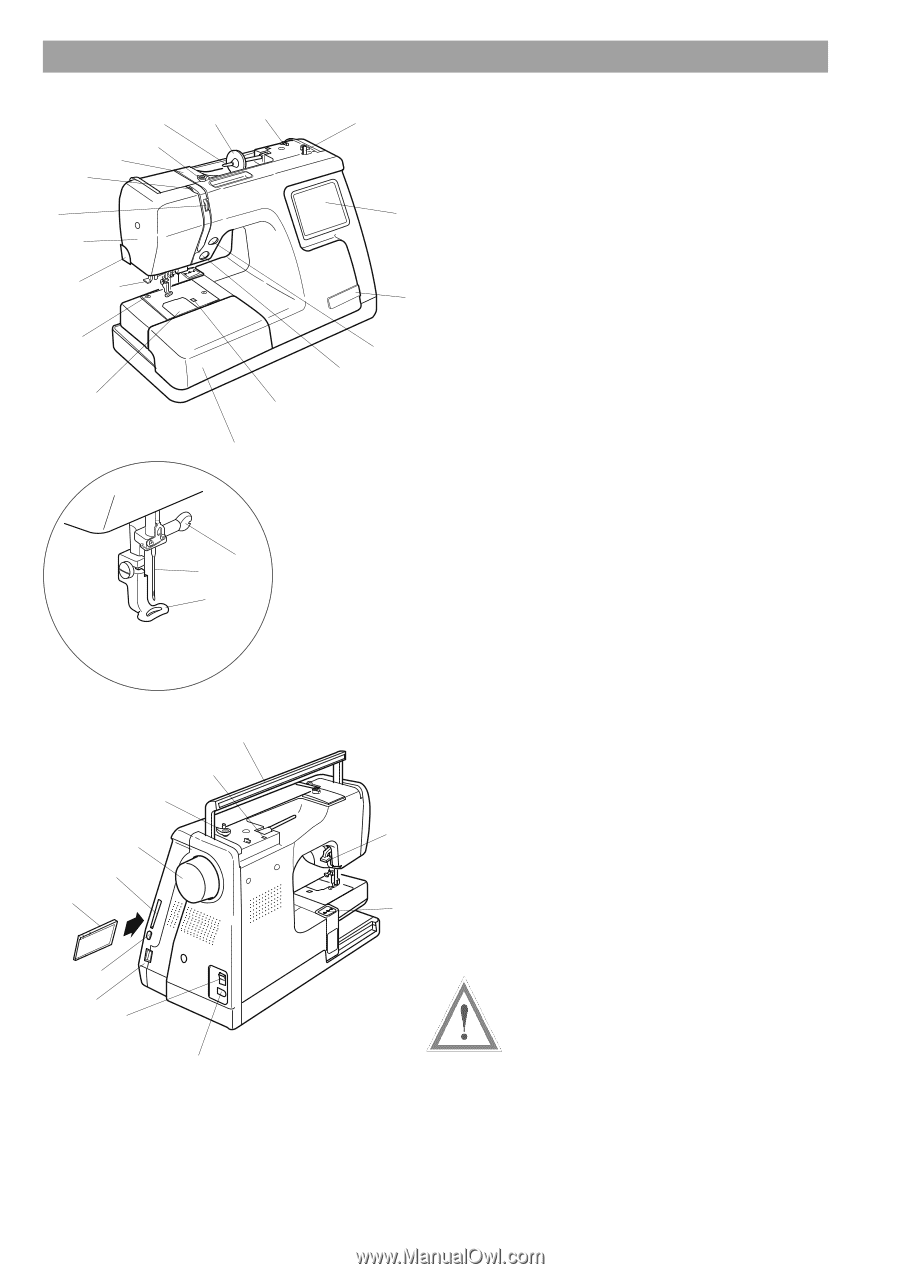
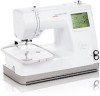
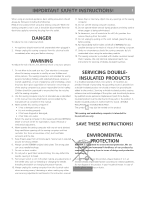
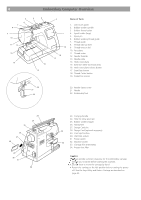
4 Embroidery Computer Overview 5 4 3 6 7 8 9 10 11 12 13 14 16 15 2 Name of Parts 1 19 18 17 1. LCD touch panel 2. Bobbin winder spindle 3. Bobbin thread cutter 4. Spool holder (large) 5. Spool pin 6. Bobbin winding thread guide 7. Thread guide 8. Thread take-up lever 9. Thread tension dial 10. Face plate 11. Thread cutter 12. Needle threader 13. Needle plate 14. Hook cover plate 15. Extension table (accessory box) 16. Hook cover plate release button 17. Start/Stop button 18. Thread Cutter button 19. Pocket for scissors 20 21 22 20. Needle clamp screw 21. Needle 22. Embroidery foot 25 26 27 28 23 24 29 30 31 32 23. Carrying handle 24. Hole for extra spool pin 25. Bobbin winder stopper 26. Handwheel 27. Design Card slot 34 28. Design Card (optional accessory) 29. Card eject button 30. USB Stick socket 31. Power switch 33 32. Machine socket 33. Carriage (for embroidery) 34. Presser foot lifter Caution: • Always provide sufficient clearance for the embroidery carriage behind your machine before starting the machine. • Do not force to move the carriage by hand. • Return the carriage to the idle position before turning the power off. Use the keys Utility and Return Carriage as described on page 25.
-
 1
1 -
 2
2 -
 3
3 -
 4
4 -
 5
5 -
 6
6 -
 7
7 -
 8
8 -
 9
9 -
 10
10 -
 11
11 -
12
-
13
-
14
-
15
-
16
-
17
-
18
-
19
-
20
-
21
-
22
-
23
-
24
-
25
-
26
-
27
-
28
-
29
-
30
-
31
-
32
-
33
-
34
-
35
-
36
-
37
-
38
-
39
-
40
-
41
-
42
-
43
-
44
-
45
-
46
-
47
-
48
-
49
-
50
-
51
-
52
-
53
-
54
-
55
-
56
-
57
-
58
-
59
-
60
-
61
-
62
-
63
-
64
-
65
-
66
-
67
-
68
-
69
-
70
-
71
-
72
-
73
-
74
-
75
 |
 |