Bernina Bernette 340 deco User Guide - Page 37
Embroidery - embroidery designs
 |
View all Bernina Bernette 340 deco manuals
Add to My Manuals
Save this manual to your list of manuals |
Page 37 highlights
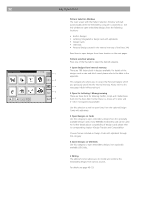
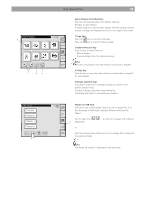
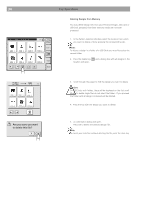
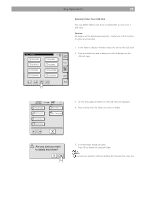
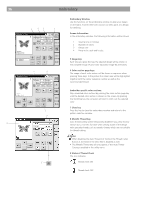
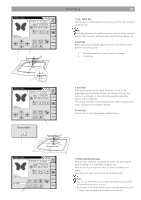
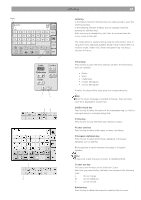
36 Embroidery 1 2 3 4 5 6 A Lem on Yellow 031 0 7 9 B 8 C Embroidery Window Use the functions on the embroidery window to align your design on the fabric. Further there are functions to select parts of a design for stitching. Screen Information In the embroidery window, the following information will be shown. 1 Sewing time in minutes 2 Number of colors 3 Design size 4 Hoop to be used and its size 5 Image key Each time you press this key, the selected design will be shown in the complete image (A) and color separated image (B) alternately. 6 Color section page keys The image of each color section will be shown in sequence when pressing these keys. In the picture the colour area will be highlighted together with the colour sequence number as well as the recommended thread. Embroider specific color sections: Skip unwanted color sections by pressing the color section page key until the desired color section is shown on the screen. By pressing the Start/Stop key the computer will start to stitch out the selected color. 7 Close key Press this key to close the embroidery window and return to the pattern selection window. 8 Metallic Thread key Auto thread cutting will be temporarily disabled if you press this key (shown as C). Use this function when sewing a part of the design with specialty threads such as metallic threads which are not suitable for thread cutting. Notes: • When disabling the Auto Thread Cut function the Thread Cutter Button at the head of the Deco 340 is disabled as well. • This Metallic Thread key will only appear, if the Auto Thread Cutting is enabled in the utility menu. 9 Status of Thread Check The icon indicates Thread check ON Thread check OFF
-
 1
1 -
2
-
3
-
4
-
5
-
6
-
7
-
8
-
9
-
10
-
11
-
12
-
13
-
14
-
15
-
16
-
17
-
18
-
19
-
20
-
21
-
22
-
23
-
24
-
25
-
26
-
27
-
28
-
29
-
30
-
31
-
 32
32 -
 33
33 -
 34
34 -
 35
35 -
 36
36 -
 37
37 -
 38
38 -
 39
39 -
 40
40 -
 41
41 -
 42
42 -
43
-
44
-
45
-
46
-
47
-
48
-
49
-
50
-
51
-
52
-
53
-
54
-
55
-
56
-
57
-
58
-
59
-
60
-
61
-
62
-
63
-
64
-
65
-
66
-
67
-
68
-
69
-
70
-
71
-
72
-
73
-
74
-
75
 |
 |
