Brother International CS-80 Users Manual - English - Page 28
Threading the needle - sewing manual
 |
View all Brother International CS-80 manuals
Add to My Manuals
Save this manual to your list of manuals |
Page 28 highlights
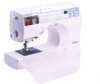
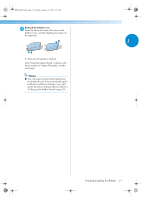
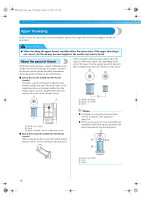
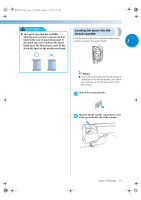
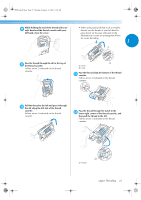
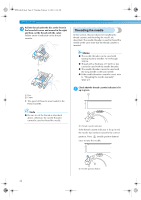
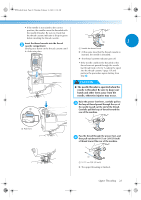
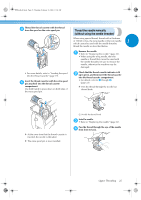
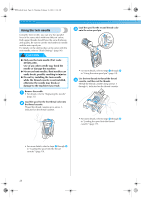
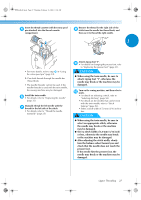
S2_brotherE.book Page 22 Thursday, February 13, 2003 11:03 AM GETTING READY Pull the thread under the disc at the front in c the lower-left corner and around to the right, and then cut the thread with the cutter. Follow arrow 6 indicated on the thread cassette. Threading the needle In this section, the procedures for installing the thread cassette and threading the needle are described. The needle threader is used to thread the needle at the same time that the thread cassette is inserted. Memo G The needle threader can be used with sewing machine needles 75/11 through 100/16. 1 G Thread with a thickness of 130/20 or less cannot be used with the needle threader. 2 G The needle threader cannot be used with the wing needle or the twin needle. G If the needle threader cannot be used, refer to " Threading the needle manually" (page 25). 1 Disc 2 Cutter X The spool of thread is now loaded in the thread cassette. Check that the thread cassette indicator is lit 1 up in green. 1 Note G Be sure to cut the thread as described above, otherwise the needle threader cannot be used to thread the needle. 1 Thread cassette indicator If the thread cassette indicator is lit up in red, the needle has not been raised to the correct position. Press (needle position button) once to raise the needle. 1 1 Needle position button 22
-
 1
1 -
2
-
3
-
4
-
5
-
6
-
7
-
8
-
9
-
10
-
11
-
12
-
13
-
14
-
15
-
16
-
17
-
18
-
19
-
20
-
21
-
22
-
 23
23 -
 24
24 -
 25
25 -
 26
26 -
 27
27 -
 28
28 -
 29
29 -
 30
30 -
 31
31 -
 32
32 -
 33
33 -
34
-
35
-
36
-
37
-
38
-
39
-
40
-
41
-
42
-
43
-
44
-
45
-
46
-
47
-
48
-
49
-
50
-
51
-
52
-
53
-
54
-
55
-
56
-
57
-
58
-
59
-
60
-
61
-
62
-
63
-
64
-
65
-
66
-
67
-
68
-
69
-
70
-
71
-
72
-
73
-
74
-
75
-
76
-
77
-
78
-
79
-
80
-
81
-
82
-
83
-
84
-
85
-
86
-
87
-
88
-
89
-
90
-
91
-
92
-
93
-
94
-
95
-
96
-
97
-
98
-
99
-
100
-
101
-
102
-
103
-
104
-
105
-
106
-
107
-
108
-
109
-
110
-
111
-
112
-
113
-
114
-
115
 |
 |