Brother International CS-80 Users Manual - English - Page 29
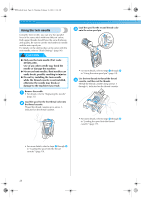
The needle threader is operated when the, needle is threaded. Be sure to keep your, hands and other
 |
View all Brother International CS-80 manuals
Add to My Manuals
Save this manual to your list of manuals |
Page 29 highlights
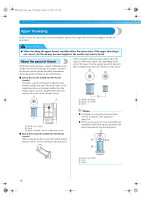
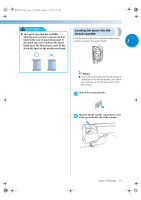
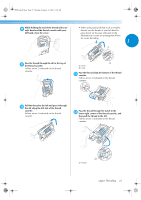
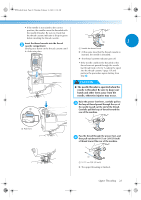
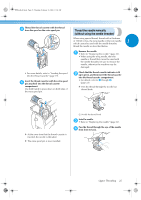
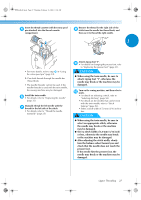
S2_brotherE.book Page 23 Thursday, February 13, 2003 11:03 AM • If the needle is not raised to the correct position, the needle cannot be threaded with the needle threader. Be sure to check that the thread cassette indicator is lit up in green before inserting the thread cassette. Insert the thread cassette into the thread 2 cassette compartment. Slowly press down on the thread cassette until it clicks into place. 1 1 1 Needle bar thread hook X At the same time that the thread cassette is inserted, the needle is threaded. X The thread cassette indicator goes off. • If the needle could not be threaded or the thread was not passed through the needle bar thread hook, refer to " Loading the spool into the thread cassette" (page 19) and perform the procedure again starting from step 2. CAUTION G The needle threader is operated when the needle is threaded. Be sure to keep your hands and other items away from the needle, otherwise injuries may occur. Raise the presser foot lever, carefully pull on 3 the loop of thread passed through the eye of the needle to pull out the end of the thread. 1 Carefully pull the loop of thread toward the rear of the machine. 1 Push here Pass the thread through the presser foot, and 4 then pull out about 10-15 cm (3/8-5/8 inch) of thread toward the rear of the machine. 1 1 10-15 cm (3/8-5/8 inch) X The upper threading is finished. Upper Threading 23
-
 1
1 -
2
-
3
-
4
-
5
-
6
-
7
-
8
-
9
-
10
-
11
-
12
-
13
-
14
-
15
-
16
-
17
-
18
-
19
-
20
-
21
-
22
-
23
-
 24
24 -
 25
25 -
 26
26 -
 27
27 -
 28
28 -
 29
29 -
 30
30 -
 31
31 -
 32
32 -
 33
33 -
 34
34 -
35
-
36
-
37
-
38
-
39
-
40
-
41
-
42
-
43
-
44
-
45
-
46
-
47
-
48
-
49
-
50
-
51
-
52
-
53
-
54
-
55
-
56
-
57
-
58
-
59
-
60
-
61
-
62
-
63
-
64
-
65
-
66
-
67
-
68
-
69
-
70
-
71
-
72
-
73
-
74
-
75
-
76
-
77
-
78
-
79
-
80
-
81
-
82
-
83
-
84
-
85
-
86
-
87
-
88
-
89
-
90
-
91
-
92
-
93
-
94
-
95
-
96
-
97
-
98
-
99
-
100
-
101
-
102
-
103
-
104
-
105
-
106
-
107
-
108
-
109
-
110
-
111
-
112
-
113
-
114
-
115
 |
 |