Brother International DCP-8085DN Users Manual - English - Page 42
Setting up restricted users, Turning Secure Function Lock on/off, Stop/Exit
 |
UPC - 012502622703
View all Brother International DCP-8085DN manuals
Add to My Manuals
Save this manual to your list of manuals |
Page 42 highlights
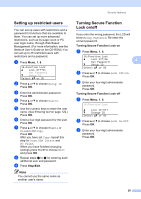
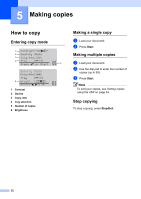
Security features Setting up restricted users 4 You can set up users with restrictions and a password for functions that are available to them. You can set up more advanced restrictions, such as by page count or PC user login name, through Web Based Management. (For more information, see the Network User's Guide on the CD-ROM.) You can set up to 25 restricted users with restrictions and a password. a Press Menu, 1, 6. 16.Function Lock a Lock OffiOn Set Password b Setup ID Select ab or OK b Press a or b to choose Setup ID. Press OK. c Enter the administrator password. Press OK. d Press a or b to choose User01. Press OK. e Use the numeric keys to enter the user name. (See Entering text on page 122.) Press OK. f Enter a four-digit password for the user. Press OK. g Press a or b to choose Enable or Disable for Copy. Press OK. After you have set Copy, repeat this step for Scan, USB Direct and PC Print. When you have finished changing settings press d or c to choose Exit and press OK. h Repeat steps d to g for entering each additional user and password. i Press Stop/Exit. Note You cannot use the same name as another user's name. Turning Secure Function Lock on/off 4 If you enter the wrong password, the LCD will show Wrong Password. Re-enter the correct password. Turning Secure Function Lock on a Press Menu, 1, 6. 16.Function Lock a Lock OffiOn 4 Set Password b Setup ID Select ab or OK b Press a or b to choose Lock OffiOn. Press OK. c Enter your four-digit administrator password. Press OK. Turning Secure Function Lock off a Press Menu, 1, 6. 16.Function Lock a Lock OniOff b Change ID Select ab or OK b Press a or b to choose Lock OniOff. Press OK. c Enter your four-digit administrator password. Press OK. 29
-
 1
1 -
2
-
3
-
4
-
5
-
6
-
7
-
8
-
9
-
10
-
11
-
12
-
13
-
14
-
15
-
16
-
17
-
18
-
19
-
20
-
21
-
22
-
23
-
24
-
25
-
26
-
27
-
28
-
29
-
30
-
31
-
32
-
33
-
34
-
35
-
36
-
 37
37 -
 38
38 -
 39
39 -
 40
40 -
 41
41 -
 42
42 -
 43
43 -
 44
44 -
 45
45 -
 46
46 -
 47
47 -
48
-
49
-
50
-
51
-
52
-
53
-
54
-
55
-
56
-
57
-
58
-
59
-
60
-
61
-
62
-
63
-
64
-
65
-
66
-
67
-
68
-
69
-
70
-
71
-
72
-
73
-
74
-
75
-
76
-
77
-
78
-
79
-
80
-
81
-
82
-
83
-
84
-
85
-
86
-
87
-
88
-
89
-
90
-
91
-
92
-
93
-
94
-
95
-
96
-
97
-
98
-
99
-
100
-
101
-
102
-
103
-
104
-
105
-
106
-
107
-
108
-
109
-
110
-
111
-
112
-
113
-
114
-
115
-
116
-
117
-
118
-
119
-
120
-
121
-
122
-
123
-
124
-
125
-
126
-
127
-
128
-
129
-
130
-
131
-
132
-
133
-
134
-
135
-
136
-
137
-
138
-
139
-
140
-
141
-
142
-
143
-
144
-
145
-
146
-
147
-
148
-
149
-
150
-
151
-
152
-
153
-
154
-
155
-
156
 |
 |
