Brother International E-100 Users Manual - English - Page 11
LCD display, Design frame, Thread cartridge - parts
 |
View all Brother International E-100 manuals
Add to My Manuals
Save this manual to your list of manuals |
Page 11 highlights
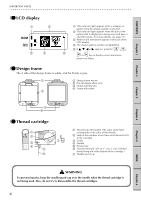
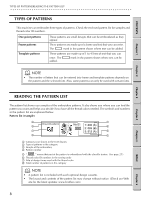
CONTENTS Chapter 1 Chapter 2 IMPORTANT PARTS G G G G G G G G G G G G G G G G G G G G G G G G G G G G G G G G G G G G G G G G G G G G G G G G G G G G G G G G G GG LCD display 1 3 2 4 1 This indicator light appears when a category or pattern from the design cassette is selected. 2 This indicator light appears when the part of the pattern that is displayed or being sewn will have a chenille texture. (For more details, see page 25.) 3 Patterns and instructions appear in this part of the LCD display. 4 The chosen pattern or letter is highlighted. 5 If or ᮣ appears, press the , , 5 or key to display more information, patterns or letters. GG Design frame The A side of the design frame is white, and the B side is gray. 1 1 Design frame mount 2 Pre-cut design fabric pins 3 Frame-opening tabs 4 Frame side marks 2 3 4 GG Thread cartridge 1 2 7 3 4 5 6 1 Thread color ID number (The color of the label corresponds to the color of the thread.) 2 Look in this window to see how much thread is left in the cartridge. 3 Guide 4 Needle 5 Presser foot 6 Thread (Normally 3/4" to 1" (2 to 3 cm) of thread should hang out of the bottom of the cartridge.) 7 Needle guard cap Chapter 3 Chapter 4 Chapter 5 INDEX Chapter 6 WARNING To prevent injuries, keep the needle guard cap over the needle when the thread cartridge is not being used. Also, do not try to disassemble the thread cartridges. 4
-
 1
1 -
2
-
3
-
4
-
5
-
 6
6 -
 7
7 -
 8
8 -
 9
9 -
 10
10 -
 11
11 -
 12
12 -
 13
13 -
 14
14 -
 15
15 -
 16
16 -
17
-
18
-
19
-
20
-
21
-
22
-
23
-
24
-
25
-
26
-
27
-
28
-
29
-
30
-
31
-
32
-
33
-
34
-
35
-
36
-
37
-
38
-
39
-
40
-
41
-
42
-
43
-
44
-
45
-
46
-
47
-
48
-
49
-
50
-
51
-
52
-
53
-
54
-
55
-
56
-
57
-
58
-
59
-
60
-
61
-
62
-
63
-
64
-
65
-
66
 |
 |
