Brother International E-100 Users Manual - English - Page 28
Finishing the appliqué
 |
View all Brother International E-100 manuals
Add to My Manuals
Save this manual to your list of manuals |
Page 28 highlights
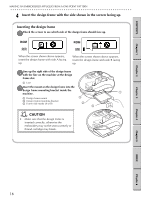
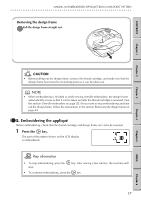
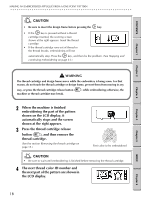
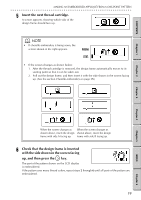
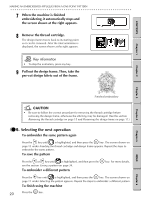
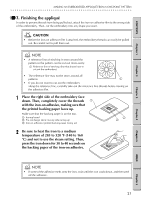
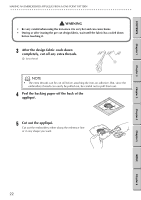
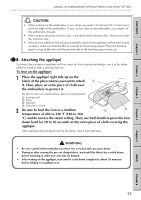
CONTENTS Chapter 1 Chapter 2 MAKING AN EMBROIDERED APPLIQUÉ FROM A ONE-POINT PATTERN G G G G G G G G G G G G G G G G G G G G G G G G G G G G G G G G G G G G G G G G G G G G G G G G G G G G G G G G G GG 7. Finishing the appliqué In order to prevent threads from being pulled out, attach the iron-on adhesive film to the wrong side of the embroidery. Then, cut the embroidery into any shape you want. CAUTION • Before the iron-on adhesive film is attached, the embroidery threads can easily be pulled out. Be careful not to pull them out. NOTE • A reference line of stitching is sewn around the pattern so the pattern can be cut out more easily. 1 Reference line of stitching (line that shows how to cut out the embroidery) • The reference line may not be sewn around all patterns. 1 • If you do not want to cut out the embroidery along the reference line, carefully take out the reference line threads before ironing on the adhesive film. 1 Place the right side of the embroidery face down. Then, completely cover the threads 1 with the iron-on adhesive, making sure that the printed backing paper faces up. Make sure that the backing paper is on the top. 1 Ironing board 2 Pre-cut design fabric (wrong side facing up) 3 Iron-on adhesive (printed backing paper facing up) 2 3 2 Be sure to heat the iron to a medium temperature of 285 to 320 ЊF (140 to 160 ЊC) and not to use the steam setting. Then, press the iron down for 30 to 40 seconds on the backing paper of the iron-on adhesive. Chapter 3 Chapter 4 Chapter 5 INDEX Chapter 6 NOTE • If some of the adhesive melts onto the iron, wait until the iron cools down, and then peel off the adhesive. 21
-
 1
1 -
2
-
3
-
4
-
5
-
6
-
7
-
8
-
9
-
10
-
11
-
12
-
13
-
14
-
15
-
16
-
17
-
18
-
19
-
20
-
21
-
22
-
 23
23 -
 24
24 -
 25
25 -
 26
26 -
 27
27 -
 28
28 -
 29
29 -
 30
30 -
 31
31 -
 32
32 -
 33
33 -
34
-
35
-
36
-
37
-
38
-
39
-
40
-
41
-
42
-
43
-
44
-
45
-
46
-
47
-
48
-
49
-
50
-
51
-
52
-
53
-
54
-
55
-
56
-
57
-
58
-
59
-
60
-
61
-
62
-
63
-
64
-
65
-
66
 |
 |