Brother International E-100 Users Manual - English - Page 50
Continuing embroidering after your machine is turned off
 |
View all Brother International E-100 manuals
Add to My Manuals
Save this manual to your list of manuals |
Page 50 highlights
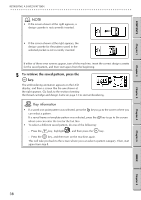
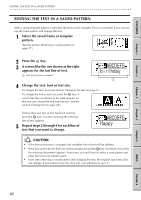
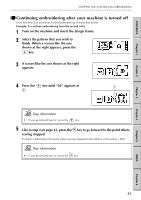
CONTENTS Chapter 1 Chapter 2 STOPPING AND CONTINUING EMBROIDERING G G G G G G G G G G G G G G G G G G G G G G G G G G G G G G G G G G G G G G G G G G G G G G G G G G G G G G G G G GG Continuing embroidering after your machine is turned off If the machine was turned off, restart embroidering as explained below. Example: To continue embroidering from the second color 1 Turn on the machine and insert the design frame. 2 Select the pattern that you wish to finish. When a screen like the one shown at the right appears, press the key. 3 A screen like the one shown at the right appears. 4 Press the key until "02" appears at 1 1. Key information • If you go forward too far, press the key. 5 Like in step 4 on page 42, press the key to go forward to the point where sewing stopped. Go back a little before the point where sewing stopped so the stitches will overlap a little. Key information • If you go forward too far, press the key. Chapter 3 Chapter 4 Chapter 5 INDEX Chapter 6 43
-
 1
1 -
2
-
3
-
4
-
5
-
6
-
7
-
8
-
9
-
10
-
11
-
12
-
13
-
14
-
15
-
16
-
17
-
18
-
19
-
20
-
21
-
22
-
23
-
24
-
25
-
26
-
27
-
28
-
29
-
30
-
31
-
32
-
33
-
34
-
35
-
36
-
37
-
38
-
39
-
40
-
41
-
42
-
43
-
44
-
 45
45 -
 46
46 -
 47
47 -
 48
48 -
 49
49 -
 50
50 -
 51
51 -
 52
52 -
 53
53 -
 54
54 -
 55
55 -
56
-
57
-
58
-
59
-
60
-
61
-
62
-
63
-
64
-
65
-
66
 |
 |
