Brother International MFC-465CN Software & Network Users Manual - English - Page 62
CUSTOM SCAN, PHOTOCAPTURE, COPY, Device Button, Software Button, Open PCC Folder, Copy From PCC - drivers
 |
UPC - 012502618218
View all Brother International MFC-465CN manuals
Add to My Manuals
Save this manual to your list of manuals |
Page 62 highlights
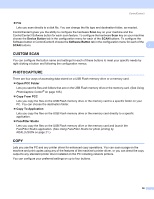
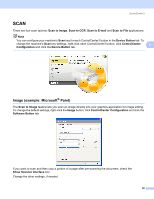
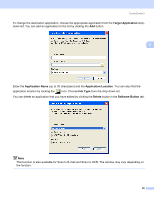
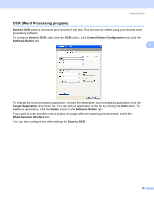
ControlCenter3 „ File Lets you scan directly to a disk file. You can change the file type and destination folder, as needed. ControlCenter3 gives you the ability to configure the hardware Scan key on your machine and the ControlCenter3 Software button for each scan feature. To configure the hardware Scan key on your machine choose the Device Button tab in the configuration menu for each of the SCAN buttons. To configure the Software button in ControlCenter3 choose the Software Button tab in the configuration menu for each of the SCAN buttons. 3 CUSTOM SCAN 3 You can configure the button name and settings for each of these buttons to meet your specific needs by right-clicking a button and following the configuration menus. PHOTOCAPTURE 3 There are four ways of accessing data stored on a USB Flash memory drive or a memory card. „ Open PCC Folder Lets you see the files and folders that are on the USB Flash memory drive or the memory card. (See Using PhotoCapture Center® on page 105.) „ Copy From PCC Lets you copy the files on the USB Flash memory drive or the memory card to a specific folder on your PC. You can choose the destination folder. „ Copy To Application Lets you copy the files on the USB Flash memory drive or the memory card directly to a specific application. „ FaceFilter Studio Lets you copy the files on the USB Flash memory drive or the memory card and launch the FaceFilter Studio application. (See Using FaceFilter Studio for photo printing by REALLUSION on page 21.) COPY 3 Lets you use the PC and any printer driver for enhanced copy operations. You can scan a page on the machine and print copies using any of the features of the machine's printer driver, or you can direct the copy output to any standard printer driver installed on the PC including network printers. You can configure your preferred settings on up to four buttons. 56
-
 1
1 -
2
-
3
-
4
-
5
-
6
-
7
-
8
-
9
-
10
-
11
-
12
-
13
-
14
-
15
-
16
-
17
-
18
-
19
-
20
-
21
-
22
-
23
-
24
-
25
-
26
-
27
-
28
-
29
-
30
-
31
-
32
-
33
-
34
-
35
-
36
-
37
-
38
-
39
-
40
-
41
-
42
-
43
-
44
-
45
-
46
-
47
-
48
-
49
-
50
-
51
-
52
-
53
-
54
-
55
-
56
-
 57
57 -
 58
58 -
 59
59 -
 60
60 -
 61
61 -
 62
62 -
 63
63 -
 64
64 -
 65
65 -
 66
66 -
 67
67 -
68
-
69
-
70
-
71
-
72
-
73
-
74
-
75
-
76
-
77
-
78
-
79
-
80
-
81
-
82
-
83
-
84
-
85
-
86
-
87
-
88
-
89
-
90
-
91
-
92
-
93
-
94
-
95
-
96
-
97
-
98
-
99
-
100
-
101
-
102
-
103
-
104
-
105
-
106
-
107
-
108
-
109
-
110
-
111
-
112
-
113
-
114
-
115
-
116
-
117
-
118
-
119
-
120
-
121
-
122
-
123
-
124
-
125
-
126
-
127
-
128
-
129
-
130
-
131
-
132
-
133
-
134
-
135
-
136
-
137
-
138
-
139
-
140
-
141
-
142
-
143
-
144
-
145
-
146
-
147
-
148
-
149
-
150
-
151
-
152
-
153
-
154
-
155
-
156
-
157
-
158
-
159
-
160
-
161
-
162
-
163
-
164
-
165
-
166
-
167
-
168
 |
 |
