Brother International XR1300 Users Manual - English - Page 108
Error Messages
 |
View all Brother International XR1300 manuals
Add to My Manuals
Save this manual to your list of manuals |
Page 108 highlights
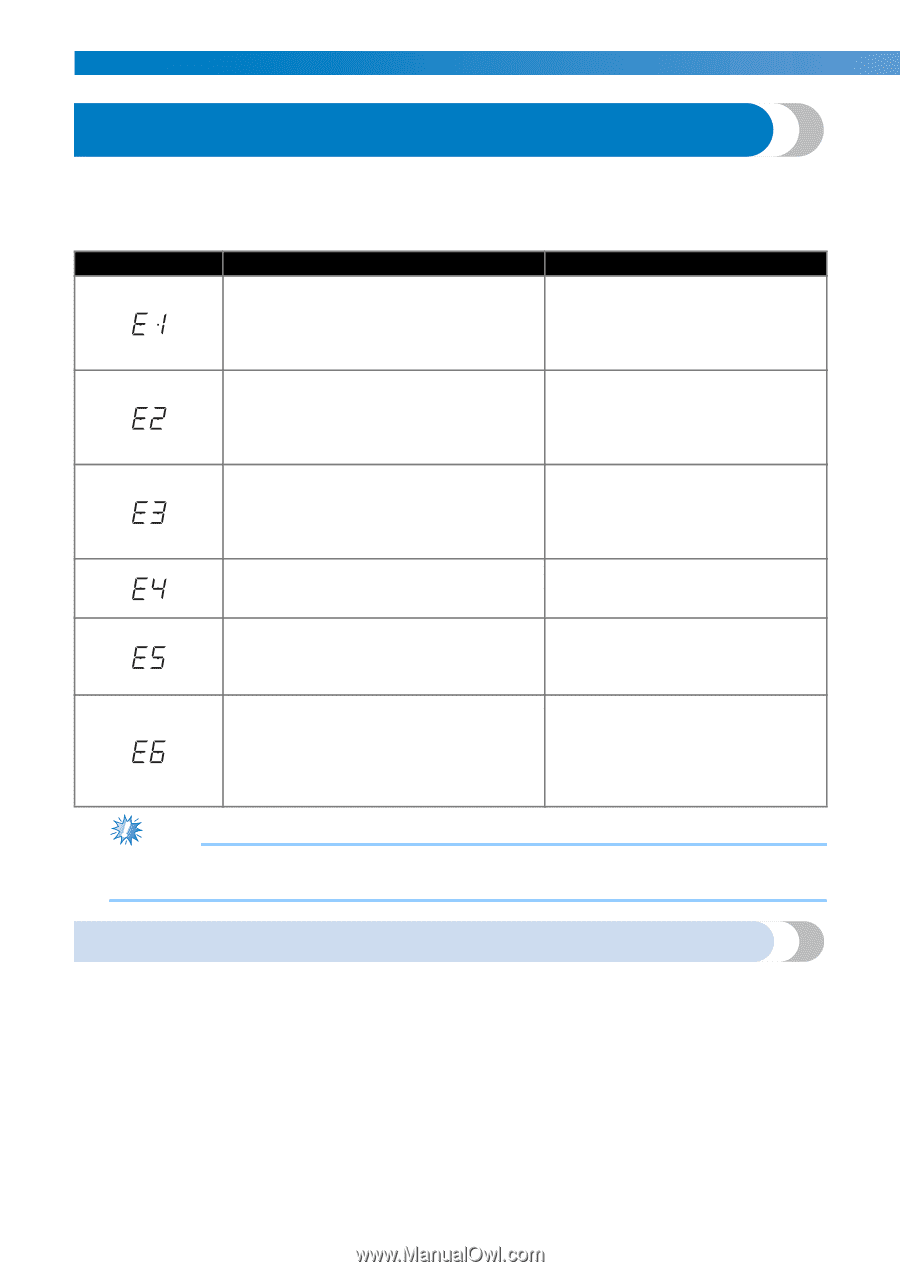
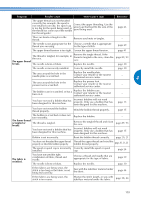
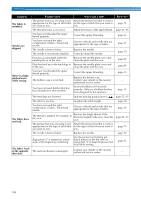
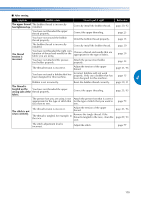
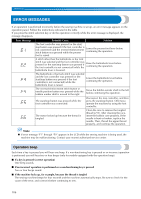
APPENDIX ERROR MESSAGES If an operation is performed incorrectly before the sewing machine is set up, an error message appears on the operation panel. Follow the instructions indicated in the table. If you press the stitch selection key or do the operation correctly while the error message is displayed, the message disappears. Error Message Probable Cause Solution The foot controller was pressed (or the start/ stop button was pressed if the foot controller is not connected) and the reverse/reinforcement stitch button was pressed while the presser Lower the presser foot lever before continuing the operation. foot is raised. A stitch other than the buttonhole or bar tack stitch was selected and the foot controller was pressed (or the start/stop button was pressed if the foot controller is not connected) while the Raise the buttonhole lever before continuing the operation. buttonhole lever is lowered. The buttonhole or bar tack stitch was selected and the foot controller was pressed (or the start/stop button was pressed if the foot controller is not connected) while the Lower the buttonhole lever before continuing the operation. buttonhole lever is raised. The reverse/reinforcement stitch button or needle position button was pressed while the bobbin winder shaft is moved to the right. Move the bobbin winder shaft to the left before continuing the operation. The start/stop button was pressed while the foot controller was connected. Disconnect the foot controller, and then press the start/stop button. Otherwise, operate the machine by using the foot controller. The motor locked up because the thread is tangled. Clean the race to remove the tangled thread (p.93). After cleaning the race, insert the bobbin case properly. If the needle is bent or broken, replace the needle. Then, thread the upper thread properly, and continue the operation. Note ● If error message "F1" through "F9" appears in the LCD while the sewing machine is being used, the machine may be malfunctioning. Contact your nearest authorized service center. Operation beep Each time a key is pressed you will hear one beep. If a non-functioning key is pressed or an incorrect operation is performed you will hear two or four beeps (only for models equipped with the operation beep). ■ If a key is pressed (correct operation) One beep sounds. ■ If an incorrect operation is performed or a non-functioning key is pressed Two or four beeps sound. ■ If the machine locks up, for example, because the thread is tangled The sewing machine beeps for four seconds and the machine automatically stops. Be sure to check for the cause of the error, and correct it before continuing to sew. 106
-
 1
1 -
2
-
3
-
4
-
5
-
6
-
7
-
8
-
9
-
10
-
11
-
12
-
13
-
14
-
15
-
16
-
17
-
18
-
19
-
20
-
21
-
22
-
23
-
24
-
25
-
26
-
27
-
28
-
29
-
30
-
31
-
32
-
33
-
34
-
35
-
36
-
37
-
38
-
39
-
40
-
41
-
42
-
43
-
44
-
45
-
46
-
47
-
48
-
49
-
50
-
51
-
52
-
53
-
54
-
55
-
56
-
57
-
58
-
59
-
60
-
61
-
62
-
63
-
64
-
65
-
66
-
67
-
68
-
69
-
70
-
71
-
72
-
73
-
74
-
75
-
76
-
77
-
78
-
79
-
80
-
81
-
82
-
83
-
84
-
85
-
86
-
87
-
88
-
89
-
90
-
91
-
92
-
93
-
94
-
95
-
96
-
97
-
98
-
99
-
100
-
101
-
102
-
 103
103 -
 104
104 -
 105
105 -
 106
106 -
 107
107 -
 108
108 -
 109
109 -
 110
110 -
 111
111 -
 112
112
 |
 |