Brother International XR1300 Users Manual - English - Page 24
Replace the bobbin cover. Put the left tab - sewing machine case
 |
View all Brother International XR1300 manuals
Add to My Manuals
Save this manual to your list of manuals |
Page 24 highlights
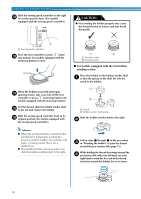
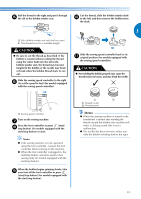
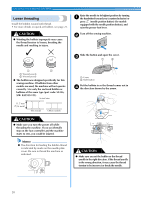
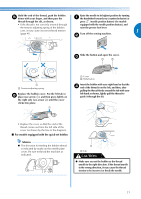
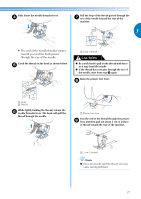
KNOWING YOUR SEWING MACHINE While lightly holding down the bobbin with e your right hand as shown, guide the thread through the slit (a and b). • At this time, check that the bobbin easily rotates counterclockwise. Then, pull the thread toward you to cut it with the cutter (c). Replace the bobbin cover. Put the left tab in f place (see arrow a), and then press lightly on the right side (see arrow b) until the cover clicks into place. a Slit b Cutter (Cut the thread with the cutter.) Note ● If the thread is not correctly inserted through the tension-adjusting spring of the bobbin case, it may cause incorrect thread tension (page 41). Memo ● You can begin sewing immediately without drawing up the bobbin thread. If you want to draw up the bobbin thread before you start to sew, follow to the procedure in "Drawing up the lower thread" (page 28). 1 a Tension-adjusting spring 22
-
 1
1 -
2
-
3
-
4
-
5
-
6
-
7
-
8
-
9
-
10
-
11
-
12
-
13
-
14
-
15
-
16
-
17
-
18
-
 19
19 -
 20
20 -
 21
21 -
 22
22 -
 23
23 -
 24
24 -
 25
25 -
 26
26 -
 27
27 -
 28
28 -
 29
29 -
30
-
31
-
32
-
33
-
34
-
35
-
36
-
37
-
38
-
39
-
40
-
41
-
42
-
43
-
44
-
45
-
46
-
47
-
48
-
49
-
50
-
51
-
52
-
53
-
54
-
55
-
56
-
57
-
58
-
59
-
60
-
61
-
62
-
63
-
64
-
65
-
66
-
67
-
68
-
69
-
70
-
71
-
72
-
73
-
74
-
75
-
76
-
77
-
78
-
79
-
80
-
81
-
82
-
83
-
84
-
85
-
86
-
87
-
88
-
89
-
90
-
91
-
92
-
93
-
94
-
95
-
96
-
97
-
98
-
99
-
100
-
101
-
102
-
103
-
104
-
105
-
106
-
107
-
108
-
109
-
110
-
111
-
112
 |
 |
