Canon Color imageCLASS MF8350Cdn Color imageCLASS MF8350Cdn/MF8050Cn Basic Ope
Canon Color imageCLASS MF8350Cdn Manual
 |
View all Canon Color imageCLASS MF8350Cdn manuals
Add to My Manuals
Save this manual to your list of manuals |
Canon Color imageCLASS MF8350Cdn manual content summary:
- Canon Color imageCLASS MF8350Cdn | Color imageCLASS MF8350Cdn/MF8050Cn Basic Ope - Page 1
Setting Procedure Security Functions Searching in Detail See the e-Manual. User Software CD-ROM Searching the Installation and Connection Procedure See the Starter Guide. Please read this guide before operating this product. After you finish reading this guide, store it in a safe place for future - Canon Color imageCLASS MF8350Cdn | Color imageCLASS MF8350Cdn/MF8050Cn Basic Ope - Page 2
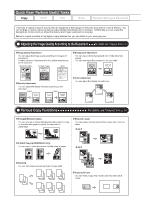
pages of this manual as well as in the e-Manual. You can enlarge or reduce copies as well as copy multiple documents onto one sheet. Additionally, documents to copy them onto one sheet. 2 on 1 2-Sided Copying (MF8350Cdn Only) You can copy 1-sided documents on both sides of paper. 4 on 1 Collating - Canon Color imageCLASS MF8350Cdn | Color imageCLASS MF8350Cdn/MF8050Cn Basic Ope - Page 3
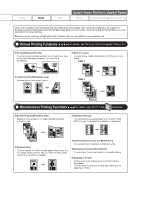
to print it out on multiple sheets of paper. You can make one large poster by joining these printouts together. Displaying a Preview before Printing You can check the printout result on a computer display. Selecting a "Profile" Some printer driver settings are provided as "Profiles" beforehand. You - Canon Color imageCLASS MF8350Cdn | Color imageCLASS MF8350Cdn/MF8050Cn Basic Ope - Page 4
paper cost as well as send a clear document which has little dirt or blur. * You need to install the fax driver in a computer. * If you are a Macintosh user, see the Fax Driver Guide. For details, see "Fax" in the e-Manual the Address Book" from p. 5-1. One-touch keys Coded dialing Group dialing - Canon Color imageCLASS MF8350Cdn | Color imageCLASS MF8350Cdn/MF8050Cn Basic Ope - Page 5
coded dial codes, you can register destinations which cannot be registered under one-touch keys. If you forget the coded dial codes, you can specify any time. If you do not need them, you can delete them, saving paper to be used. Remote Receiving If an external telephone is connected, you can switch - Canon Color imageCLASS MF8350Cdn | Color imageCLASS MF8350Cdn/MF8050Cn Basic Ope - Page 6
is performed by operating the software supplied with the machine. For details, see "Scan" in the e-Manual. Documents 1 3 Data 2 " in the e-Manual. Scanning with the WIA Driver (Windows XP/Vista/7 Only) Scanning is performed using the driver system supplied with Windows operating systems. There - Canon Color imageCLASS MF8350Cdn | Color imageCLASS MF8350Cdn/MF8050Cn Basic Ope - Page 7
Port settings - Sharing settings for the printer e-Manual. Miscellaneous Settings Communication mode/ Communication speed Manager Mode] or [End-User Mode]. (2) For [System Manager Mode], enter [System Manager ID] and [System Manager PIN]. For [End-User Mode], enter [User Name]. (3) Click [OK]. - Canon Color imageCLASS MF8350Cdn | Color imageCLASS MF8350Cdn/MF8050Cn Basic Ope - Page 8
Safety Instructions Installation Requirements and Handling Legal Notices Laser Safety ii v vi vi vii xi xiii xvii Paper Type 2-7 Printable Range Loading Paper In the Paper Cassette In the Multi-Purpose Tray (for MF8350Cdn) In the Manual Feed Slot (for MF8050Cn) Precautions when Loading Paper Paper - Canon Color imageCLASS MF8350Cdn | Color imageCLASS MF8350Cdn/MF8050Cn Basic Ope - Page 9
Editing One- MF8350Cdn Only) Receive Data Reduction Received Page Footer Continue Printing When Toner Is Low ECM Receiving Incoming Ring Remote Receiving Manual Driver Manual Redialing) Useful Fax Sending Methods Sending a Fax after Making a Phone Call (Manual Sending) Push-button Telephone Service - Canon Color imageCLASS MF8350Cdn | Color imageCLASS MF8350Cdn/MF8050Cn Basic Ope - Page 10
8-13 8-14 Index 11-4 9. Troubleshooting Clearing Jams Document Jams in the Feeder Paper Jams in the Paper Cassette (Cassette 1 or 2) Paper Jams in the Multi-purpose Tray (MF8350Cdn Only) Paper Jams in the Manual Feed Slot (MF8050Cn Only) 9-1 9-2 9-2 9-3 9-4 9-5 Paper Jams in the Rear Cover or - Canon Color imageCLASS MF8350Cdn | Color imageCLASS MF8350Cdn/MF8050Cn Basic Ope - Page 11
the Scan Functions Maintenance Troubleshooting Registering/Setting the Various Functions • Appendix e-Manual Read the desired chapter to suit your needs. The e-Manual is categorized by subject to find desired information easily. * The e-Manual is included in the User Software CD-ROM. Basic - Canon Color imageCLASS MF8350Cdn | Color imageCLASS MF8350Cdn/MF8050Cn Basic Ope - Page 12
for each model. : available -: not available Copy MF8350Cdn MF8050Cn Print 2-sided Printing Fax (PC Fax) USB Scan Network Scan Remote UI ADF (1-sided) ADF (2-sided) - How to Use This Manual Symbols Used in This Manual WARNING CAUTION IMPORTANT NOTE Indicates a warning concerning operations that - Canon Color imageCLASS MF8350Cdn | Color imageCLASS MF8350Cdn/MF8050Cn Basic Ope - Page 13
user and other persons or to prevent destruction of property, always pay attention to these instructions and operational requirements. Also, as it may result in unexpected accidents or injuries, do not perform any operation unless otherwise specified in the manual Canon dealer fixed with staples, or - Canon Color imageCLASS MF8350Cdn | Color imageCLASS MF8350Cdn/MF8050Cn Basic Ope - Page 14
one instructions for safety. - Never open covers other than those indicated in this manual. - Do not remove the caution label attached to the cover of the laser • Do not drop paper clips, staples, or other metal objects outlet and contact your local authorized Canon dealer. • When plugging or - Canon Color imageCLASS MF8350Cdn | Color imageCLASS MF8350Cdn/MF8050Cn Basic Ope - Page 15
Canon dealer or the Canon by fixing it with staples. - The power toner cartridges or paper in a location exposed to open flames. This may cause the toner or paper to ignite, resulting in burns or fire. • When disposing of a toner cartridge, place the toner cartridge into a bag to prevent the toner - Canon Color imageCLASS MF8350Cdn | Color imageCLASS MF8350Cdn/MF8050Cn Basic Ope - Page 16
your eyes or mouth, wash them immediately with cold water and consult a physician. • If toner leaks from the toner cartridge, be careful not to inhale the toner or allow it to come into direct contact with your skin. If the toner comes into contact with your skin, wash with soap. If the skin becomes - Canon Color imageCLASS MF8350Cdn | Color imageCLASS MF8350Cdn/MF8050Cn Basic Ope - Page 17
trouble-free able to fully support the weight of the MF8050Cn: 900 W or less • Electrical noise or a dramatic drop in mains voltage may cause the machine or computer to operate incorrectly or lose data. Installation Space Required installation space MF8350Cdn Front View 4 (100) 52 1/4 (1327) Paper - Canon Color imageCLASS MF8350Cdn | Color imageCLASS MF8350Cdn/MF8050Cn Basic Ope - Page 18
website. http://www.canontechsupport.com/ Customer Support (Canada) Canon Canada Inc., offers a full range of customer technical support options*: • For step-by-step troubleshooting, e-mail technical support, the latest driver or document downloads, and answers to frequently asked questions, visit - Canon Color imageCLASS MF8350Cdn | Color imageCLASS MF8350Cdn/MF8050Cn Basic Ope - Page 19
Logo Phase-1 defined by IPv6 Forum. Canon, the Canon logo, and Color imageCLASS are registered trademarks of Canon Inc. in the United States and may also be trademarks or registered trademarks in other countries. Microsoft, Windows and Windows Vista are either trademarks or registered trademarks - Canon Color imageCLASS MF8350Cdn | Color imageCLASS MF8350Cdn/MF8050Cn Basic Ope - Page 20
Identifying Badges or Insignias Selective Service or Draft Papers Checks or Drafts Issued by one. Use one line per unit. DDD (Direct Distance Dial) line -orIDDD (International Direct Distance Dial) line if you communicate overseas Color imageCLASS MF8350Cdn: F157902 Color imageCLASS MF8050Cn - Canon Color imageCLASS MF8350Cdn | Color imageCLASS MF8350Cdn/MF8050Cn Basic Ope - Page 21
contact Canon Authorized Service Facilities for servicing of equipment, Information regarding Authorized Service Facility locations can be obtained by calling Canon Customer Care Center (1-800-OK-CANON). NOTE Rights of the Telephone Company If this equipment (Color imageCLASS MF8350Cdn/MF8050Cn - Canon Color imageCLASS MF8350Cdn | Color imageCLASS MF8350Cdn/MF8050Cn Basic Ope - Page 22
conforme aux spécifications techniques applicables d'Industrie Canada. • Avant d'installer cet appareil, importante dans les zones rurales CAUTION Users should not attempt to make such service d'inspection faisant autorité en matière d'électricité ou à un électricien, selon le cas. NOTE Canon - Canon Color imageCLASS MF8350Cdn | Color imageCLASS MF8350Cdn/MF8050Cn Basic Ope - Page 23
as a Class 1 laser product under the U.S. Department of Health and Human Services (DHHS) Radiation Performance , the laser beam cannot escape from the machine during any phase of user operation. this manual may result in hazardous radiation exposure. The label is attached to the laser scanner - Canon Color imageCLASS MF8350Cdn | Color imageCLASS MF8350Cdn/MF8050Cn Basic Ope - Page 24
xviii - Canon Color imageCLASS MF8350Cdn | Color imageCLASS MF8350Cdn/MF8050Cn Basic Ope - Page 25
its useful functions. 1 Names and Functions on Each Part of the Machine1-2 Front Side Back Side Interior Multi-purpose Tray (Manual Feed Slot) Paper Cassette Operation Panel Main Operation Panel Fax Operation Panel 1-2 1-3 1-4 1-5 1-6 1-7 1-7 1-8 LCD (Standby Mode) Copy Mode Fax Mode Scan Mode - Canon Color imageCLASS MF8350Cdn | Color imageCLASS MF8350Cdn/MF8050Cn Basic Ope - Page 26
MF8350Cdn Before Using the Machine MF8050Cn tray Place document. (17) USB memory port Used to save scanned documents in a USB memory. Tray extension Pull out the tray extension when the paper is hanging out of the document feeder tray such as Legal size paper. (18) Manual feed transport guide - Canon Color imageCLASS MF8350Cdn | Color imageCLASS MF8350Cdn/MF8050Cn Basic Ope - Page 27
Back Side MF8350Cdn (1) (2) Before Using the Machine (5) (6) (7) (8) (3) (4) MF8050Cn (1) (2) (4) (3) (8) (5) (7) (6) (1) (2) (3) (4) USB port Connect the USB cable. (5) (6) Rear cover Open this cover when clearing paper jams. LAN port Connect the LAN cable. Rating label The current - Canon Color imageCLASS MF8350Cdn | Color imageCLASS MF8350Cdn/MF8050Cn Basic Ope - Page 28
Interior MF8350Cdn (1) (2) (3) (4) (5) Before Using the Machine MF8050Cn (1) (2) (3) (4) (5) (1) (2) (3) Y (Yellow) toner cartridge slot The Y (yellow) toner cartridge is installed in this slot. (4) (5) K (Black) toner cartridge slot The K (black) toner cartridge is installed in this slot. M - Canon Color imageCLASS MF8350Cdn | Color imageCLASS MF8350Cdn/MF8050Cn Basic Ope - Page 29
Multi-purpose Tray (Manual Feed Slot) MF8350Cdn (1) (2) Before Using the Machine (3) MF8050Cn (1) (1) (2) Paper guides Adjust to the width of the paper. (3) Tray extension (MF8350Cdn Only) Open to prevent the paper from hanging out of the multipurpose tray when loading long-size paper such - Canon Color imageCLASS MF8350Cdn | Color imageCLASS MF8350Cdn/MF8050Cn Basic Ope - Page 30
Paper Cassette MF8350Cdn (2) (2) (3) (1) (1) Before Using the Machine MF8050Cn (2) (2) (3) (1) (1) (2) Lock release lever Hold this lever to slide the paper guides. (3) Lock release lever (changing cassette size) When loading paper that is longer than A4 size, pull out the paper cassette - Canon Color imageCLASS MF8350Cdn | Color imageCLASS MF8350Cdn/MF8050Cn Basic Ope - Page 31
to copy them on one sheet of paper • [Collate] key When making multiple copies, collates them in page order. • [Enlarge/Reduce] key Specify a copy ratio. • [2-sided] key (MF8350Cdn only) Specifies the settings for 2-sided printing. • [Frame Erase] key (MF8050Cn only) Specifies the settings - Canon Color imageCLASS MF8350Cdn | Color imageCLASS MF8350Cdn/MF8050Cn Basic Ope - Page 32
/Settings] key Registers a size and type of paper to be loaded in the paper cassette or multi-purpose tray. [Paper Select] indicator The indicator for the selected cassette turns on. Before Using the Machine (15) [Reset] key Resets the settings. (Resets the copy/scan/fax mode to the standard mode - Canon Color imageCLASS MF8350Cdn | Color imageCLASS MF8350Cdn/MF8050Cn Basic Ope - Page 33
Settings→ Setting the Default Screen • If the machine remains idle for 2 minutes, the display returns to the standby mode. e-Manual→ Basic Operation→ Specifying the Auto Reset Timer Specify destination. 2010 01/01 12:52AM Before Using the Machine RX Mode: Auto Resolution: 200 x 1... Scan Mode - Canon Color imageCLASS MF8350Cdn | Color imageCLASS MF8350Cdn/MF8050Cn Basic Ope - Page 34
a Deleting Characters Delete with [ ] (Clear). Pressing and holding [ ] (Clear) key deletes all characters. Before Using the Machine Example: Enter . OK Tone, Numeric keys, Symbols, Clear Changing Entry Mode Register Username Entry Mode: A Select with [ ], and then - Canon Color imageCLASS MF8350Cdn | Color imageCLASS MF8350Cdn/MF8050Cn Basic Ope - Page 35
on green. ] (Energy Saver). To enter sleep mode manually 1 2 Press [ ] (Menu). ] or [ such as adjusting and cleaning • When a paper jam occurs in the machine • When Settin...Send/Receive Settin...Printer Settings Timer Settings When Reset Timer Auto Offline Time ] or [ ], and then 1-11 - Canon Color imageCLASS MF8350Cdn | Color imageCLASS MF8350Cdn/MF8050Cn Basic Ope - Page 36
[OK]. Menu Memory Media Settin...Send/Receive Settin...Printer Settings Timer Settings Specifies the current time and date. 3 Select with [ and then press [OK]. Timer Settings Time & Date Settings Sleep Timer Auto Reset Timer Auto Offline Time ] or - Canon Color imageCLASS MF8350Cdn | Color imageCLASS MF8350Cdn/MF8050Cn Basic Ope - Page 37
in the Feeder 2-4 2-4 2-4 Paper Requirements Paper Size Paper Type 2-6 2-6 2-7 Printable Range Loading Paper In the Paper Cassette In the Multi-Purpose Tray (for MF8350Cdn) In the Manual Feed Slot (for MF8050Cn) Precautions when Loading Paper Paper Loading Capacity Paper Loading Orientation When - Canon Color imageCLASS MF8350Cdn | Color imageCLASS MF8350Cdn/MF8050Cn Basic Ope - Page 38
paper • Carbon paper or carbon-backed paper • Curled or rolled paper • Coated paper • Torn paper • Onion skin or thin paper • Documents with staples or paper clips attached • Paper printed with a thermal transfer printer document loaded in the document feeder tray Copy Platen Glass Feeder 1/8 in. - Canon Color imageCLASS MF8350Cdn | Color imageCLASS MF8350Cdn/MF8050Cn Basic Ope - Page 39
in. (1 mm) 1/8 in. (3 mm) 1/8 in. (3 mm) 3/64 in. (1 mm) 3/64 in. (1 mm) Scan (Saving in a Computer) Platen Glass Feeder 3/64 in. (1 mm) Document and Paper Handling 1/16 in. (1.5 mm) Scan (Saving in a USB Memory) Platen Glass Feeder 1/16 in. (1.5 mm) 1/64 in. (0.5 mm) 1/64 in. (0.5 mm) 2-3 - Canon Color imageCLASS MF8350Cdn | Color imageCLASS MF8350Cdn/MF8050Cn Basic Ope - Page 40
and cause personal injury. 1 Open the feeder. Document and Paper Handling Loading Document in the Feeder 1 2 Place a document face down. Spread the document guides a little wider than the actual document width. 2 3 Pull out the tray extension before loading the large size document. Pull out - Canon Color imageCLASS MF8350Cdn | Color imageCLASS MF8350Cdn/MF8050Cn Basic Ope - Page 41
the width of the paper If the document guides are too loose or too tight, this may result in misfeeds or paper jams. While scanning a document Do not add or remove documents. Scanning documents is complete Remove the documents from the document delivery tray to avoid paper jams. Avoid scanning - Canon Color imageCLASS MF8350Cdn | Color imageCLASS MF8350Cdn/MF8050Cn Basic Ope - Page 42
documents, reports, or lists can be printed. Use envelopes with the flap closed. You can load Envelope Monarch in the paper cassette only for MF8050Cn. You can load paper of the following custom paper sizes. * MF8350Cdn Width 4" to 8 1/2" (100 to 215.9 mm); Length 5 7/8" to 14" (148 to 355.6 mm - Canon Color imageCLASS MF8350Cdn | Color imageCLASS MF8350Cdn/MF8050Cn Basic Ope - Page 43
The available paper types are as follows. Paper Source Paper Type Printer Driver Setting Paper Capacity (Paper Cassette) Paper Capacity (Multi-purpose Tray) (Manual Feed Slot) Plain Paper *1 Heavy Paper * (MF8350Cdn) 1 Heavy Paper (MF8050Cn) Recycled Paper *1 Color Paper *1 Coated Paper 16 to - Canon Color imageCLASS MF8350Cdn | Color imageCLASS MF8350Cdn/MF8050Cn Basic Ope - Page 44
Printable Range 1/4 in. (5 mm) 1/4 in. (5 mm) 1/4 in. (5 mm) The shaded area indicates the approximate printable area of A4 paper. Note that the margin widths listed below are rough standards and there may be slight variations in actual use. Document and Paper Handling 1/4 in. (5 mm) 2-8 - Canon Color imageCLASS MF8350Cdn | Color imageCLASS MF8350Cdn/MF8050Cn Basic Ope - Page 45
. Holding the lock release lever, slide the paper guides. The side paper guides move together. The lock release lever is not installed in MF8050Cn. (2) Slide the paper guide at the front center. Holding the lock release lever, slide the paper guides. MF8350Cdn * If you want to change the size of - Canon Color imageCLASS MF8350Cdn | Color imageCLASS MF8350Cdn/MF8050Cn Basic Ope - Page 46
hooks (A) on the paper guides. Make sure that the paper stack does not exceed the line of the load limit mark (B). MF8350Cdn (A) (A) (A) (B) (B) (4) Align the edges of the envelopes on a flat surface. MF8050Cn (A) (B) (A) (A) (B) (5) Load the envelopes into the paper cassette with the print - Canon Color imageCLASS MF8350Cdn | Color imageCLASS MF8350Cdn/MF8050Cn Basic Ope - Page 47
size paper, open the tray extension. MF8050Cn Document and Paper Handling 4 Spread the paper guides a little wider than the actual paper width. 7 Specify the loaded paper size and type. "Setting a Paper Size and Type" (→P.2-16) In the Multi-Purpose Tray (for MF8350Cdn) Before loading paper in - Canon Color imageCLASS MF8350Cdn | Color imageCLASS MF8350Cdn/MF8050Cn Basic Ope - Page 48
in the figure, and insert the paper until it touches the back of the tray. When the paper touches the back of the tray, it is caught by the slot. Only one sheet of the paper can be loaded in the manual feed slot. "Paper Loading Orientation" (→P.2-14) 6 Align the paper guides with the width of the - Canon Color imageCLASS MF8350Cdn | Color imageCLASS MF8350Cdn/MF8050Cn Basic Ope - Page 49
it before loading. NOTE Detailed information about usable paper "Paper Requirements" (→P.2-6) MF8050Cn Size abbreviation on the paper guides of the paper cassette Paper size Legal Letter Executive B5 Paper guide LGL LTR EXEC JIS B5 (A) (B) Paper type Plain paper (Ex. 21 lb Bond (80 g/m2 - Canon Color imageCLASS MF8350Cdn | Color imageCLASS MF8350Cdn/MF8050Cn Basic Ope - Page 50
Multi-purpose tray (MF8350Cdn Only) 1-sided printing (When "Selecting Print Side (MF8350Cdn Only)" (→P.2-19) is set to (the default setting)) (with the printing side facing up) Document and Paper Handling (with the printing side facing up) Manual feed slot (MF8050Cn Only - Canon Color imageCLASS MF8350Cdn | Color imageCLASS MF8350Cdn/MF8050Cn Basic Ope - Page 51
facing up) (with the printing side facing up) Printing on Envelopes Document and Paper Handling Load envelopes with the front side (non-glued side) facing up as follows. ( : Feeding direction) Manual feed slot (MF8050Cn Only) Envelope COM10 Load the envelopes so that the flap is toward the left - Canon Color imageCLASS MF8350Cdn | Color imageCLASS MF8350Cdn/MF8050Cn Basic Ope - Page 52
Color Heavy 1 (24 lb Bond... ] or [ ], and then For the Paper Cassette Keys to be used for this operation Document and Paper Handling Select Paper/Settings Reset 6 Press [ ] (Reset) to return to standby mode. Registering the Default Paper Settings for the Multi-purpose Tray (Manual - Canon Color imageCLASS MF8350Cdn | Color imageCLASS MF8350Cdn/MF8050Cn Basic Ope - Page 53
of frequently used paper. Registered paper is displayed when paper settings are specified for each paper source. • Paper cassette Paper size setting screen Paper Size LTR LGL STMT EXEC Paper Size 1. 7 x 9 " LTR LGL STMT "For the Paper Cassette" (→P.2-16) • Multi-purpose tray (manual feed slot - Canon Color imageCLASS MF8350Cdn | Color imageCLASS MF8350Cdn/MF8050Cn Basic Ope - Page 54
and 6 Select the paper type with [ press [OK]. Paper Type Plain 2 (19 lb BondRecycled Color Heavy 1 (24 lb Bond... ] or [ ], and then Select with [ then press [OK]. Select Paper MP Tray 1 LTR:Plain 2 2 LTR:Plain 2 Paper Settings 7 ] or Press [ ] (Reset) to return to standby - Canon Color imageCLASS MF8350Cdn | Color imageCLASS MF8350Cdn/MF8050Cn Basic Ope - Page 55
only when the optional paper cassette (Cassette 2) is installed in MF8350Cdn. When setting this item paper when using multi-purpose tray or when printing pages of the landscape layout, see "Paper Loading Orientation" (→ P.2-14). When performing 1-sided printing Load paper - Canon Color imageCLASS MF8350Cdn | Color imageCLASS MF8350Cdn/MF8050Cn Basic Ope - Page 56
Feeding direction) ( * For details on the procedure for loading paper when using multi-purpose tray or when printing pages of the landscape layout, see "Paper Loading Orientation" (→ P.2-14). The procedure for loading paper is the same for 2-sided printing and 1-sided printing - Canon Color imageCLASS MF8350Cdn | Color imageCLASS MF8350Cdn/MF8050Cn Basic Ope - Page 57
. 3 Basic Copying Method Canceling Copy Jobs 3-2 3-2 Copy Settings Selecting Copy Papers Adjusting the Density Selecting Image Quality (Copy) 2-Sided Copying (MF8350Cdn Only) Enlarging/Reducing Copies Multiple Documents onto One Sheet (N on 1) Collating Copies Erase Dark Borders and Frame Lines - Canon Color imageCLASS MF8350Cdn | Color imageCLASS MF8350Cdn/MF8050Cn Basic Ope - Page 58
Type: Text/Ph 2-Sided: Off 1 3 Specify the copy settings as needed. You can specify up to 9 items. (for details, see P.3-3 to P.3-6.) 5 Press [ ] (Color) or [ ] (B & W). Paper select Density Image quality 2-Sided Enlarged/reduced Reduced layout Collating Frame erase Sharpness - For - Canon Color imageCLASS MF8350Cdn | Color imageCLASS MF8350Cdn/MF8050Cn Basic Ope - Page 59
mode screen. Select the paper cassette with [ ] or [ ] → [OK] Copying Adjusting the Density Copy mode screen Density adjustment Setting screen* Copy: Press Start 100% 1 LTR Density: +0 Original Type: Text...2-Sided: Off 1 Density + Background: Default Color Balance: Defau... [ [ ] ] Makes - Canon Color imageCLASS MF8350Cdn | Color imageCLASS MF8350Cdn/MF8050Cn Basic Ope - Page 60
as maps. This option scans the document at a low resolution for color copy. This option is suitable for documents that contain text and photos ] → [OK] High Image Quality Text Priority Photo Priority 2-Sided Copying (MF8350Cdn Only) Copy mode screen Setting screen* Copy: Press Start 100% 1 LTR - Canon Color imageCLASS MF8350Cdn | Color imageCLASS MF8350Cdn/MF8050Cn Basic Ope - Page 61
setting screen also by selecting in the copy mode screen. Reduce two-page documents to fit on one sheet of paper. Reduce four-page documents to fit on one sheet of paper. Copy: Press Start 100% 1 LTR Density: +0 Original Type: Text...2-Sided: Off 1 N on 1 Off 2 on 1 4 on 1 ID Card Copy - Canon Color imageCLASS MF8350Cdn | Color imageCLASS MF8350Cdn/MF8050Cn Basic Ope - Page 62
mode screen Setting screen* Copy: Press Start 100% 1 LTR N on 1: Off Collate: Off Erase Frame: Off 1 ] or [ ] Erase Frame Off On * For MF8050Cn, you can display the setting ] (Frame screen also by pressing [ Erase) on the operation panel. Select with [ Select with [ ] or - Canon Color imageCLASS MF8350Cdn | Color imageCLASS MF8350Cdn/MF8050Cn Basic Ope - Page 63
Card You can make a copy of a 2-sided card onto one side of a paper. Keys to be used for this operation 6 Turn and place the card with the arrow mark. If you want to arrange the cards horizontally 7 Press [ ] (Color) or [ ] (B & W). NOTE Place a document (card) Place a card on the platen - Canon Color imageCLASS MF8350Cdn | Color imageCLASS MF8350Cdn/MF8050Cn Basic Ope - Page 64
copy are the function which is applied when [ ] (Reset) is pressed or the power is turned ON. You Papers" (→P.3-3) "Adjusting the Density" (→P.3-3) "Selecting Image Quality (Copy)" (→P.3-4) "2-Sided Copying (MF8350Cdn Only)" (→P.3-4) "Enlarging/Reducing Copies" (→P.3-5) "Multiple Documents onto One - Canon Color imageCLASS MF8350Cdn | Color imageCLASS MF8350Cdn/MF8050Cn Basic Ope - Page 65
how to print from computers. * If you are a Macintosh user, see the Printer Driver Guide. 4 Installing the Printer Driver Printing from a Computer Scaling Print Output Printing Multiple Pages on One Sheet 2-sided Printing (MF8350Cdn Only) Checking/Deleting Print Jobs Checking Print Status in the - Canon Color imageCLASS MF8350Cdn | Color imageCLASS MF8350Cdn/MF8050Cn Basic Ope - Page 66
set such as scaling or gutter adjustment. • The UFRII LT printer driver is included in the supplied User Software CD-ROM When performing this procedure in shared printer environment Along with the driver, install [Canon Driver Information Assist Service] on the computer of the print server. By this - Canon Color imageCLASS MF8350Cdn | Color imageCLASS MF8350Cdn/MF8050Cn Basic Ope - Page 67
. For details on the procedure for displaying the printer driver, see "Printing with the Printer Driver" in the e-Manual. 5 Click [OK]. Printing Multiple Pages on One Sheet This mode enables you to reduce multiple pages to fit onto one sheet of paper. You can fit 2, 4, 6, 8, 9 or 16 pages on - Canon Color imageCLASS MF8350Cdn | Color imageCLASS MF8350Cdn/MF8050Cn Basic Ope - Page 68
Select binding edge for the paper printout from [Binding Location]. MF8350Cdn Only) This mode enables you to make two-sided printing. You can cut down print costs by half when copying in large quantities. NOTE Document name and user type and version of the printer driver. Keys to be used - Canon Color imageCLASS MF8350Cdn | Color imageCLASS MF8350Cdn/MF8050Cn Basic Ope - Page 69
Checking Print Status in the Middle of Printing or Waiting NOTE If the Processing/Data Indicator on the operation panel is: • Turned on/blinking A job is being processed. • Turned off Not jobs are in the memory 1 2 Press [ ] (Status Monitor/Cancel). ] or [ ], Select - Canon Color imageCLASS MF8350Cdn | Color imageCLASS MF8350Cdn/MF8050Cn Basic Ope - Page 70
Printing from a Computer 4-6 - Canon Color imageCLASS MF8350Cdn | Color imageCLASS MF8350Cdn/MF8050Cn Basic Ope - Page 71
registering destinations in the address book and changing or deleting the registered settings. Address Book One-touch Keys Coded Dialing Group Dialing 5-2 5-2 5-2 5-2 Storing/Editing One-Touch Keys Storing/Editing from the Operation Panel Storing/Editing from the Remote UI 5-3 5-3 5-4 Storing - Canon Color imageCLASS MF8350Cdn | Color imageCLASS MF8350Cdn/MF8050Cn Basic Ope - Page 72
You can register frequently used destinations under one-touch keys and coded dial codes. You can also save one-touch keys and coded dial codes as the Remote UI, and the saved file can be read in the machine. e-Manual → Setting and Managing from Computer → Managing the Address Book However, you cannot - Canon Color imageCLASS MF8350Cdn | Color imageCLASS MF8350Cdn/MF8050Cn Basic Ope - Page 73
-touch key (1) Confirm that is selected, and then press [OK]. Fax Name: CANON Destination: One-Touch: 01 (9) Use the numeric keys to specify . Press [OK] to specify as needed. Register New to Addr Edit Address Book Address Book - Canon Color imageCLASS MF8350Cdn | Color imageCLASS MF8350Cdn/MF8050Cn Basic Ope - Page 74
Manager ID] and [System Manager PIN]. (3) Click [OK]. Fax Name: CANON02 Destination: 9876543...One-Touch: 02 When deleting a registered one-touch key (1) Press [ ]. CANON 0123456789 (1) All A-Z ], and then press [OK]. (2) (2) Select with [ (3) Edit Address - Canon Color imageCLASS MF8350Cdn | Color imageCLASS MF8350Cdn/MF8050Cn Basic Ope - Page 75
number or name. (2) Click [Edit]. (3) Specify the required settings in the edit screen for destinations, and then click [OK]. When deleting a registered one-touch key (1) Select the check box for which you want to delete the number, and then click [Delete]. Registering Destinations in the Address - Canon Color imageCLASS MF8350Cdn | Color imageCLASS MF8350Cdn/MF8050Cn Basic Ope - Page 76
(10) Select with [ ], and then press [OK]. Register Dest. Coded Dial One-Touch (3) Confirm that is selected, and then press [OK]. Destination Type Fax Group Fax Name: CANON Destination: 0123456...Coded Dial: 001 (11) Select the number to be registered with [ press [OK - Canon Color imageCLASS MF8350Cdn | Color imageCLASS MF8350Cdn/MF8050Cn Basic Ope - Page 77
in the Address Book (3) Select a destination that you want to edit with [ then press [OK]. 3 Press [ ] (Back) to close the menu screen. CANON 0123456789 All A-Z 0-9 ] or [ ], and then (4) Select an item that you want to edit with [ press [OK]. • Name • Destination • Coded Dial Fax - Canon Color imageCLASS MF8350Cdn | Color imageCLASS MF8350Cdn/MF8050Cn Basic Ope - Page 78
Storing/Editing from the Remote UI When deleting a registered coded dial code (1) Select the check box for which you want to delete the number, and then click [Delete]. 1 2 Start the web browser. Enter "http:///" in the address field, and then press the [ENTER] key - Canon Color imageCLASS MF8350Cdn | Color imageCLASS MF8350Cdn/MF8050Cn Basic Ope - Page 79
-touch keys or coded dial codes beforehand. (4) Select with [ ], and then press [OK]. Destination Type Fax Group (5) If you selected in Step (3), select the number to be registered with [ ] or [ ], and then press [OK]. Storing/Editing from the Operation Panel Keys to be used - Canon Color imageCLASS MF8350Cdn | Color imageCLASS MF8350Cdn/MF8050Cn Basic Ope - Page 80
press [OK]. Registering Destinations in the Address Book (14) Select with [ ], and then press [OK]. Group Name: GROUP Destinations: 2 One-Touch: 03 When adding the recipients to registered group addresses ]. (1) Press [ (2) Select with [ ], and then press [OK - Canon Color imageCLASS MF8350Cdn | Color imageCLASS MF8350Cdn/MF8050Cn Basic Ope - Page 81
registered group addresses ]. (1) Press [ (2) Select with [ ], and then press [OK]. Group Name: GROUP Destinations: 2 One-Touch: 03 When changing group name of registered group addresses ]. (1) Press [ (2) Select with [ ], and then press [OK - Canon Color imageCLASS MF8350Cdn | Color imageCLASS MF8350Cdn/MF8050Cn Basic Ope - Page 82
addresses Proceed to Step 5. When adding the recipients to registered group addresses (1) (2) (3) (4) Click the number or name. Click [Edit]. Click [Address Book]. Click [One-Touch] or [Coded Dial] from the drop-down list, select the check box for the number to be added in a group, and then click - Canon Color imageCLASS MF8350Cdn | Color imageCLASS MF8350Cdn/MF8050Cn Basic Ope - Page 83
8 Click [One-Touch] or [Coded Dial] from the dropdown list, select the check box for the number to be registered in a group, and then click [OK]. (3) (1) (2) 9 Check - Canon Color imageCLASS MF8350Cdn | Color imageCLASS MF8350Cdn/MF8050Cn Basic Ope - Page 84
Registering Destinations in the Address Book 5-14 - Canon Color imageCLASS MF8350Cdn | Color imageCLASS MF8350Cdn/MF8050Cn Basic Ope - Page 85
One Manual Sending) Push-button Telephone Service Using a Dial-line Sending a Fax Abroad (Adding Pauses) Sending to Multiple Destinations at a Time (Sequential Broadcast) 6-6 6-7 6-7 6-7 6-8 6-9 Setting Procedure for Receiving Setting Items for the Receive Settings 2-Sided Printing (MF8350Cdn Driver - Canon Color imageCLASS MF8350Cdn | Color imageCLASS MF8350Cdn/MF8050Cn Basic Ope - Page 86
Specify the destination. These are the following methods to specify a destination. (For details, see P.6-4 to 6-5.) Entering the fax number One-touch keys Coded dialing Group dialing Address book - Sequential broadcast (→P.6-9) Using the Fax Functions Specify destination. 2010 01/01 12:52AM RX - Canon Color imageCLASS MF8350Cdn | Color imageCLASS MF8350Cdn/MF8050Cn Basic Ope - Page 87
Fax Settings Image Quality Settings Fax mode screen Specify destination. 2010 01/01 12:52AM RX Mode: Auto Resolution: 200 x 1...Image Quality Setting screen Resolution 200 x 100 dpi (Norma 200 x 200 dpi (Fine) 200 x 200 dpi (Phot...200 x 400 dpi (Supe... - Canon Color imageCLASS MF8350Cdn | Color imageCLASS MF8350Cdn/MF8050Cn Basic Ope - Page 88
19) of the destination. To use this feature, you need to register destinations in one-touch keys beforehand. "Storing/Editing One-Touch Keys" (→P.5-3) If incorrect keys are pressed After pressing [ ] (Reset), repeat the procedure from specifying the settings for the document scanning. Using the Fax - Canon Color imageCLASS MF8350Cdn | Color imageCLASS MF8350Cdn/MF8050Cn Basic Ope - Page 89
keys are pressed After pressing [ ] (Reset), repeat the procedure from specifying the destinations from the registered address book (one-touch keys, coded dial, or the recipients. CANON 012XXXXXX GroupA 2 Destin...User01 012xxxxx...All A-Z 3 Select a recipient with [ CANON 012XXXXXX GroupA 2 - Canon Color imageCLASS MF8350Cdn | Color imageCLASS MF8350Cdn/MF8050Cn Basic Ope - Page 90
Redialing (Manual Redialing) You can redial a number which you dialed the last time. Keys to be used for this operation Redial FAX OK Start 1 2 3 4 Place documents on - Canon Color imageCLASS MF8350Cdn | Color imageCLASS MF8350Cdn/MF8050Cn Basic Ope - Page 91
" (→P.2-2) Use the numeric keys to dial the desired information service. Specify destination. 2010 01/01 12:52AM 012XXXXXX Start Receiving can send the fax documents. NOTE Restrictions for manual sending When placing documents on the platen glass, only one page can be sent. Furthermore, the group - Canon Color imageCLASS MF8350Cdn | Color imageCLASS MF8350Cdn/MF8050Cn Basic Ope - Page 92
scanning settings for documents as needed. "Fax Settings" (→P.6-3) 5 Use the numeric keys to enter the required numbers for the information service. Specify destination. 2010 01/01 12:52AM 012XXXXXXT3456 Start Receiving Resolution: 200 x 1... Use the numeric keys to enter the international access - Canon Color imageCLASS MF8350Cdn | Color imageCLASS MF8350Cdn/MF8050Cn Basic Ope - Page 93
capable of sequential broadcast You can select destinations in the following combinations. • Specifying destinations using numeric keys: Only one destination • One-touch keys: Up to 19 destinations • Coded dial codes: Up to 181 destinations Numeric keys When specifying destinations using - Canon Color imageCLASS MF8350Cdn | Color imageCLASS MF8350Cdn/MF8050Cn Basic Ope - Page 94
This section describes the procedure for receiving faxes. Your machine provides several methods for receiving fax documents. You can receive documents automatically or manually. Follow the chart below to choose the fax receive mode that best suits your needs. The default setting is . Receives - Canon Color imageCLASS MF8350Cdn | Color imageCLASS MF8350Cdn/MF8050Cn Basic Ope - Page 95
Fax/Tel mode Receives a fax automatically. (An incoming call rings. To configure so that the incoming call does not ring, see "Incoming Ring" (→P.6-25)) Respond to a telephone call by picking up the handset. Operation for when an incoming call is received An incoming call rings for the specified - Canon Color imageCLASS MF8350Cdn | Color imageCLASS MF8350Cdn/MF8050Cn Basic Ope - Page 96
telephone. DRPD (Distinctive Ring Pattern Detection) mode The DRPD service allows you to assign distinctive ring patterns for two phone operation 3 Select a receive mode with [ press [OK]. Receive Mode Auto Fax/Tel Manual Answer ] or [ ], and then FAX If you select and press - Canon Color imageCLASS MF8350Cdn | Color imageCLASS MF8350Cdn/MF8050Cn Basic Ope - Page 97
. 2010 01/01 12:52AM Using the Fax Functions RX Mode: Auto Resolution: 200 x 1... 3 Select with [ [OK]. Receive Mode Auto Fax/Tel Manual Answer ] or [ ], and then press 4 Select an item to be specified with [ and then press [OK]. Fax/Tel Ring Start Time: 6 Incoming Ring - Canon Color imageCLASS MF8350Cdn | Color imageCLASS MF8350Cdn/MF8050Cn Basic Ope - Page 98
for You can specify also from the Remote UI. e-Manual → Setting and Managing from Computer → Setting Transfer - Canon Color imageCLASS MF8350Cdn | Color imageCLASS MF8350Cdn/MF8050Cn Basic Ope - Page 99
Failed #018 6 Specify the forwarding destination. You can specify the destination only with one-touch keys or coded dial codes. "Specifying Destinations" (→P.6-4) CANON 012XXXXXX GroupA 2 Destin...User01 012xxxxx...All A-Z The detailed information is displayed. 7 Press [ ] (B & W). Details - Canon Color imageCLASS MF8350Cdn | Color imageCLASS MF8350Cdn/MF8050Cn Basic Ope - Page 100
(2) Specify the forwarding destination. You can specify the destination only by one-touch keys or coded dial codes. "Specifying Destinations" (→P.6-4) CANON 012XXXXXX GroupA 2 Destin...User01 012xxxxx...All (3) Press [ A-Z ] (Status Monitor/Cancel) to close the screen. ] or [ ], and then press [ - Canon Color imageCLASS MF8350Cdn | Color imageCLASS MF8350Cdn/MF8050Cn Basic Ope - Page 101
Checking/Handling Fax Documents in Memory You can check the status of or handle fax documents in memory. The detailed information is displayed. Checking/Canceling Fax Transmission Documents You can check the details of fax documents currently being sent or waiting to be sent. You can also delete - Canon Color imageCLASS MF8350Cdn | Color imageCLASS MF8350Cdn/MF8050Cn Basic Ope - Page 102
with [ then press [OK]. Menu Printer Settings Timer Settings Adjustment/Cleaning System Settings ] or [ the documents. "Forwarding Received Fax Documents in Memory to Other Destinations (Manual Forwarding)" (→P.6-14) You can print stored documents. "Printing Received Fax Documents - Canon Color imageCLASS MF8350Cdn | Color imageCLASS MF8350Cdn/MF8050Cn Basic Ope - Page 103
The detailed information is displayed. 3 Details Job Number: 0004 Status: Receiving For deleting (1) Select with [ ] or [ ], and then press [OK]. Select with [ press [OK]. Fax Job Status/History Send Job Status Receive Job Status Job History Forwarding - Canon Color imageCLASS MF8350Cdn | Color imageCLASS MF8350Cdn/MF8050Cn Basic Ope - Page 104
Changing the Default Values for Fax The default values for fax are those functions which are applied automatically when [ ] (Reset) is pressed or the power is turned ON. You can change the default values to suit your needs. You can register the following types of - Canon Color imageCLASS MF8350Cdn | Color imageCLASS MF8350Cdn/MF8050Cn Basic Ope - Page 105
for the System Settings" (→P.6-26) 4 Select with [ press [OK]. Fax Settings Basic Settings Send Settings Receive Settings Fax Setup Guide ] or [ ], and then Setting procedure for Sending Specify the settings for sending using the following procedure. This section describes the - Canon Color imageCLASS MF8350Cdn | Color imageCLASS MF8350Cdn/MF8050Cn Basic Ope - Page 106
registered is printed on the recipient's paper. Fax/Telephone Number (FAX No.) P.001/006 Sender Name (User name) CANON Offhook Alarm Specifies whether the ON or pressing [ ] (Reset). How to display the settings take time to send documents if a problem occurs with the telephone line. On Fax - Canon Color imageCLASS MF8350Cdn | Color imageCLASS MF8350Cdn/MF8050Cn Basic Ope - Page 107
: Off, On Does not redial automatically. When redialing manually, see "Redialing (Manual Redialing)" (→P.6-6). Specifies the number of times for redialing. press [OK]. Fax Settings Basic Settings Send Settings Receive Settings Fax Setup Guide ] or [ ], and 5 Select with [ then - Canon Color imageCLASS MF8350Cdn | Color imageCLASS MF8350Cdn/MF8050Cn Basic Ope - Page 108
. Send/Receive Settings "2-Sided Printing (MF8350Cdn Only)" (→ P.6-24) Common Settings paper. Prints on both sides of paper. You can specify whether printing of a document being received is continued when a toner cartridge needs to be replaced soon. IMPORTANT When - Canon Color imageCLASS MF8350Cdn | Color imageCLASS MF8350Cdn/MF8050Cn Basic Ope - Page 109
and recipient's machine are enabled. Manual/Auto Switch You can configure the It may take time to receive documents if a problem occurs with the telephone line. How to display the Settings> with [ then press [OK]. Menu Printer Settings Timer Settings Adjustment/Cleaning System Settings 3 - Canon Color imageCLASS MF8350Cdn | Color imageCLASS MF8350Cdn/MF8050Cn Basic Ope - Page 110
P.6-27) "Restrict New Destinations" (→P.6-27) "Allow Driver Faxing" (→ P.6-27) "Restrict Sending from History" (Boldface: Default settings) UnitedStates (US), Canada (CA), Brazil (BR), Mexico (MX), not need them, you can delete them, saving paper to be used. How to display the settings [ - Canon Color imageCLASS MF8350Cdn | Color imageCLASS MF8350Cdn/MF8050Cn Basic Ope - Page 111
settings) Off On A fax cannot be sent from the fax driver. A fax can be sent from the fax driver. On Print Report: Off, On Memory Lock Time: Do New Destinations Restrict the destinations that can be specified to alreadyregistered one-touch keys or coded dial codes. You cannot perform the following - Canon Color imageCLASS MF8350Cdn | Color imageCLASS MF8350Cdn/MF8050Cn Basic Ope - Page 112
Using the Fax Functions 6-28 - Canon Color imageCLASS MF8350Cdn | Color imageCLASS MF8350Cdn/MF8050Cn Basic Ope - Page 113
Functions The documents scanned by the machine can be stored in a computer or a USB memory. * If you are a Macintosh user, see the Scanner Driver Guide. 7 Basic Operation Methods for Scanning Scanning Documents and Saving Them in a Computer (USB & Network Connection) Saving Scanned Documents in - Canon Color imageCLASS MF8350Cdn | Color imageCLASS MF8350Cdn/MF8050Cn Basic Ope - Page 114
To scan documents by operating a computer See "Scan" in the e-Manual. Keys to be used for this operation SCAN Specify destination. EXAMPLE1 EXAMPLE2 Remote Scanner Memory Media Specify destination. Scan: Press OK Color:Scan-1 Compa Color:Scan-2 JPEG B&W:Scan-3 TIFF Scanning operation starts, - Canon Color imageCLASS MF8350Cdn | Color imageCLASS MF8350Cdn/MF8050Cn Basic Ope - Page 115
in the [My Pictures] folder in [My Documents]. (For Windows Vista/7, the folder is created in the [Pictures] folder.) Connect computer. For more details, see "Scan" in the e-Manual. 2 Place documents on the platen glass or load them supported as the file type to save. For more details, see "Scan" - Canon Color imageCLASS MF8350Cdn | Color imageCLASS MF8350Cdn/MF8050Cn Basic Ope - Page 116
see "Scan" in the e-Manual. • Scanning size • Density • Original orientation • Original type • Sharpness • Data Size (Color Only) The settings specified press [OK]. ] or [ ], For Color Scan For Black and White Scan Device Status Paper Information Toner Gauge Remove Memory Media Check Counter (4) - Canon Color imageCLASS MF8350Cdn | Color imageCLASS MF8350Cdn/MF8050Cn Basic Ope - Page 117
a Message Appears Replacing Toner Cartridges Precautions when Replacing Toner Cartridges 8-5 8-5 8-5 8-6 8-6 8-7 8-7 8-8 Purchase Consumables 8-9 Recycling Used Cartridges The Clean Earth Campaign U.S.A. PROGRAM Packaging Shipping 8-10 8-10 8-10 8-10 8-11 CANADA PROGRAM-CANADA PROGRAMME 8-12 - Canon Color imageCLASS MF8350Cdn | Color imageCLASS MF8350Cdn/MF8050Cn Basic Ope - Page 118
paper • When a toner cartridge printer is completely dry, connect the power cord, and then turn ON the power. Make sure that paper is loaded, and then press [OK]. Load the paper indicated in the display. Cleaning starts. It takes approx. 68 seconds for MF8350Cdn and approx. 74 seconds for MF8050Cn - Canon Color imageCLASS MF8350Cdn | Color imageCLASS MF8350Cdn/MF8050Cn Basic Ope - Page 119
to select , and then press [OK]. Menu Send/Receive Settin...Printer Settings Timer Settings Adjustment/Cleaning 2 Maintenance Clean the platen glass and the under surface 51 seconds for MF8350Cdn and approx. 83 seconds for MF8050Cn. 3 Close the feeder. Clean ITB Start 8-3 - Canon Color imageCLASS MF8350Cdn | Color imageCLASS MF8350Cdn/MF8050Cn Basic Ope - Page 120
roller. Clean the roller using blank paper. 4 Load 10 sheets of A4 or Letter size plain paper in the feeder, and then press to select , and then press [OK]. Menu Send/Receive Settin...Printer Settings Timer Settings Adjustment/Cleaning Press [ ] (Menu) to close the menu - Canon Color imageCLASS MF8350Cdn | Color imageCLASS MF8350Cdn/MF8050Cn Basic Ope - Page 121
cartridge yield for color printers and multifunction devices that contain printer components" issued by ISO (International Organization for Standardization). *2 The life of the toner cartridges is affected by the following conditions. Spaced printing Paper size and paper type settings MF8350Cdn - Canon Color imageCLASS MF8350Cdn | Color imageCLASS MF8350Cdn/MF8050Cn Basic Ope - Page 122
Black, yellow, magenta, or cyan will appear in . (More than one color may appear.) For details on the solution, see "Troubleshooting" in the e-Manual. * Even if or is displayed, the message may appear in the display. Do not disassemble - Canon Color imageCLASS MF8350Cdn | Color imageCLASS MF8350Cdn/MF8050Cn Basic Ope - Page 123
amount of data. 2 Press the lever and pull out the toner cartridge tray. MF8350Cdn (1) Prepare * toner cartridge. When a toner cartridge soon needs to be replaced. Check * toner cartridge. Toner cartridges with print quality that cannot be guaranteed due to their - Canon Color imageCLASS MF8350Cdn | Color imageCLASS MF8350Cdn/MF8050Cn Basic Ope - Page 124
front cover (1) Make sure that the toner cartridge tray is closed. Do not try to forcefully close the front cover, as this may damage the machine. 2) Precautions when Replacing Toner Cartridges See "Maintenance and Inspections" (→P.viii) in "Important Safety Instructions" as well. WARNING Do not - Canon Color imageCLASS MF8350Cdn | Color imageCLASS MF8350Cdn/MF8050Cn Basic Ope - Page 125
For optimum print quality, replacement is recommended using genuine Canon toner cartridges. Model name MF8350Cdn Supported Canon genuine toner cartridge • If any tape remains in the toner cartridge, this may result in poor print quality. Disposing of the removed sealing tape Dispose of the - Canon Color imageCLASS MF8350Cdn | Color imageCLASS MF8350Cdn/MF8050Cn Basic Ope - Page 126
. Becoming a part of this worthwhile program is easy. When your cartridge is of no further use, simply follow the instructions detailed for U.S. or Canadian residents. We appreciate your support of The Canon Cartridge Recycling Program. Working together we can make a significant contribution to - Canon Color imageCLASS MF8350Cdn | Color imageCLASS MF8350Cdn/MF8050Cn Basic Ope - Page 127
mail service with the U.S. Postal Service. Please call 1-800-OK-Canon to receive U.S. Postal Service merchandise returning label. • Give the shipment to your UPS driver when you receive your next regular delivery; (UPS may charge a fee for customers who call UPS to pick up a cartridge shipment - Canon Color imageCLASS MF8350Cdn | Color imageCLASS MF8350Cdn/MF8050Cn Basic Ope - Page 128
and pulp mould end-blocks from the new cartridge's box. • Place the empty cartridge in the box of your new cartridge. Seal the box. • Apply the Canon Canada Inc./Canada Post label provided in this brochure. Canon's labels are specially marked so that Canon pays the postage. • Deposit your empty - Canon Color imageCLASS MF8350Cdn | Color imageCLASS MF8350Cdn/MF8050Cn Basic Ope - Page 129
paper cassette. Hold the paper cassette with both hands. 1 Turn the power OFF, then disconnect the cables and cord from the machine. MF8350Cdn machine so it can be carried safely. "Main Specifications" (→P.11-2) MF8350Cdn MF8050Cn (3) (4) (2) Maintenance (5) (6) (1) How to remove the cables - Canon Color imageCLASS MF8350Cdn | Color imageCLASS MF8350Cdn/MF8050Cn Basic Ope - Page 130
MF8050Cn carefully at the new installation site. Insert the paper cassette into the machine. Push it into the following. • Remove the toner cartridges • Securely pack the printer in the original box with tray open Make sure that the front cover and multi-purpose tray are closed before carrying the - Canon Color imageCLASS MF8350Cdn | Color imageCLASS MF8350Cdn/MF8050Cn Basic Ope - Page 131
Chapter Troubleshooting This section describes solutions for cases such as paper jam and when problems are not solved. 9 Clearing Jams Document Jams in the Feeder Paper Jams in the Paper Cassette (Cassette 1 or 2) Paper Jams in the Multi-purpose Tray (MF8350Cdn Only) Paper Jams in the Manual Feed - Canon Color imageCLASS MF8350Cdn | Color imageCLASS MF8350Cdn/MF8050Cn Basic Ope - Page 132
, remove the jammed document or paper. "Document Jams in the Feeder" (→P.9-2) "Paper Jams in the Paper Cassette (Cassette 1 or 2)" (→P.9-3) "Paper Jams in the Multi-purpose Tray (MF8350Cdn Only)" (→ P.9-4) "Paper Jams in the Manual Feed Slot (MF8050Cn Only)" (→ P.9-5) "Paper Jams in the Rear Cover - Canon Color imageCLASS MF8350Cdn | Color imageCLASS MF8350Cdn/MF8050Cn Basic Ope - Page 133
2 (optional) can be used only for MF8350Cdn. Keys to be used for this operation Troubleshooting 4 5 Insert the paper cassette into the machine. If the optional paper cassette (Cassette 2) is installed in MF8350Cdn, close the optional paper cassette also. When the following screen appears - Canon Color imageCLASS MF8350Cdn | Color imageCLASS MF8350Cdn/MF8050Cn Basic Ope - Page 134
Lower the manual feed transport guide. (1) Hold the tabs (A) on both sides. (2) Push them down. 2 Remove the paper by pulling it gently. (A) IMPORTANT Do not touch the rubber pad (A) Touching it may result in deterioration in print quality. Troubleshooting If the jammed paper cannot be removed - Canon Color imageCLASS MF8350Cdn | Color imageCLASS MF8350Cdn/MF8050Cn Basic Ope - Page 135
? Yes No 2 Pull out the paper cassette. Hold the paper cassette with both hands. Troubleshooting NOTE If the jammed paper cannot be removed in Step 6 See "Paper Jams in the Rear Cover or Duplex Unit (MF8350Cdn Only)" (→P.9-6) and remove the paper. 3 Open the manual feed slot cover. 9-5 - Canon Color imageCLASS MF8350Cdn | Color imageCLASS MF8350Cdn/MF8050Cn Basic Ope - Page 136
to be used for this operation (A) 5 Remove the paper by pulling it gently. 1 6 Return the manual feed transport guide to its original position. Press [ ]. Paper jam. Press [ ] to display steps. 2 7 Troubleshooting Close the manual feed slot cover. Open the rear cover. (1) (2) 3 8 9 Insert - Canon Color imageCLASS MF8350Cdn | Color imageCLASS MF8350Cdn/MF8050Cn Basic Ope - Page 137
[ ] to display steps. 6 Holding the tabs (A) on both sides, close the duplex unit. Close the guide firmly until it clicks. 2 (A) Open the front cover. Troubleshooting (A) 7 Remove the paper by pulling it gently. 3 Lift the scanning platform. 4 8 Close the rear cover. The machine is ready - Canon Color imageCLASS MF8350Cdn | Color imageCLASS MF8350Cdn/MF8050Cn Basic Ope - Page 138
to be used for this operation (1) (2) 6 Remove the paper by pulling it gently. 1 Press [ ]. Paper jam. Press [ ] to display steps. 7 Close the rear cover. The machine is ready to print. 2 Troubleshooting Lift the scanning platform. 3 Remove the paper by pulling it gently. 4 Lower the - Canon Color imageCLASS MF8350Cdn | Color imageCLASS MF8350Cdn/MF8050Cn Basic Ope - Page 139
and solve the problem. e-Manual → Troubleshooting → Display Messages Error 's machine has run out of paper. Ask the recipient to make sure that paper is loaded in their machine. one-touch key, change the settings for international sending in the detailed setting screen. Troubleshooting #012 9-9 - Canon Color imageCLASS MF8350Cdn | Color imageCLASS MF8350Cdn/MF8050Cn Basic Ope - Page 140
which is not for the machine. Print the data again from the printer driver for the machine. Printing cannot be performed because print data is broken. Repeat the operation. A process problem in the printer has occurred, and the machine does not operate properly Turn OFF the main power switch, wait - Canon Color imageCLASS MF8350Cdn | Color imageCLASS MF8350Cdn/MF8050Cn Basic Ope - Page 141
in the menu. Printing from the multi-purpose tray/manual feed slot When is set to for the multi-purpose tray, load paper in the multi-purpose tray/manual feed slot, and then specify the size of the loaded paper correctly. 9-11 Troubleshooting - Canon Color imageCLASS MF8350Cdn | Color imageCLASS MF8350Cdn/MF8050Cn Basic Ope - Page 142
panel to cancel the Sleep mode. If there is no problem Troubleshooting Is the Error indicator on or blinking? Make sure that paper is loaded properly in the paper cassette or multi-purpose tray. "Loading Paper" (→P.2-9) Check if paper is jammed. "Clearing Jams" (→P.9-2) Turn OFF the main power - Canon Color imageCLASS MF8350Cdn | Color imageCLASS MF8350Cdn/MF8050Cn Basic Ope - Page 143
" (→P.6-18) Check if there is a device nearby that interferes with signal reception (e.g., microwave oven). This may affect the telephone line status. If You Cannot Solve a Problem If You Cannot Solve a Problem See "Troubleshooting" in the e-Manual, then solve the problem. Troubleshooting 9-13 - Canon Color imageCLASS MF8350Cdn | Color imageCLASS MF8350Cdn/MF8050Cn Basic Ope - Page 144
battery after the machine is turned ON. If the built-in battery is not charged enough, data may not be saved properly in the memory. Troubleshooting 9-14 - Canon Color imageCLASS MF8350Cdn | Color imageCLASS MF8350Cdn/MF8050Cn Basic Ope - Page 145
8:00 A.M. to 8:00 P.M. EST. On-line support is also available 24 hours a day at the website http://www.canontechsupport.com. Please have the following information ready when you contact Canon: • Product name (Color imageCLASS MF8350Cdn/MF8050Cn) • Serial number (a character string which consists of - Canon Color imageCLASS MF8350Cdn | Color imageCLASS MF8350Cdn/MF8050Cn Basic Ope - Page 146
above or via the website at http://www.canon.ca/ * Support program specifics are subject to change without notice. Please have the following information ready when you contact Canon: • Product name (Color imageCLASS MF8350Cdn/MF8050Cn) • Serial number (a character string which consists of three - Canon Color imageCLASS MF8350Cdn | Color imageCLASS MF8350Cdn/MF8050Cn Basic Ope - Page 147
Chapter 10 Registering/Setting the Various Functions You can set or change machine functions from the setting menu according to your purpose. Setting Menu List Printing a User Data List Contents of the Setting Menu 10-2 10-2 10-2 10-1 - Canon Color imageCLASS MF8350Cdn | Color imageCLASS MF8350Cdn/MF8050Cn Basic Ope - Page 148
with [ press [OK]. ] or [ ], and then Report Make sure that the paper is loaded, and then press [OK]. Load the paper indicated in the display. Supported paper: in MF8350Cdn. Back Returns to the previous hierarchy. Cancels the setting and returns to the initial screen. Reset 10-2 - Canon Color imageCLASS MF8350Cdn | Color imageCLASS MF8350Cdn/MF8050Cn Basic Ope - Page 149
No. Group Name Destination One-Touch Dial Fax Enter Registration Paper/Settings Invert Screen Colors CD-ROM 1 Press [Select Paper/Settings]. 2 The paper selection screen is displayed. 3 Press [ ] to select [Paper Settings], and then press [OK]. Screen After Auto Reset - Canon Color imageCLASS MF8350Cdn | Color imageCLASS MF8350Cdn/MF8050Cn Basic Ope - Page 150
Printer Drawer 1 Off On Drawer 2* Off On Fax Multi-Purpose Tray Off On Drawer 1 Off On Drawer 2* Off On Other Multi-Purpose Tray Off On Drawer 1 Off On Drawer 2* Off On Paper Feed Method Switch Multi-Purpose Tray (seconds) Slow, Normal, Fast Auto Manual Remote Receiving Incoming Ring P.6-25 Off On - Canon Color imageCLASS MF8350Cdn | Color imageCLASS MF8350Cdn/MF8050Cn Basic Ope - Page 151
Settings Auto Obtain IP Address Subnet Mask Correct Color Mismatch when turned ON Off On Correct Print Color Mismatch Black Text Processing for Color Feeder Document Glass Special Processing Special Paper Processing Manual 2-Sided Settings Multi-Purpose Tray CD-ROM CD-ROM -3 to 0 to +3 -3 to - Canon Color imageCLASS MF8350Cdn | Color imageCLASS MF8350Cdn/MF8050Cn Basic Ope - Page 152
Driver Printer Management Infomation from Host Off On Enable Dedicated Port Off On Startup Settings Ethernet Driver Settings Auto Detect Off - Communication Mode: Half Duplex, Full Duplex - Ethernet Type: 10 Base-T, 100 Base-TX On MAC Canada One-Touch Store Images in Memory Continues to the upper - Canon Color imageCLASS MF8350Cdn | Color imageCLASS MF8350Cdn/MF8050Cn Basic Ope - Page 153
Chapter Appendix 11 Main Specifications Machine Specifications Copy Specifications Printer Specification Scanner Specifications Fax Specifications Telephone Specifications Cassette Feeding Unit-V1 (optional) (MF8350Cdn Only) 11-2 11-2 11-2 11-2 11-3 11-3 11-3 11-3 Index 11-4 11-1 - Canon Color imageCLASS MF8350Cdn | Color imageCLASS MF8350Cdn/MF8050Cn Basic Ope - Page 154
to 90 g/m2))* • MF8350Cdn Color: 21 ppm B/W: 21 ppm • MF8050Cn Color: 8 ppm B/W: 12 ppm 600 dpi x 600 dpi 256 gradations "Replacing Toner Cartridges " (→P.8-5) Dimensions (W x L x H) Paper Capacity Appendix Installation Space (W x L) Output Tray Capacity (Letter size paper which has been just - Canon Color imageCLASS MF8350Cdn | Color imageCLASS MF8350Cdn/MF8050Cn Basic Ope - Page 155
g/m2)) "Paper Requirements" (→P.2-6) From main unit 17 1/8" x 17 7/8" x 4 7/8" (435 mm x 455 mm x 124 mm) Approx. 8.8 lb (4 kg) Scanning Speed (300 x 600 dpi)* Host Interface Operating System Driver Windows 2000/XP/Vista/7 • TWAIN • WIA 1.0 (Windows XP/Vista/7) • WIA 2.0 (Windows Vista/7) * The - Canon Color imageCLASS MF8350Cdn | Color imageCLASS MF8350Cdn/MF8050Cn Basic Ope - Page 156
Copy Mode ...1-9 Copyright ...xiii Display ...1-9 Display Messages...9-9 LCD (Standby Mode) ...1-9 Document delivery tray ...1-2 Document feeder tray ...1-2 Document guides...1-2 Documents Clearing Jams ...9-2 Placing ...2-4 Receiving Faxes ...6-10 Requirements ...2-2 Scanning Range ...2-2 Sending - Canon Color imageCLASS MF8350Cdn | Color imageCLASS MF8350Cdn/MF8050Cn Basic Ope - Page 157
-2 Printer Specification ...11-2 Scanner Specifications ...11-3 Telephone Specifications...11-3 Maintenance and Inspections ...viii, xii Manual feed transport guide ...1-2 Manual Sending ...6-7 Multi-purpose Tray (Manual Feed Slot) 1-2, 1-5 Paper guide ...1-5 The auxiliary tray ...1-5 Tray extension - Canon Color imageCLASS MF8350Cdn | Color imageCLASS MF8350Cdn/MF8050Cn Basic Ope - Page 158
Toner cartridge slot ...1-4 Toner cartridge tray ...1-4 Trademarks ...xiii Transporting the Machine...8-13 Tray extension ...1-2 Troubleshooting ...9-1 Clearing Jams ...9-2 Error Code ...9-9 If Appears...9-11 If a Power Failure Occurs ...9-14 If You Cannot Solve a Problem - Canon Color imageCLASS MF8350Cdn | Color imageCLASS MF8350Cdn/MF8050Cn Basic Ope - Page 159
, Dongcheng District, Beijing 100005, PRC CANON SINGAPORE PTE LTD 1 HarbourFront Avenue, #04-01 Keppel Bay Tower, Singapore 098632 CANON AUSTRALIA PTY LTD 1 Thomas Holt Drive, North Ryde, Sydney NSW 2113, Australia CANON GLOBAL WORLDWIDE SITES http://www.canon.com/ FT5-2612 (030) XXXXXXXXXX
-
 1
1 -
 2
2 -
 3
3 -
 4
4 -
 5
5 -
 6
6 -
 7
7 -
8
-
9
-
10
-
11
-
12
-
13
-
14
-
15
-
16
-
17
-
18
-
19
-
20
-
21
-
22
-
23
-
24
-
25
-
26
-
27
-
28
-
29
-
30
-
31
-
32
-
33
-
34
-
35
-
36
-
37
-
38
-
39
-
40
-
41
-
42
-
43
-
44
-
45
-
46
-
47
-
48
-
49
-
50
-
51
-
52
-
53
-
54
-
55
-
56
-
57
-
58
-
59
-
60
-
61
-
62
-
63
-
64
-
65
-
66
-
67
-
68
-
69
-
70
-
71
-
72
-
73
-
74
-
75
-
76
-
77
-
78
-
79
-
80
-
81
-
82
-
83
-
84
-
85
-
86
-
87
-
88
-
89
-
90
-
91
-
92
-
93
-
94
-
95
-
96
-
97
-
98
-
99
-
100
-
101
-
102
-
103
-
104
-
105
-
106
-
107
-
108
-
109
-
110
-
111
-
112
-
113
-
114
-
115
-
116
-
117
-
118
-
119
-
120
-
121
-
122
-
123
-
124
-
125
-
126
-
127
-
128
-
129
-
130
-
131
-
132
-
133
-
134
-
135
-
136
-
137
-
138
-
139
-
140
-
141
-
142
-
143
-
144
-
145
-
146
-
147
-
148
-
149
-
150
-
151
-
152
-
153
-
154
-
155
-
156
-
157
-
158
-
159
 |
 |
Quick View- Perform Useful Tasks
Next
Page
Before Using the Machine
P.1-1
1
Document and Paper Handling
P.2-1
2
Copying
P.3-1
3
Printing from a Computer
P.4-1
4
Registering Destinations
in the Address Book
P.5-1
5
Using the Fax Functions
P.6-1
6
Using the Scan Functions
P.7-1
7
Maintenance
P.8-1
8
Troubleshooting
P.9-1
9
Registering/
Setting the Various Functions
P.
10
-1
10
Appendix
P.
11
-1
11
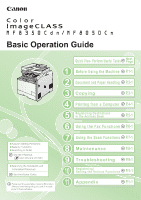
Basic Operation Guide
Please read this guide before operating this product.
After you finish reading this guide, store it in a safe
place for future reference.
Network Setting Procedure
Security Functions
Searching the Installation and
Connection Procedure
See the Starter Guide.
See the e-Manual.
User Software CD-ROM
Searching in Detail