Canon Color imageCLASS MF8350Cdn Color imageCLASS MF8350Cdn/MF8050Cn Basic Ope - Page 114
Canon Color imageCLASS MF8350Cdn Manual
 |
View all Canon Color imageCLASS MF8350Cdn manuals
Add to My Manuals
Save this manual to your list of manuals |
Page 114 highlights
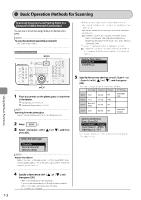
Basic Operation Methods for Scanning Scanning Documents and Saving Them in a Computer (USB & Network Connection) You can scan a document using the keys on the operation panel. • If eleven or more computers are connected via a network The eleventh and subsequent computers are not displayed (you cannot scan). Reduce the number of computers connected to this machine via a network. e-Manual → Scan → Scanning Documents and Saving Them in a Computer (USB & Network Connection) → Registering the Scanner in MF Network Scan Utility (Network Connection Only) * You can change the names for the displayed computers. e-Manual → Scan → Scanning Documents and Saving Them in a Computer (USB & Network Connection) → Using the MF Toolbox NOTE To scan documents by operating a computer See "Scan" in the e-Manual. Keys to be used for this operation SCAN Specify destination. EXAMPLE1 EXAMPLE2 5 OK Specify the scanner settings (any of to ] or [ ], and then press ) with [ [OK]. The scanner settings are specified by default as follows. Scan Mode Resolution 300 dpi 300 dpi 300 dpi File Type PDF JPEG TIFF PDF Settings Searchable/ High Searchable/ Standard 1 Place documents on the platen glass or load them in the feeder. "Placing Documents" (→P.2-4) "Documents Requirements" (→P.2-2) Scan-1 Scan-2 Scan-3 Color Color Black and White Color Using the Scan Functions NOTE Scanning from the platen glass You cannot scan multiple documents from the platen glass. Scan-4 300 dpi PDF 2 3 Press [ ]. ] or [ ], and then Select with [ press [OK]. Select the scan type. Computer Remote Scanner Memory Media Specify destination. Scan: Press OK Color:Scan-1 Compa Color:Scan-2 JPEG B&W:Scan-3 TIFF Scanning operation starts, and the scan mode screen reappears after saving the data. NOTE About Select in the above screen, and then press [OK]. The fax sending screen appears. (This is the same state as where [FAX] on the operation panel is pressed.) 4 Specify a destination with [ then press [OK]. ] or [ ], and • When multiple computers are connected The computer connected by a USB cable is listed on the top. • When a computer is connected by a USB cable This screen is not displayed. 7-2
-
 1
1 -
2
-
3
-
4
-
5
-
6
-
7
-
8
-
9
-
10
-
11
-
12
-
13
-
14
-
15
-
16
-
17
-
18
-
19
-
20
-
21
-
22
-
23
-
24
-
25
-
26
-
27
-
28
-
29
-
30
-
31
-
32
-
33
-
34
-
35
-
36
-
37
-
38
-
39
-
40
-
41
-
42
-
43
-
44
-
45
-
46
-
47
-
48
-
49
-
50
-
51
-
52
-
53
-
54
-
55
-
56
-
57
-
58
-
59
-
60
-
61
-
62
-
63
-
64
-
65
-
66
-
67
-
68
-
69
-
70
-
71
-
72
-
73
-
74
-
75
-
76
-
77
-
78
-
79
-
80
-
81
-
82
-
83
-
84
-
85
-
86
-
87
-
88
-
89
-
90
-
91
-
92
-
93
-
94
-
95
-
96
-
97
-
98
-
99
-
100
-
101
-
102
-
103
-
104
-
105
-
106
-
107
-
108
-
 109
109 -
 110
110 -
 111
111 -
 112
112 -
 113
113 -
 114
114 -
 115
115 -
 116
116 -
 117
117 -
 118
118 -
 119
119 -
120
-
121
-
122
-
123
-
124
-
125
-
126
-
127
-
128
-
129
-
130
-
131
-
132
-
133
-
134
-
135
-
136
-
137
-
138
-
139
-
140
-
141
-
142
-
143
-
144
-
145
-
146
-
147
-
148
-
149
-
150
-
151
-
152
-
153
-
154
-
155
-
156
-
157
-
158
-
159
 |
 |
