Canon Color imageCLASS MF8350Cdn Color imageCLASS MF8350Cdn/MF8050Cn Basic Ope - Page 148
Canon Color imageCLASS MF8350Cdn Manual
 |
View all Canon Color imageCLASS MF8350Cdn manuals
Add to My Manuals
Save this manual to your list of manuals |
Page 148 highlights
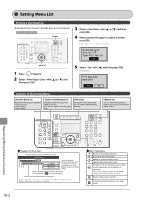
Setting Menu List Printing a User Data List To see the contents of current settings, print out user's data list. Keys to be used for this operation 3 4 [Select with [ press [OK]. ] or [ ], and then Report Make sure that the paper is loaded, and then press [OK]. Load the paper indicated in the display. Supported paper: Size: A4, LTR Type: P1/2, Rec, Clr OK OK 5 ] or [ ], and Select with [ Printing starts. ], and then press [OK]. 1 2 Press [ ] (Report). Print user data report list? Yes No Select with [ then press [OK]. Contents of the Setting Menu [Address Book] key Register the following types of destination. - One-touch keys - Coded dialing - Group dialing [Select Paper/Settings] key Register the size and type of the paper to be used. You can also register a custom paper size. [Menu] key Configure the machine settings. You can perform adjustment and cleaning. [Report] key You can specify the settings for various report output conditions and output a report. Registering/Setting the Various Functions Viewing the Route Map This area represents the first hierarchy in the menu. Menu Operations Returns to the previous hierarchy. Proceeds to the next hierarchy. This area represents hierarchies for "setting values." The setting values with the gray background or of the boldface represents the default settings. Timer Settings Time&Date Settings Date Display Type P.1-12 Selects an upper item/setting value. Selects a lower item/setting value. OK YYYY MM/DD MM/DD/YYYY DD/MM YYYY Proceeds to the next hierarchy. Also, a setting value is determined, and an operation is performed. * When appears in the screen, you need to select and press [OK] after specifying the setting. These represents reference areas in this manual. For the items with the icon, see the e-Manual. This area represents hierarchies for "setting item." - Settings or values with " * " mark may not appear depending on the availability of the optional accessories. - Settings or values with " " mark appear only in MF8350Cdn. Back Returns to the previous hierarchy. Cancels the setting and returns to the initial screen. Reset 10-2
-
 1
1 -
2
-
3
-
4
-
5
-
6
-
7
-
8
-
9
-
10
-
11
-
12
-
13
-
14
-
15
-
16
-
17
-
18
-
19
-
20
-
21
-
22
-
23
-
24
-
25
-
26
-
27
-
28
-
29
-
30
-
31
-
32
-
33
-
34
-
35
-
36
-
37
-
38
-
39
-
40
-
41
-
42
-
43
-
44
-
45
-
46
-
47
-
48
-
49
-
50
-
51
-
52
-
53
-
54
-
55
-
56
-
57
-
58
-
59
-
60
-
61
-
62
-
63
-
64
-
65
-
66
-
67
-
68
-
69
-
70
-
71
-
72
-
73
-
74
-
75
-
76
-
77
-
78
-
79
-
80
-
81
-
82
-
83
-
84
-
85
-
86
-
87
-
88
-
89
-
90
-
91
-
92
-
93
-
94
-
95
-
96
-
97
-
98
-
99
-
100
-
101
-
102
-
103
-
104
-
105
-
106
-
107
-
108
-
109
-
110
-
111
-
112
-
113
-
114
-
115
-
116
-
117
-
118
-
119
-
120
-
121
-
122
-
123
-
124
-
125
-
126
-
127
-
128
-
129
-
130
-
131
-
132
-
133
-
134
-
135
-
136
-
137
-
138
-
139
-
140
-
141
-
142
-
 143
143 -
 144
144 -
 145
145 -
 146
146 -
 147
147 -
 148
148 -
 149
149 -
 150
150 -
 151
151 -
 152
152 -
 153
153 -
154
-
155
-
156
-
157
-
158
-
159
 |
 |
