Canon MX310 MX310 series Quick Start Guide - Page 40
Entering the Date and Time, Registering Your Fax/Telephone Number and Name Sender, Information - install
 |
UPC - 013803081282
View all Canon MX310 manuals
Add to My Manuals
Save this manual to your list of manuals |
Page 40 highlights
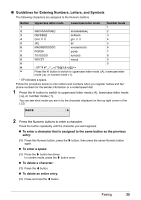
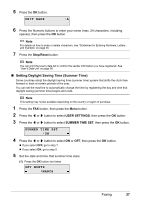
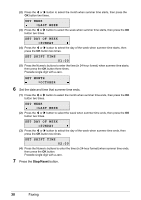
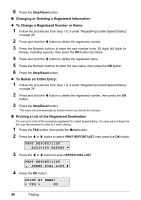
„ Entering the Date and Time Note z When the machine is connected to a computer with the MP Drivers installed, the date and time setting will be copied from the computer to the machine. As long as the date and time is set accurately on your computer, you do not need to set it on the machine. z If you disconnect the power cord or when there is a power failure, the date and time setting on the machine will be reset. When you connect the machine to a computer with the MP Drivers installed, the setting will be copied to the machine once again. 1 Press the FAX button, then press the Menu button. 2 Press the [ or ] button to select USER SETTINGS, then press the OK button two times. DATE/TIME SETTING 02/15/2007 18:46 3 Press the Numeric buttons to enter the date and time (in 24-hour format), then press the OK button. Enter only the last two digits of the year. Note z If you misentered the date and time, press the [ or ] button to move the cursor under the number to enter the correct number. z Three formats of date are available. For details on the date format settings, refer to "DATE DISPLAY" in "FAX SETTINGS" of the User's Guide on-screen manual. 4 Press the Stop/Reset button. „ Registering Your Fax/Telephone Number and Name (Sender Information) 1 Press the FAX button, then press the Menu button. 2 Press the [ or ] button to select USER SETTINGS, then press the OK button. 3 Press the [ or ] button to select UNIT TEL NUMBER, then press the OK button. UNIT TEL NUMBER TEL= 4 Press the Numeric buttons to enter your fax/telephone number (max. 20 digits, including spaces), then press the OK button. To enter a plus sign (+) before the number, press the # button. USER SETTINGS UNIT NAME Note For details on how to enter or delete characters, see "Guidelines for Entering Numbers, Letters, and Symbols" on page 35. 36 Faxing
-
 1
1 -
2
-
3
-
4
-
5
-
6
-
7
-
8
-
9
-
10
-
11
-
12
-
13
-
14
-
15
-
16
-
17
-
18
-
19
-
20
-
21
-
22
-
23
-
24
-
25
-
26
-
27
-
28
-
29
-
30
-
31
-
32
-
33
-
34
-
 35
35 -
 36
36 -
 37
37 -
 38
38 -
 39
39 -
 40
40 -
 41
41 -
 42
42 -
 43
43 -
 44
44 -
 45
45 -
46
-
47
-
48
-
49
-
50
-
51
-
52
-
53
-
54
-
55
-
56
-
57
-
58
-
59
-
60
-
61
-
62
-
63
-
64
-
65
-
66
-
67
-
68
-
69
-
70
-
71
-
72
-
73
-
74
-
75
-
76
-
77
-
78
-
79
-
80
-
81
-
82
-
83
-
84
-
85
-
86
-
87
-
88
-
89
-
90
-
91
-
92
-
93
-
94
-
95
-
96
-
97
-
98
-
99
-
100
-
101
-
102
-
103
-
104
-
105
-
106
-
107
-
108
-
109
-
110
-
111
-
112
-
113
-
114
-
115
-
116
-
117
-
118
-
119
-
120
-
121
-
122
-
123
-
124
 |
 |
