Canon PIXMA MP520 MP520 series Quick Start Guide - Page 18
Important, Paper Feed Switch, Rear Tray - driver windows 7
 |
View all Canon PIXMA MP520 manuals
Add to My Manuals
Save this manual to your list of manuals |
Page 18 highlights
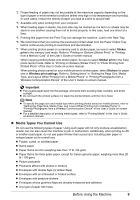
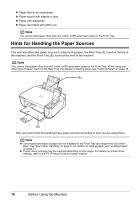
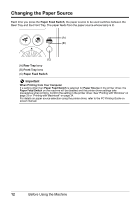
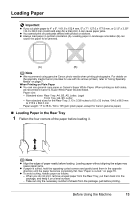
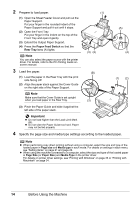
2 Prepare to load paper. (1) Open the Sheet Feeder Cover and pull out the Paper Support. Put your finger in the rounded indent of the Paper Support and pull it out until it stops. (2) Open the Front Tray. Put your finger in the indent on the top of the Front Tray and open it gently. (3) Extend the Output Paper Support. (4) Press the Paper Feed Switch so that the Rear Tray lamp (A) lights. Note You can also select the paper source with the printer driver. For details, refer to the PC Printing Guide onscreen manual. 3 Load the paper. (1) Load the paper in the Rear Tray with the print side facing UP. (2) Align the paper stack against the Cover Guide on the right side of the Paper Support. (1) (3) (2) (B) (A) (4) (1) (2) Note Make sure that the Cover Guide is set upright when you load paper in the Rear Tray. (3) (3) Pinch the Paper Guide and slide it against the left side of the paper stack. Important z Do not load higher than the Load Limit Mark (B). z Do not slide the Paper Guide too hard. Paper may not be fed properly. 4 Specify the page size and media type settings according to the loaded paper. Note z When performing copy direct printing without using a computer, select the size and type of the loaded paper in Page size and Media type in each mode. For details on settings in each menu, see "Setting Items" on page 21 and page 26. z When using the machine connected to a computer, select the size and type of the loaded paper in Page Size (or Paper Size) and Media Type in the printer driver. For details on printer driver settings, see "Printing with Windows" on page 33 or "Printing with Macintosh" on page 34. 14 Before Using the Machine
-
 1
1 -
2
-
3
-
4
-
5
-
6
-
7
-
8
-
9
-
10
-
11
-
12
-
 13
13 -
 14
14 -
 15
15 -
 16
16 -
 17
17 -
 18
18 -
 19
19 -
 20
20 -
 21
21 -
 22
22 -
 23
23 -
24
-
25
-
26
-
27
-
28
-
29
-
30
-
31
-
32
-
33
-
34
-
35
-
36
-
37
-
38
-
39
-
40
-
41
-
42
-
43
-
44
-
45
-
46
-
47
-
48
-
49
-
50
-
51
-
52
-
53
-
54
-
55
-
56
-
57
-
58
-
59
-
60
-
61
-
62
-
63
-
64
-
65
-
66
-
67
-
68
-
69
-
70
-
71
-
72
-
73
-
74
-
75
-
76
-
77
-
78
-
79
-
80
-
81
-
82
-
83
-
84
-
85
-
86
-
87
-
88
-
89
-
90
-
91
-
92
-
93
-
94
-
95
-
96
-
97
-
98
-
99
-
100
-
101
-
102
-
103
-
104
-
105
-
106
-
107
-
108
 |
 |
