Canon PIXMA MP520 MP520 series Quick Start Guide - Page 29
Removing the Memory Card, Printing Photographs Saved on a Memory Card, Access, Important
 |
View all Canon PIXMA MP520 manuals
Add to My Manuals
Save this manual to your list of manuals |
Page 29 highlights
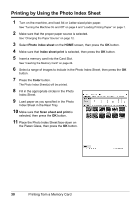
Removing the Memory Card 1 Open the Card Slot Cover. 2 Make sure that the Access lamp is lit, then remove the memory card. 3 Close the Card Slot Cover. Important The Access lamp flashes while the machine is reading or writing data from/to the memory card. Removing the memory card or turning off the machine while the Access lamp is flashing may damage the data saved on the memory card. Do not remove the memory card while the Access lamp is flashing. Printing Photographs Saved on a Memory Card 1 Prepare for printing. (1) Turn on the machine. See "Turning the Machine On and Off" on page 4. (2) Load paper. See "Loading Printing Paper" on page 7. 2 Insert the memory card. (1) Select Memory card on the HOME screen, then press the OK button. (2) Insert the memory card into the Card Slot. See "Inserting the Memory Card" on page 24. 3 Select the print menu. (1) Make sure that Select and print is selected, then press the OK button. (2) Confirm the paper source, paper size, media type, and other settings. To change the settings, select the item and press the OK button. (3) Select Next, and then press the OK button. 4 Select the photo to print and specify the number of copies for each photo. (1) Use the Easy-Scroll Wheel or the [ or ] button to display a photo to print. (2) Press the [+] or [-] button to specify the number of copies. (3) Repeat steps (1) and (2) to specify the number of copies for each photo. (4) Press the OK button. Printing from a Memory Card 25
-
 1
1 -
2
-
3
-
4
-
5
-
6
-
7
-
8
-
9
-
10
-
11
-
12
-
13
-
14
-
15
-
16
-
17
-
18
-
19
-
20
-
21
-
22
-
23
-
 24
24 -
 25
25 -
 26
26 -
 27
27 -
 28
28 -
 29
29 -
 30
30 -
 31
31 -
 32
32 -
 33
33 -
 34
34 -
35
-
36
-
37
-
38
-
39
-
40
-
41
-
42
-
43
-
44
-
45
-
46
-
47
-
48
-
49
-
50
-
51
-
52
-
53
-
54
-
55
-
56
-
57
-
58
-
59
-
60
-
61
-
62
-
63
-
64
-
65
-
66
-
67
-
68
-
69
-
70
-
71
-
72
-
73
-
74
-
75
-
76
-
77
-
78
-
79
-
80
-
81
-
82
-
83
-
84
-
85
-
86
-
87
-
88
-
89
-
90
-
91
-
92
-
93
-
94
-
95
-
96
-
97
-
98
-
99
-
100
-
101
-
102
-
103
-
104
-
105
-
106
-
107
-
108
 |
 |
