Canon PIXMA MP520 MP520 series Quick Start Guide - Page 34
Printing by Using the Photo Index Sheet
 |
View all Canon PIXMA MP520 manuals
Add to My Manuals
Save this manual to your list of manuals |
Page 34 highlights
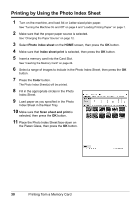
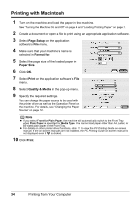
Printing by Using the Photo Index Sheet 1 Turn on the machine, and load A4 or Letter-sized plain paper. See "Turning the Machine On and Off" on page 4 and "Loading Printing Paper" on page 7. 2 Make sure that the proper paper source is selected. See "Changing the Paper Source" on page 12. 3 Select Photo index sheet on the HOME screen, then press the OK button. 4 Make sure that Index sheet print is selected, then press the OK button. 5 Insert a memory card into the Card Slot. See "Inserting the Memory Card" on page 24. 6 Select a range of images to include in the Photo Index Sheet, then press the OK button. 7 Press the Color button. The Photo Index Sheet(s) will be printed. 8 Fill in the appropriate circles in the Photo Index Sheet. 9 Load paper as you specified in the Photo Index Sheet in the Rear Tray. 10 Make sure that Scan sheet and print is selected, then press the OK button. 11 Place the Photo Index Sheet face-down on the Platen Glass, then press the OK button. 30 Printing from a Memory Card
-
 1
1 -
2
-
3
-
4
-
5
-
6
-
7
-
8
-
9
-
10
-
11
-
12
-
13
-
14
-
15
-
16
-
17
-
18
-
19
-
20
-
21
-
22
-
23
-
24
-
25
-
26
-
27
-
28
-
 29
29 -
 30
30 -
 31
31 -
 32
32 -
 33
33 -
 34
34 -
 35
35 -
 36
36 -
 37
37 -
 38
38 -
 39
39 -
40
-
41
-
42
-
43
-
44
-
45
-
46
-
47
-
48
-
49
-
50
-
51
-
52
-
53
-
54
-
55
-
56
-
57
-
58
-
59
-
60
-
61
-
62
-
63
-
64
-
65
-
66
-
67
-
68
-
69
-
70
-
71
-
72
-
73
-
74
-
75
-
76
-
77
-
78
-
79
-
80
-
81
-
82
-
83
-
84
-
85
-
86
-
87
-
88
-
89
-
90
-
91
-
92
-
93
-
94
-
95
-
96
-
97
-
98
-
99
-
100
-
101
-
102
-
103
-
104
-
105
-
106
-
107
-
108
 |
 |
