Canon PIXMA MP520 MP520 series Quick Start Guide - Page 45
Setting on the Machine, Displaying the PictBridge Settings Screen and Specifying the Settings, Default
 |
View all Canon PIXMA MP520 manuals
Add to My Manuals
Save this manual to your list of manuals |
Page 45 highlights
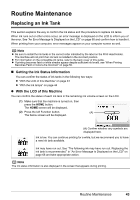
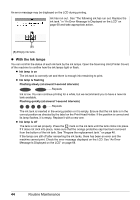
„ Setting on the Machine This section describes the PictBridge print settings on the machine. Set the print settings to Default on the PictBridge compliant device when you want to print according to the settings on the machine. z Displaying the PictBridge Settings Screen and Specifying the Settings (1) Turn on the machine. (2) Select Settings on the HOME screen, then press the OK button. (3) Select Device settings, then press the OK button. (4) Select PictBridge settings, then press the OK button. (5) Select the item to set, then press the OK button. (6) Select the item, then press the OK button. (7) Confirm the print settings, select Next and then press the OK button. (8) Select Auto image fix ON or Manual correction, then press the OK button. When Auto image fix On is selected, the scene or person's face of a shot photo is recognized and the most suitable correction for each photo is made automatically. It makes a darkened face by backlight brighter to print. It also analyzes a scene such as scenery, night scene, person, etc. and corrects each scene with the most suitable color, brightness, or contrasts automatically to print. When Manual correction is selected, repeat steps (5) and (6) and then specify each item. After finishing all settings you need, select OK and then press the OK button. You can print from the PictBridge compliant device with specified settings. Printing Photographs Directly from a PictBridge Compliant Device 41
-
 1
1 -
2
-
3
-
4
-
5
-
6
-
7
-
8
-
9
-
10
-
11
-
12
-
13
-
14
-
15
-
16
-
17
-
18
-
19
-
20
-
21
-
22
-
23
-
24
-
25
-
26
-
27
-
28
-
29
-
30
-
31
-
32
-
33
-
34
-
35
-
36
-
37
-
38
-
39
-
 40
40 -
 41
41 -
 42
42 -
 43
43 -
 44
44 -
 45
45 -
 46
46 -
 47
47 -
 48
48 -
 49
49 -
 50
50 -
51
-
52
-
53
-
54
-
55
-
56
-
57
-
58
-
59
-
60
-
61
-
62
-
63
-
64
-
65
-
66
-
67
-
68
-
69
-
70
-
71
-
72
-
73
-
74
-
75
-
76
-
77
-
78
-
79
-
80
-
81
-
82
-
83
-
84
-
85
-
86
-
87
-
88
-
89
-
90
-
91
-
92
-
93
-
94
-
95
-
96
-
97
-
98
-
99
-
100
-
101
-
102
-
103
-
104
-
105
-
106
-
107
-
108
 |
 |
