Canon PowerShot SD4000 IS PowerShot SD4000 IS / IXUS 300 HS Camera User Guide - Page 73
Changing the Recording Pixel Setting Image Size, Changing the Compression Ratio Image Quality
 |
View all Canon PowerShot SD4000 IS manuals
Add to My Manuals
Save this manual to your list of manuals |
Page 73 highlights
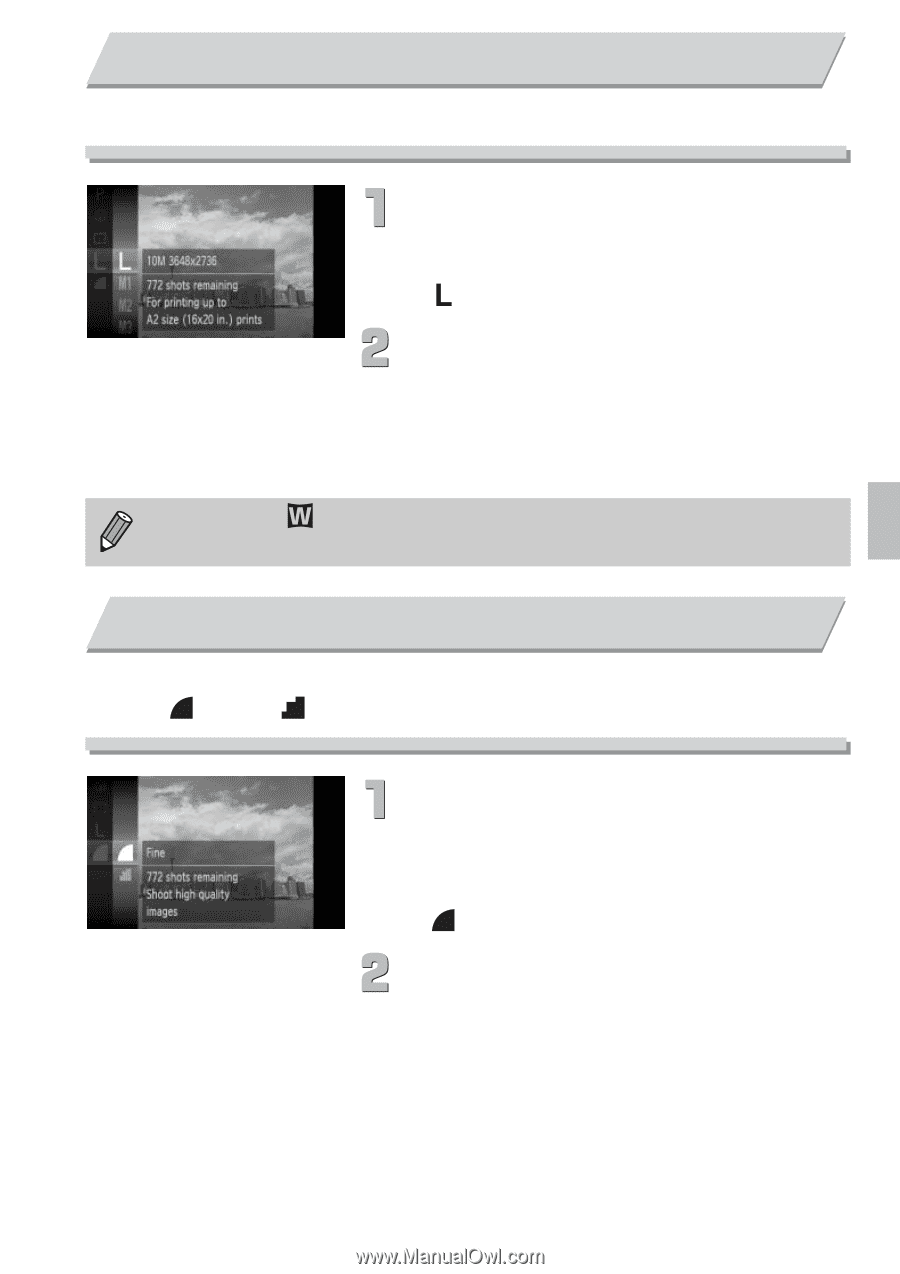
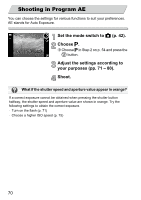
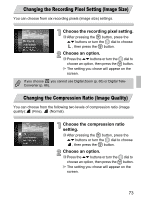
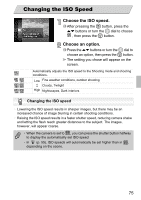
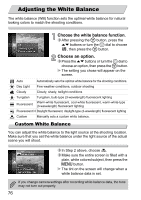
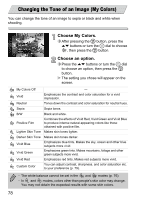
Changing the Recording Pixel Setting (Image Size) You can choose from six recording pixels (image size) settings. Choose the recording pixel setting. ∆ After pressing the m button, press the op buttons or turn the - dial to choose , then press the m button. Choose an option. ∆ Press the op buttons or turn the - dial to choose an option, then press the m button. The setting you chose will appear on the screen. If you choose you cannot use Digital Zoom (p. 65) or Digital TeleConverter (p. 66). Changing the Compression Ratio (Image Quality) You can choose from the following two levels of compression ratio (image quality): (Fine), (Normal). Choose the compression ratio setting. ∆ After pressing the m button, press the op buttons or turn the - dial to choose , then press the m button. Choose an option. ∆ Press the op buttons or turn the - dial to choose an option, then press the m button. The setting you chose will appear on the screen. 73
-
 1
1 -
2
-
3
-
4
-
5
-
6
-
7
-
8
-
9
-
10
-
11
-
12
-
13
-
14
-
15
-
16
-
17
-
18
-
19
-
20
-
21
-
22
-
23
-
24
-
25
-
26
-
27
-
28
-
29
-
30
-
31
-
32
-
33
-
34
-
35
-
36
-
37
-
38
-
39
-
40
-
41
-
42
-
43
-
44
-
45
-
46
-
47
-
48
-
49
-
50
-
51
-
52
-
53
-
54
-
55
-
56
-
57
-
58
-
59
-
60
-
61
-
62
-
63
-
64
-
65
-
66
-
67
-
 68
68 -
 69
69 -
 70
70 -
 71
71 -
 72
72 -
 73
73 -
 74
74 -
 75
75 -
 76
76 -
 77
77 -
 78
78 -
79
-
80
-
81
-
82
-
83
-
84
-
85
-
86
-
87
-
88
-
89
-
90
-
91
-
92
-
93
-
94
-
95
-
96
-
97
-
98
-
99
-
100
-
101
-
102
-
103
-
104
-
105
-
106
-
107
-
108
-
109
-
110
-
111
-
112
-
113
-
114
-
115
-
116
-
117
-
118
-
119
-
120
-
121
-
122
-
123
-
124
-
125
-
126
-
127
-
128
-
129
-
130
-
131
-
132
-
133
-
134
-
135
-
136
-
137
-
138
-
139
-
140
-
141
-
142
-
143
-
144
-
145
-
146
-
147
-
148
-
149
-
150
-
151
-
152
-
153
-
154
-
155
-
156
-
157
-
158
-
159
-
160
-
161
-
162
-
163
-
164
-
165
-
166
-
167
-
168
-
169
-
170
-
171
-
172
-
173
-
174
-
175
-
176
-
177
-
178
-
179
-
180
 |
 |