Cisco 877W Hardware Installation Guide - Page 58
Connecting an ISDN S/T Port
 |
UPC - 882658019579
View all Cisco 877W manuals
Add to My Manuals
Save this manual to your list of manuals |
Page 58 highlights
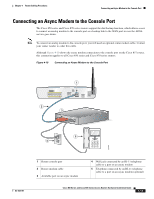
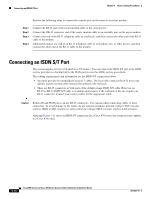
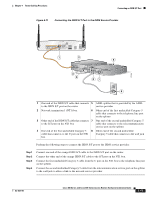
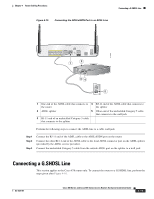
Connecting an ISDN S/T Port Chapter 4 Router Cabling Procedures Perform the following steps to connect the console port on the router to an async modem: Step 1 Step 2 Step 3 Step 4 Connect the RJ-45 end of the router modem cable to the console port. Connect the DB-25 connector end of the router modem cable to an available port on the async modem. Connect one end of the RJ-11 telephone cable to a wall jack, and then connect the other end of the RJ-11 cable to the modem. (Optional) Connect one end of an RJ-11 telephone cable to a telephone, fax, or other device, and then connect the other end of the RJ-11 cable to the modem. Connecting an ISDN S/T Port This section applies to Cisco 876 and Cisco 878 routers. You can connect the ISDN S/T port to the ISDN service provider as a backup link to the WAN port in case the ADSL service goes down. The cabling requirements and information for the ISDN S/T connection follow: • You must provide two unshielded Category 5 cables. The first cable connects the NT1 box to the splitter, and the second cable connects the splitter to the wall jack. • There are RJ-45 connectors at both ends of the default orange ISDN S/T cable. However, an RJ-45-to-RJ-11 ISDN S/T cable is available upon request if the wall jack at the site requires an RJ-11 connector. Contact your router reseller for the appropriate cable. Caution Both LAN and WAN ports can use RJ-45 connectors. Use caution when connecting cables to these connectors. To avoid damage to the router, do not connect telephone-network voltage (TNV) circuits (such as ISDN or DSL circuits) to safety extra-low voltage (SELV) circuits (such as LAN circuits). Although Figure 4-11 shows an ISDN S/T connection for a Cisco 876 router, this connection also applies to a Cisco 878 router. 4-14 Cisco 850 Series and Cisco 870 Series Access Routers Hardware Installation Guide OL-5331-01
-
 1
1 -
2
-
3
-
4
-
5
-
6
-
7
-
8
-
9
-
10
-
11
-
12
-
13
-
14
-
15
-
16
-
17
-
18
-
19
-
20
-
21
-
22
-
23
-
24
-
25
-
26
-
27
-
28
-
29
-
30
-
31
-
32
-
33
-
34
-
35
-
36
-
37
-
38
-
39
-
40
-
41
-
42
-
43
-
44
-
45
-
46
-
47
-
48
-
49
-
50
-
51
-
52
-
 53
53 -
 54
54 -
 55
55 -
 56
56 -
 57
57 -
 58
58 -
 59
59 -
 60
60 -
 61
61 -
 62
62 -
 63
63 -
64
-
65
-
66
-
67
-
68
-
69
-
70
-
71
-
72
-
73
-
74
-
75
-
76
-
77
-
78
-
79
-
80
-
81
-
82
-
83
-
84
-
85
-
86
-
87
-
88
-
89
-
90
-
91
-
92
 |
 |
