Cisco SPA962-NA Administration Guide - Page 38
Installing the SPA900 Series IP Phone, Assembling the Phone and Connecting to the Network - power adapter
 |
View all Cisco SPA962-NA manuals
Add to My Manuals
Save this manual to your list of manuals |
Page 38 highlights
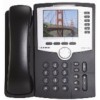
Establishing Connectivity Chapter 2 Getting Started Installing the SPA900 Series IP Phone This section describes how to install and verify operation of SPA900 Series IP phones. Check to make sure that you have the following package contents: • Linksys 900 Series phone • Ethernet cable • Power adapter (must be ordered separately for PoE units: SPA922, SPA942, and SPA962) Assembling the Phone and Connecting to the Network Perform the following steps to connect 900 Series phone. Step 1 Step 2 Step 3 Step 4 Find the end of the coiled phone cord that has the longer straightened end. Plug that end into the back of the phone base (phone symbol). Plug in the short straightened end of the handset cord into the jack at the bottom of the handset. If you are using an external power source, push the power cord into the power supply, and plug the power supply into the phone base unit. Use only the power supply that came with the phone. SPA922, SPA942 and SPA962 can be configured without external power, if connecting to an IEEE powered Ethernet switch. See Linksys.com for details. Plug the Ethernet cable into the back of the base station. Plug the other end of the Ethernet cable into your already prepared network connection. If the phone is configured using an optional PoE adapter, see the PoE device documentation for setup instructions. With the SPA922, SPA942, and SPA962, the second Ethernet port can be used to connect a PC. The AUX RJ-11 port is reserved for future functionality of the SPA962. It is not for use as a telephone line port. Note Do NOT plug a telephone line into the AUX port. Attaching the Desk Stand This and the following sections apply to a SPA900 Series IP phone with an LCD display. For information regarding the SPA901 IP phone, refer to the SPA901 QuickStart Guide. Step 1 Step 2 Step 3 Line up the tabs on the desk stand with the slots on the back of the phone. Slide the bottom tabs into the slots Lightly press down on the top of the desk stand. It should easily slide into the top slots. Do not force. 2-10 Linksys 900 Series IP Phone Administrator Guide Document Version 3.0
-
 1
1 -
2
-
3
-
4
-
5
-
6
-
7
-
8
-
9
-
10
-
11
-
12
-
13
-
14
-
15
-
16
-
17
-
18
-
19
-
20
-
21
-
22
-
23
-
24
-
25
-
26
-
27
-
28
-
29
-
30
-
31
-
32
-
 33
33 -
 34
34 -
 35
35 -
 36
36 -
 37
37 -
 38
38 -
 39
39 -
 40
40 -
 41
41 -
 42
42 -
 43
43 -
44
-
45
-
46
-
47
-
48
-
49
-
50
-
51
-
52
-
53
-
54
-
55
-
56
-
57
-
58
-
59
-
60
-
61
-
62
-
63
-
64
-
65
-
66
-
67
-
68
-
69
-
70
-
71
-
72
-
73
-
74
-
75
-
76
-
77
-
78
-
79
-
80
-
81
-
82
-
83
-
84
-
85
-
86
-
87
-
88
-
89
-
90
-
91
-
92
-
93
-
94
-
95
-
96
-
97
-
98
-
99
-
100
-
101
-
102
-
103
-
104
-
105
-
106
-
107
-
108
-
109
-
110
-
111
-
112
-
113
-
114
-
115
-
116
-
117
-
118
-
119
-
120
-
121
-
122
-
123
-
124
-
125
-
126
-
127
-
128
-
129
-
130
-
131
-
132
-
133
-
134
-
135
-
136
-
137
-
138
-
139
-
140
-
141
-
142
-
143
-
144
-
145
-
146
-
147
-
148
-
149
-
150
-
151
-
152
-
153
-
154
-
155
-
156
-
157
-
158
-
159
-
160
-
161
-
162
-
163
-
164
 |
 |
