D-Link DSN-5000-10 Hardware Reference Guide for DSN-5000-10 - Page 32
Connecting the Power Cords, Powering-on the DSN-5000 series Primary Array
 |
UPC - 790069324024
View all D-Link DSN-5000-10 manuals
Add to My Manuals
Save this manual to your list of manuals |
Page 32 highlights
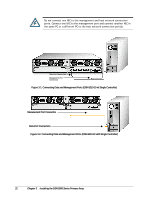
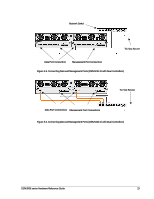
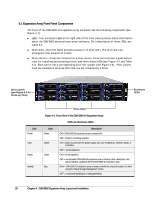
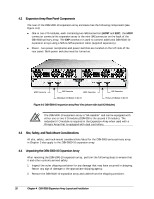
3.7 Connecting the Power Cords The DSN-5000 series primary array has two power receptacles. Both must be used to connect the DSN-5000 series primary array to an AC outlet: 1. Plug the female end of one power cord into one of the 3-pronged power connectors on the back of the DSN-5000 series primary array. Plug the other end of the power cord into a working AC outlet that is not controlled by a wall switch. 2. Repeat the previous step using the second power cable and power receptacle on the DSN-5000 series primary array. For best results, the second power receptacle should be on a different circuit. Although the DSN-5000 series primary array can operate temporarily with only one AC power connection, an audio alarm will sound until both power supply units are powered on. 3.8 Powering-on the DSN-5000 series Primary Array To power-on the DSN-5000 series primary array, turn on both of the rocker switches on both power supplies at the rear of the unit. When the DSN-5000 series primary array powers-on, the following actions occur: The front panel Power LED turns green. The DSN-5000 series primary array runs its power-on procedure (up to 5 minutes), after which the READY LED on the right front bracket turns green. After the DSN-5000 series primary array powers-on for the first time, it automatically loads the factory-default configuration settings. If necessary, you can use the xStack Storage Management Center to change these settings to suit your requirements. For a description of the array's factory-default configuration settings and how to change them, refer to the xStack Storage Management Center Software User's Guide. 24 Chapter 3 Installing the DSN-5000 Series Primary Array
-
 1
1 -
2
-
3
-
4
-
5
-
6
-
7
-
8
-
9
-
10
-
11
-
12
-
13
-
14
-
15
-
16
-
17
-
18
-
19
-
20
-
21
-
22
-
23
-
24
-
25
-
26
-
 27
27 -
 28
28 -
 29
29 -
 30
30 -
 31
31 -
 32
32 -
 33
33 -
 34
34 -
 35
35 -
 36
36 -
 37
37 -
38
-
39
-
40
-
41
-
42
-
43
-
44
-
45
-
46
-
47
-
48
-
49
-
50
-
51
-
52
 |
 |
