D-Link DSN-5000-10 Hardware Reference Guide for DSN-5000-10 - Page 42
Installing or Replacing Drives
 |
UPC - 790069324024
View all D-Link DSN-5000-10 manuals
Add to My Manuals
Save this manual to your list of manuals |
Page 42 highlights
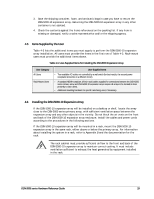
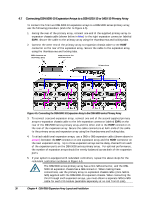
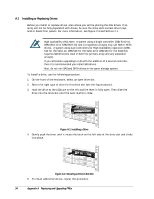
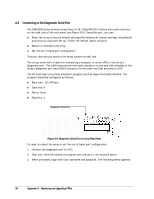
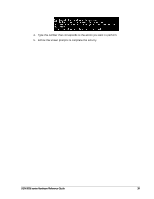
A.1 Installing or Replacing Drives Before you install or replace drives, plan where you will be placing the disk drives. If an array will not be fully populated with drives, be sure the drive slots contain drive trays and/or blank filler panels. For more information, see Figure 2-3 and Section 2.1. High Availability (HA) Note: A system using a single controller (DSN-5110-10. DSN-5210-10 or DSN-5410-10) and its expansion array(s) may use SAS or SATA drives. A system using dual controllers for High Availability operation (DSN510 for the 5110-10, DSN-520 for the 5210-10 or DSN-540 for the 5410-10) requires SAS drives be used in both the primary array and any expansion array(s). If you anticipate upgrading to HA with the addition of a second controller, then it is recommended you install SAS drives. Also, do not mix SAS and SATA drives in the same storage system. To install a drive, use the following procedure. 1. On the front of the enclosure, select an open drive slot. 2. Select the right type of drive for this drive slot (see the figures above). 3. Hold the drive so the LEDs are on the left and the lever is fully open. Then slide the drive into the drive slot until the lever starts to close. Figure A-1. Installing a Drive 4. Gently push the lever until it meets the latch on the left side of the drive slot and clicks into place. Figure A-2. Securing a Drive in the Slot 5. To install additional drives, repeat this procedure. 34 Appendix A Replacing and Upgrading FRUs
-
 1
1 -
2
-
3
-
4
-
5
-
6
-
7
-
8
-
9
-
10
-
11
-
12
-
13
-
14
-
15
-
16
-
17
-
18
-
19
-
20
-
21
-
22
-
23
-
24
-
25
-
26
-
27
-
28
-
29
-
30
-
31
-
32
-
33
-
34
-
35
-
36
-
 37
37 -
 38
38 -
 39
39 -
 40
40 -
 41
41 -
 42
42 -
 43
43 -
 44
44 -
 45
45 -
 46
46 -
 47
47 -
48
-
49
-
50
-
51
-
52
 |
 |