D-Link DSN-5000-10 Hardware Reference Guide for DSN-5000-10 - Page 7

Contents

Page 7 highlights

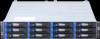
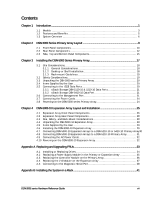
Contents Chapter 1 Introduction ...1 1.1 Models 3 1.2 Features and Benefits 5 1.3 System Overview 6 Chapter 2 DSN-5000 Series Primary Array Layout 9 2.1 Front Panel Components 10 2.2 Rear Panel Components 12 2.3 Side, Top and Bottom Panel Components 15 Chapter 3 Installing the DSN-5000 Series Primary Array 17 3.1 Site Considerations 18 3.1.1 General Considerations 18 3.1.2 Desktop or Shelf Installation 18 3.1.3 Rack-mount Guidelines 19 3.2 Safety Considerations 19 3.3 Unpacking the DSN-5000 series Primary Array 20 3.4 Items Supplied by the User 20 3.5 Connecting to the iSCSI Data Ports 20 3.5.1 xStack Storage DSN-5110-10 & 5210-10 Data Ports 21 3.5.2 xStack Storage DSN-5410-10 Data Port 21 3.6 Connecting to the Management Port 21 3.7 Connecting the Power Cords 24 3.8 Powering-on the DSN-5000 series Primary Array 24 Chapter 4 DSN-5000-10 Expansion Array Layout and Installation 25 4.1 Expansion Array Front Panel Components 26 4.2 Expansion Array Rear Panel Components 28 4.3 Site, Safety, and Rack-Mount Considerations 28 4.4 Unpacking the DSN-5000-10 Expansion Array 28 4.5 Items Supplied by the User 29 4.6 Installing the DSN-5000-10 Expansion Array 29 4.7 Connecting DSN-5000-10 Expansion Arrays to a DSN-5210-10 or 5410-10 Primary Array30 4.8 Connecting DSN-5000-10 Expansion Arrays to a DSN-5110-10 Primary Array .......... 31 4.9 Connecting the AC Power Cords 32 4.10 Powering-on the DSN-5000-10 Expansion Array 32 Appendix A Replacing and Upgrading FRUs 33 A.1 Installing or Replacing Drives 34 A.2 Replacing a Power Supply Module in the Primary or Expansion Array 35 A.3 Replacing the Controller Module on the Primary Array 36 A.4 Replacing the I/O Module on the Expansion Array 37 A.5 Connecting to the Diagnostic Serial Port 38 Appendix B Installing the System in a Rack 41 DSN-5000 series Hardware Reference Guide vii

  • 1
  • 2
  • 3
  • 4
  • 5
  • 6
  • 7
  • 8
  • 9
  • 10
  • 11
  • 12
  • 13
  • 14
  • 15
  • 16
  • 17
  • 18
  • 19
  • 20
  • 21
  • 22
  • 23
  • 24
  • 25
  • 26
  • 27
  • 28
  • 29
  • 30
  • 31
  • 32
  • 33
  • 34
  • 35
  • 36
  • 37
  • 38
  • 39
  • 40
  • 41
  • 42
  • 43
  • 44
  • 45
  • 46
  • 47
  • 48
  • 49
  • 50
  • 51
  • 52

DSN-5000 series Hardware Reference Guide
vii
Contents
Chapter 1
Introduction
..................................................................................................................................
1
1.1
Models
..............................................................................................
3
1.2
Features and Benefits
............................................................................
5
1.3
System Overview
..................................................................................
6
Chapter 2
DSN-5000 Series Primary Array Layout
...................................................................................
9
2.1
Front Panel Components
........................................................................
10
2.2
Rear Panel Components
.........................................................................
12
2.3
Side, Top and Bottom Panel Components
....................................................
15
Chapter 3
Installing the DSN-5000 Series Primary Array
.......................................................................
17
3.1
Site Considerations
...............................................................................
18
3.1.1
General Considerations
................................................................
18
3.1.2
Desktop or Shelf Installation
..........................................................
18
3.1.3
Rack-mount Guidelines
................................................................
19
3.2
Safety Considerations
............................................................................
19
3.3
Unpacking the DSN-5000 series Primary Array
..............................................
20
3.4
Items Supplied by the User
.....................................................................
20
3.5
Connecting to the iSCSI Data Ports
............................................................
20
3.5.1
xStack Storage DSN-5110-10 & 5210-10 Data Ports
...............................
21
3.5.2
xStack Storage DSN-5410-10 Data Port
..............................................
21
3.6
Connecting to the Management Port
..........................................................
21
3.7
Connecting the Power Cords
...................................................................
24
3.8
Powering-on the DSN-5000 series Primary Array
............................................
24
Chapter 4
DSN-5000-10 Expansion Array Layout and Installation
.......................................................
25
4.1
Expansion Array Front Panel Components
...................................................
26
4.2
Expansion Array Rear Panel Components
....................................................
28
4.3
Site, Safety, and Rack-Mount Considerations
...............................................
28
4.4
Unpacking the DSN-5000-10 Expansion Array
................................................
28
4.5
Items Supplied by the User
.....................................................................
29
4.6
Installing the DSN-5000-10 Expansion Array
.................................................
29
4.7
Connecting DSN-5000-10 Expansion Arrays to a DSN-5210-10 or 5410-10 Primary Array30
4.8
Connecting DSN-5000-10 Expansion Arrays to a DSN-5110-10 Primary Array
..........
31
4.9
Connecting the AC Power Cords
...............................................................
32
4.10
Powering-on the DSN-5000-10 Expansion Array
.............................................
32
Appendix A
Replacing and Upgrading FRUs
..............................................................................................
33
A.1
Installing or Replacing Drives
..................................................................
34
A.2
Replacing a Power Supply Module in the Primary or Expansion Array
..................
35
A.3
Replacing the Controller Module on the Primary Array
....................................
36
A.4
Replacing the I/O Module on the Expansion Array
.........................................
37
A.5
Connecting to the Diagnostic Serial Port
.....................................................
38
Appendix B
Installing the System in a Rack
...............................................................................................
41