Dell 3330dn Mono Laser Printer User's Guide - Page 33
Loading trays, Specify the paper height and width, Specify a feed direction - duplex
 |
View all Dell 3330dn Mono Laser Printer manuals
Add to My Manuals
Save this manual to your list of manuals |
Page 33 highlights
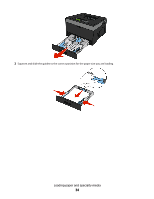
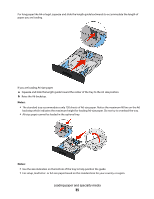
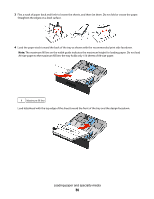
4 Press the down arrow button until Universal Setup appears, and then press . 5 Press the down arrow button until Units of Measure appears, and then press . 6 Press the down arrow button until appears next to the correct unit of measure, and then press . Submitting selection appears, followed by the Universal Setup menu. Specify the paper height and width Defining a specific height and width measurement for the Universal paper size (in the portrait orientation) allows the printer to support the size, including support for standard features such as duplex printing and printing multiple pages on one sheet. Note: Select Portrait Height to adjust the paper height setting or Paper Width to adjust the paper width setting, or adjust both. Instructions to adjust both follow. 1 From the Universal Setup menu, press the down arrow button until Portrait Width appears, and then press . 2 Press the left arrow button to decrease the setting or the right arrow button to increase the setting, and then press . Submitting selection appears, followed by the Universal Setup menu. 3 From the Universal Setup menu, press the down arrow button until Portrait Height appears, and then press . 4 Press the left arrow button to decrease the setting or the right arrow button to increase the setting, and then press . Submitting selection appears, followed by the Universal Setup menu. 5 Press and release until Ready appears. Specify a feed direction Short Edge is the factory default setting for feed direction for Universal paper settings. The Feed Direction menu will not appear from the Universal Setup menu unless Long Edge is an available setting. If necessary, specify whether the short or long edge of the paper will enter the printer first. 1 From the Universal Setup menu, press the down arrow button until Feed Direction appears, and then press . 2 Press the down arrow button until Short Edge or Long Edge appears, and then press . Loading trays 1 Pull the tray completely out. Note: Do not remove trays while a job prints or while Busy appears on the display. Doing so may cause a jam. Loading paper and specialty media 33
-
 1
1 -
2
-
3
-
4
-
5
-
6
-
7
-
8
-
9
-
10
-
11
-
12
-
13
-
14
-
15
-
16
-
17
-
18
-
19
-
20
-
21
-
22
-
23
-
24
-
25
-
26
-
27
-
 28
28 -
 29
29 -
 30
30 -
 31
31 -
 32
32 -
 33
33 -
 34
34 -
 35
35 -
 36
36 -
 37
37 -
 38
38 -
39
-
40
-
41
-
42
-
43
-
44
-
45
-
46
-
47
-
48
-
49
-
50
-
51
-
52
-
53
-
54
-
55
-
56
-
57
-
58
-
59
-
60
-
61
-
62
-
63
-
64
-
65
-
66
-
67
-
68
-
69
-
70
-
71
-
72
-
73
-
74
-
75
-
76
-
77
-
78
-
79
-
80
-
81
-
82
-
83
-
84
-
85
-
86
-
87
-
88
-
89
-
90
-
91
-
92
-
93
-
94
-
95
-
96
-
97
-
98
-
99
-
100
-
101
-
102
-
103
-
104
-
105
-
106
-
107
-
108
-
109
-
110
-
111
-
112
-
113
-
114
-
115
-
116
-
117
-
118
-
119
-
120
-
121
-
122
-
123
-
124
-
125
-
126
-
127
-
128
-
129
-
130
-
131
-
132
-
133
-
134
-
135
-
136
-
137
-
138
-
139
-
140
-
141
-
142
-
143
-
144
-
145
-
146
-
147
-
148
-
149
-
150
-
151
-
152
-
153
-
154
-
155
-
156
-
157
-
158
-
159
-
160
 |
 |