Dell Dimension 8300N Owner's Manual - Page 100
Closing the Computer Cover
 |
View all Dell Dimension 8300N manuals
Add to My Manuals
Save this manual to your list of manuals |
Page 100 highlights
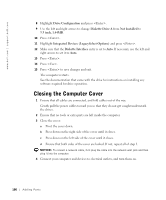
www.dell.com | support.dell.com 8 Highlight Drive Configuration and press . 9 Use the left and right arrows to change Diskette Drive A from Not Installed to 3.5 inch, 1.44MB. 10 Press . 11 Highlight Integrated Devices (LegacySelect Options) and press . 12 Make sure that the Diskette Interface entry is set to Auto. If necessary, use the left and right arrows to set it to Auto. 13 Press . 14 Press . 15 Press to save changes and exit. The computer restarts. See the documentation that came with the drive for instructions on installing any software required for drive operation. Closing the Computer Cover 1 Ensure that all cables are connected, and fold cables out of the way. Gently pull the power cables toward you so that they do not get caught underneath the drives. 2 Ensure that no tools or extra parts are left inside the computer. 3 Close the cover: a Pivot the cover down. b Press down on the right side of the cover until it closes. c Press down on the left side of the cover until it closes. d Ensure that both sides of the cover are locked. If not, repeat all of step 3. NOTICE: To connect a network cable, first plug the cable into the network wall jack and then plug it into the computer. 4 Connect your computer and devices to electrical outlets, and turn them on. 100 Adding Parts
-
 1
1 -
2
-
3
-
4
-
5
-
6
-
7
-
8
-
9
-
10
-
11
-
12
-
13
-
14
-
15
-
16
-
17
-
18
-
19
-
20
-
21
-
22
-
23
-
24
-
25
-
26
-
27
-
28
-
29
-
30
-
31
-
32
-
33
-
34
-
35
-
36
-
37
-
38
-
39
-
40
-
41
-
42
-
43
-
44
-
45
-
46
-
47
-
48
-
49
-
50
-
51
-
52
-
53
-
54
-
55
-
56
-
57
-
58
-
59
-
60
-
61
-
62
-
63
-
64
-
65
-
66
-
67
-
68
-
69
-
70
-
71
-
72
-
73
-
74
-
75
-
76
-
77
-
78
-
79
-
80
-
81
-
82
-
83
-
84
-
85
-
86
-
87
-
88
-
89
-
90
-
91
-
92
-
93
-
94
-
 95
95 -
 96
96 -
 97
97 -
 98
98 -
 99
99 -
 100
100 -
 101
101 -
 102
102 -
 103
103 -
 104
104 -
 105
105 -
106
-
107
-
108
-
109
-
110
-
111
-
112
-
113
-
114
-
115
-
116
-
117
-
118
-
119
-
120
-
121
-
122
-
123
-
124
-
125
-
126
-
127
-
128
-
129
-
130
-
131
-
132
-
133
-
134
-
135
-
136
-
137
-
138
-
139
-
140
-
141
-
142
-
143
-
144
-
145
-
146
 |
 |