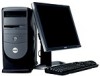
Dell Dimension 8300N Owner's Manual - Page 98
floppy drive kit over the front of the drive bay. If you are installing a floppy drive
 |
View all Dell Dimension 8300N manuals
Add to My Manuals
Save this manual to your list of manuals |
Page 98 highlights
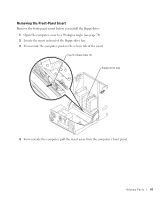
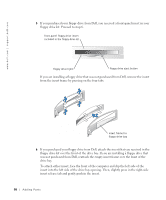
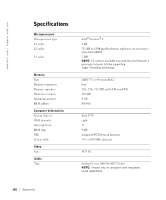
www.dell.com | support.dell.com 5 If you purchased your floppy drive from Dell, you received a front-panel insert in your floppy drive kit. Proceed to step 6. front-panel floppy drive insert included in the floppy drive kit floppy drive light floppy drive eject button If you are installing a floppy drive that was not purchased from Dell, remove the insert from the insert frame by pressing on the four tabs. insert frame for floppy-drive bay 6 If you purchased your floppy drive from Dell, attach the insert that you received in the floppy drive kit over the front of the drive bay. If you are installing a floppy drive that was not purchased from Dell, reattach the empty insert frame over the front of the drive bay. To attach either insert, face the front of the computer and slip the left side of the insert into the left side of the drive bay opening. Then, slightly press in the right-side insert release tab and gently push in the insert. 98 Adding Parts
-
 1
1 -
2
-
3
-
4
-
5
-
6
-
7
-
8
-
9
-
10
-
11
-
12
-
13
-
14
-
15
-
16
-
17
-
18
-
19
-
20
-
21
-
22
-
23
-
24
-
25
-
26
-
27
-
28
-
29
-
30
-
31
-
32
-
33
-
34
-
35
-
36
-
37
-
38
-
39
-
40
-
41
-
42
-
43
-
44
-
45
-
46
-
47
-
48
-
49
-
50
-
51
-
52
-
53
-
54
-
55
-
56
-
57
-
58
-
59
-
60
-
61
-
62
-
63
-
64
-
65
-
66
-
67
-
68
-
69
-
70
-
71
-
72
-
73
-
74
-
75
-
76
-
77
-
78
-
79
-
80
-
81
-
82
-
83
-
84
-
85
-
86
-
87
-
88
-
89
-
90
-
91
-
92
-
 93
93 -
 94
94 -
 95
95 -
 96
96 -
 97
97 -
 98
98 -
 99
99 -
 100
100 -
 101
101 -
 102
102 -
 103
103 -
104
-
105
-
106
-
107
-
108
-
109
-
110
-
111
-
112
-
113
-
114
-
115
-
116
-
117
-
118
-
119
-
120
-
121
-
122
-
123
-
124
-
125
-
126
-
127
-
128
-
129
-
130
-
131
-
132
-
133
-
134
-
135
-
136
-
137
-
138
-
139
-
140
-
141
-
142
-
143
-
144
-
145
-
146
 |
 |
