Denon DN-X1500S Operating Instructions - Page 5
Main Features, Installation, Part Names And Functions - dj mixer
 |
UPC - 081757507202
View all Denon DN-X1500S manuals
Add to My Manuals
Save this manual to your list of manuals |
Page 5 highlights
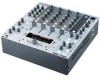
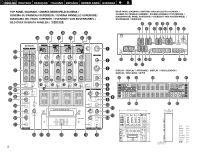
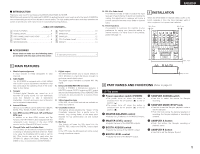
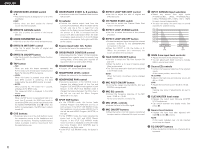
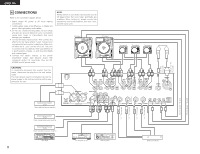
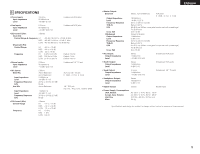
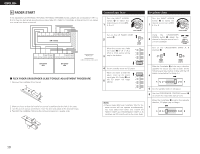
ENGLISH 2 INTRODUCTION Thank you very much for purchasing the DENON DN-X1500S DJ MIXER. DENON proudly presents this advanced DJ MIXER to audiophiles and music lovers as a further proof of DENON's non-compromising pursuit of the ultimate in sound quality. The high quality performance and easy operation are certain to provide you with many hours of outstanding listening pleasure. - TABLE OF CONTENTS - z MAIN FEATURES 5 x INSTALLATION 5 c PART NAMES AND FUNCTIONS 5 ~ 7 v CONNECTIONS 8 b SPECIFICATIONS 9 n FADER START 10 m EFFECTOR 11 , SAMPLER 12 . PFL (Pre Fader Level 12 ⁄0 PRESET 13 12. PFL (Pre Fader Level) This feature provides a means to adjust the input level gain of each channel to avoid over loading. By making this adjustment in advance will insure a smooth transition between cross fades or channel fades. 13. Preset functions It is possible to customise the machine to your preference by saving your favourite setting to internal memory. For items found in the presets, please see page 13. 2 INSTALLATION When the DN-X1500S is installed inside a coffin or DJ booth, separate it from the foam (sponge), walls or other equipment to improve heat radiation. Min. 2 cm Min. 2 cm 2 ACCESSORIES Please check to make sure the following items are included with the main unit in the carton: q Operating instructions 1 1 MAIN FEATURES 1. Matrix input assignment 8 input sources is freely assignable to each channels. 2. FLEX FADER The DN-X1500S is equipped with a FLEX FADER with built-in torque adjustment mechanism that lets users adjust the operating force of the crossfader to their tastes. 3. Sampler On-board digital Sampler can record up to 8 seconds CD quality sound. You can seamlessly Loop this Sampler or play it backwards (REVERSE). The pitch and output level of Sampler can be adjusted independently. 4. Internal Effector Various sound effects can be performed. (DELAY, ECHO, PAN, TRANS, FILTER, FLANGER, KEY) 5. Auto BPM counter, BPM Lock, TAP and Manual BPM input In addition to an Auto BPM counter and Tap function, the DN-X1500S is also equipped with the temporarily Lock function of the Auto BPM counter and the Manual BPM input function. 6. Channel Fader and Crossfader Start The CD player can be started or stopped simply by increasing or decreasing the level of the Ch. Fader or by using the Crossfader left to right or right to left. (This function can only be used when the DENON CD players DN-S3500, DN-S5000, DND4500 or etc. is connected to the DN-X1500S.) 7. Digital output The DN-X1500S allows you to record directly to CD-R, MiniDisc or a hard disk device through it's exclusive coaxial digital output. The digital output maintains a constant 44.1 kHz signal. 8. Enhanced SEND/RETURN terminals 8 LINE, 3 PHONO, 2 Microphone systems, 2 MASTER outputs, BOOTH output and REC output are provided independently. Effect SEND/RETURN terminals are also provided for a external effects processor. 9. 3-Band equalizer/gain LOW, MID, HI and GAIN controls are available on every input channel. 10. Crossfader Contour This feature allows adjusting the "shape" of the Crossfader response from a gentle curve for smooth, long running fades, to the steep pitch required for top performance cut and scratch effects. 11. Mic Post This feature will pass the Mic signal into the BOOTH, REC output and DIGITAL output signal path. In the OFF mode, the Mic signal will not be routed through the above outputs. Min. 2 cm Min. 3 mm 3 PART NAMES AND FUNCTIONS (Refer to page 3.) (1) Top panel q Power operation switch (POWER) • The power turns on when the button is switched from the off position (£) to the on position (¢). • The power turns off when the button is switched from the on position (¢) to the off position (£). w MASTER BALANCE control • Adjusts the L/R balance of the MASTER output. e MASTER LEVEL control • Adjusts the level of the MASTER outputs. r BOOTH ASSIGN switch • Selects the source of the BOOTH output. t BOOTH LEVEL control • Adjusts the level of the BOOTH output. y SAMPLER ASSIGN switch • Use this to select the source for Sampler recording. u SAMPLER MODE/STOP knob • Use this to set the Sampler playback mode or edit the Sampler. • Push this knob during the Sampler playback or recording, the Sampler playback or recording is stopped. i SAMPLER A button • Push this button, the Sampler recording or playback starts. o SAMPLER B button • Use this to set the Sampler B point. 5
-
 1
1 -
 2
2 -
 3
3 -
 4
4 -
 5
5 -
 6
6 -
 7
7 -
 8
8 -
 9
9 -
 10
10 -
 11
11 -
12
-
13
-
14
-
15
-
16
-
17
-
18
-
19
-
20
-
21
-
22
-
23
-
24
-
25
-
26
-
27
-
28
-
29
-
30
-
31
-
32
-
33
-
34
-
35
-
36
-
37
-
38
-
39
-
40
-
41
-
42
-
43
-
44
-
45
-
46
-
47
-
48
-
49
-
50
-
51
-
52
-
53
-
54
-
55
-
56
-
57
-
58
-
59
-
60
-
61
-
62
-
63
-
64
-
65
-
66
-
67
-
68
-
69
-
70
-
71
-
72
-
73
-
74
-
75
-
76
-
77
-
78
 |
 |
