Dynex DX-40L260A12 User Manual (English) - Page 18
Connecting a camcorder or game console, Connecting a computer
 |
View all Dynex DX-40L260A12 manuals
Add to My Manuals
Save this manual to your list of manuals |
Page 18 highlights
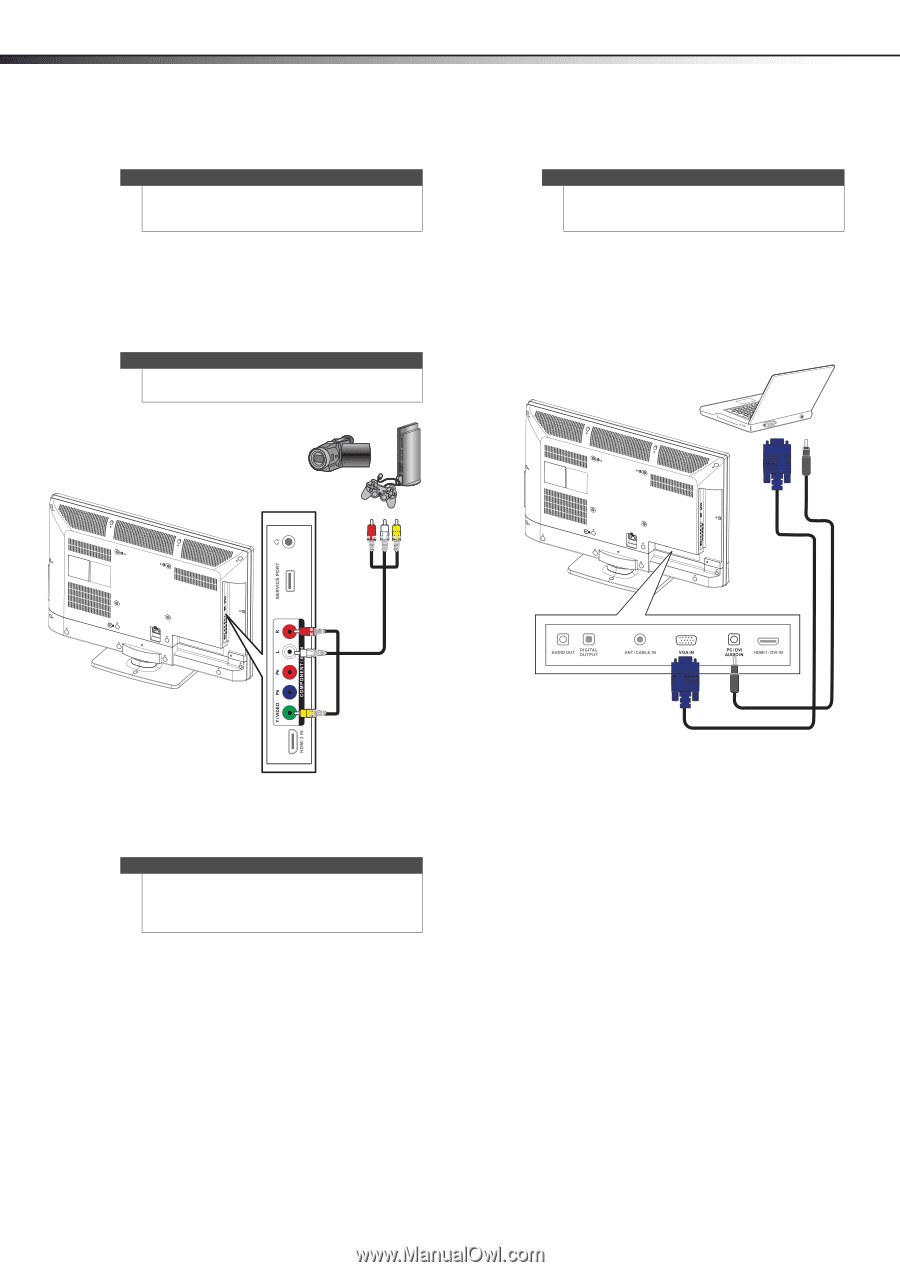
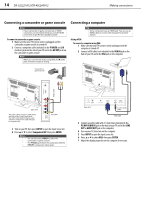
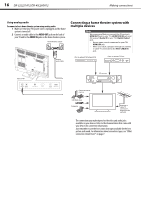
14 DX-32L221A12/DX-40L260A12 Making connections Connecting a camcorder or game console Note If your camcorder or game console has an HDMI connection, we recommend that you use the HDMI connection to get the best quality possible. To connect a camcorder or game console: 1 Make sure that your TV's power cord is unplugged and the camcorder or game console is turned off. 2 Connect a composite cable (included) to the Y/VIDEO and L/R (audio in) jacks on the side of your TV and to the AV OUT jacks on the camcorder or game console. Note When you connect the audio using the L and R audio jacks, the audio output is analog. Connecting a computer Tip Some computers have an HDMI jack. You can use an HDMI cable to connect the computer for a better picture. Using VGA To connect a computer using VGA: 1 Make sure that your TV's power cord is unplugged and the computer is turned off. 2 Connect a VGA cable (not included) to the VGA IN jack on the back of your TV and to the VGA jack on the computer. Camcorder or game console Audio cable Side of TV The audio cables are color coded (white and red) to the L and R audio jacks. The video cable (yellow) shares a jack. with the component Y cable and goes to the green jack. A/V cable 3 Turn on your TV, then press INPUT to open the Input Source list. 4 Press or to select Component/AV, then press ENTER. Notes • • You can also press VIDEO to select the camcorder or game console. The Y/Video jack shares the audio jacks with the Y/Pb/Pr (component video) jacks. Back of TV 3.5 mm audio cable VGA cable 3 Connect an audio cable with 3.5 mm stereo mini plug to the PC/DVI AUDIO IN jack on the back of your TV and to the LINE OUT or AUDIO OUT jack on the computer. 4 Turn on your TV, then turn on the computer. 5 Press INPUT to open the Input Source list. 6 Press or to select VGA, then press ENTER. 7 Adjust the display properties on the computer if necessary.
-
 1
1 -
2
-
3
-
4
-
5
-
6
-
7
-
8
-
9
-
10
-
11
-
12
-
 13
13 -
 14
14 -
 15
15 -
 16
16 -
 17
17 -
 18
18 -
 19
19 -
 20
20 -
 21
21 -
 22
22 -
 23
23 -
24
-
25
-
26
-
27
-
28
-
29
-
30
-
31
-
32
-
33
-
34
-
35
-
36
-
37
-
38
-
39
-
40
-
41
-
42
-
43
-
44
 |
 |