Epson EPL-N1200 User Manual
Epson EPL-N1200 Manual
 |
View all Epson EPL-N1200 manuals
Add to My Manuals
Save this manual to your list of manuals |
Epson EPL-N1200 manual content summary:
- Epson EPL-N1200 | User Manual - Page 1
® Laser Printer User's Guide All rights reserved. No part of this publication may be reproduced, stored in a retrieval system, or transmitted in any form or by any means, electronic, mechanical, photocopying, recording, or otherwise, without the prior written permission of Seiko Epson Corporation. - Epson EPL-N1200 | User Manual - Page 2
comply with the limits for a class B digital device, pursuant to Part 15 of the FCC Rules. These limits are designed to provide reasonable energy and, if not installed and used in accordance with the instructions, may cause harmful interference to radio and television reception. However, there - Epson EPL-N1200 | User Manual - Page 3
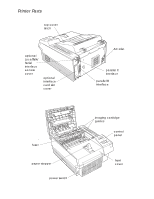
Printer Parts top cover latch optional LocalTalk/ Serial interface access cover optional interface card slot cover fuser paper stopper power switch AC inlet parallel C interface parallel B interface imaging cartridge guides control panel front cover - Epson EPL-N1200 | User Manual - Page 4
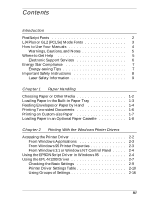
2 Printing With the Windows Printer Drivers Accessing the Printer Driver 2-2 From Windows Applications 2-3 From Windows 95 Printer Properties 2-3 From Windows 3.1 or Windows NT Control Panel . . . . . 2-4 Using the EPSONScript Driver in Windows 95 2-4 Using the EPL-N1200 Driver 2-7 Checking the - Epson EPL-N1200 | User Manual - Page 5
Installing and Using the Windows NT 3.51 Drivers 2-17 Installing the EPSONScript Driver for Windows NT . . . . 2-18 Installing the EPL-N1200 Driver for Windows NT 2-20 Chapter 3 Using the Control Panel Reading the Indicator Lights 3-2 Using the Control Panel Buttons 3-3 Using OneTouch Modes 3-5 - Epson EPL-N1200 | User Manual - Page 6
Replacing the Imaging Cartridge 5-2 Adjusting the RITech Setting 5-5 Cleaning the Printer 5-8 Transporting the Printer 5-10 Chapter 6 Troubleshooting Diagnosing Problems 6-2 Reading Control Panel Display Messages 6-2 Using Hex Dump Mode 6-7 Paper Feeding Problems 6-8 Fixing Paper Jams - Epson EPL-N1200 | User Manual - Page 7
Introduction Your EPSON® EPL-N1200 is a PostScript®-compatible, 600-dpi laser printer that uses EPSON's latest quality- interface lets you connect the printer to an ECP port on your computer, for even faster printing under Microsoft® Windows® 95. Easy-to-use software for Windows (3.1, 95, or NT 3. - Epson EPL-N1200 | User Manual - Page 8
. In most cases, a screen font has the same name as the corresponding printer font. In other cases, the name of the font you select is different lists the standard font names, available styles, and the corresponding printer font names (if different): PostScript fonts Font name Times® Roman - Epson EPL-N1200 | User Manual - Page 9
LJ4 Plus or GL2 (PCL5e) Mode Fonts The EPL-N1200 includes a number of resident fonts that you can use in Swiss 721 SWM Dutch 801 SWM Symbol Set SWA More Wingbats SWM Courier SWC Letter Gothic SWC Line Printer Scalable styles Roman, Bold, Italic, Bold Italic Demi, Bold, Demi Italic, Bold Italic - - - Epson EPL-N1200 | User Manual - Page 10
Your Manuals For instructions on setting up your printer, connecting it to your computer, and installing your printer software, see the Quick Setup card. This User's Guide contains the information you need to use your printer and control it with the Windows printer driver or the printer's control - Epson EPL-N1200 | User Manual - Page 11
your manual set: w Warnings must be followed carefully to avoid bodily injury. c Cautions must be observed to avoid damage to your equipment. Notes contain important information and useful tips on the operation of your printer. Where to Get Help EPSON provides customer support and service through - Epson EPL-N1200 | User Manual - Page 12
, you can download drivers, FAQs, and sample files from EPSON's FTP site. Use your Web browser (or other software for FTP downloading) to log onto ftp.epson.com with the user name anonymous and your e-mail address as the password. EPSON Download Service You can call the EPSON Download Service BBS at - Epson EPL-N1200 | User Manual - Page 13
service You can access EPSON's technical information library by calling (800) 442-2110 or (800) 922-8911 and selecting the appropriate phone option. You must provide a return fax number to use Fax-on-Demand. EPSON Forum on CompuServe Members of CompuServe® can type GO EPSON computers, printers, and - Epson EPL-N1200 | User Manual - Page 14
power consumption standby mode to save energy when you're not using your printer for a while; see Chapter 2 for details. Important Safety Instructions Before using your printer, read the following safety instructions to make sure you use the printer safely and effectively. u Turn off and unplug the - Epson EPL-N1200 | User Manual - Page 15
in this User's Guide, do not attempt to service the printer yourself. u Unplug the printer and refer servicing to qualified service personnel under the instructions. Laser Safety Information This printer is certified as a Class 1 laser product under the U.S. Department of Health and Human Services - Epson EPL-N1200 | User Manual - Page 16
CDRH) of the U.S. Food and Drug Administration implemented regulations for laser products on August 2, 1976. Compliance is mandatory for products marketed those specified in this User's Guide may result in hazardous radiation exposure. Your printer is a Class 1 laser product as defined in IEC 825 - Epson EPL-N1200 | User Manual - Page 17
; it is produced only during printing. The recommended exposure limit for ozone is 0.1 parts per million (ppm) expressed as an average time-weighted concentration over an eight hour period. The EPL-N1200 laser printer generates - Epson EPL-N1200 | User Manual - Page 18
HOT SURFACE u Avoid touching the components inside the printer unless instructed to do so in this User's Guide. u Never force the printer's components into place; rough handling can damage the printer. u When you remove the imaging cartridge from the printer, always set it on a clean, smooth surface - Epson EPL-N1200 | User Manual - Page 19
service life of the drum. Also, do not open the drum's protective cover. u Try not to touch the toner and avoid contact with your eyes. u Do not use a cartridge of the laser beam; otherwise, print quality may decline. glass To get the best print quality, do not store the imaging cartridge in an - Epson EPL-N1200 | User Manual - Page 20
Chapter 1 Paper Handling Choosing Paper or Other Media 1-2 1 Loading Paper in the Built-in Paper Tray 1-3 Feeding Envelopes or Paper by Hand 1-4 Printing Two-sided Documents 1-6 Printing on Custom-size Paper 1-7 Loading Paper in an Optional Paper Cassette 1-8 Paper Handling 1-1 - Epson EPL-N1200 | User Manual - Page 21
You can print on many different kinds of paper or other media with your EPL-N1200: u Plain bond paper (16 to 24 lb weight) u Card stock the print density setting in the printer driver (see Chapter 2). u Labels. Select labels designed specifically for laser printers or plain paper copiers. Make sure - Epson EPL-N1200 | User Manual - Page 22
made just for laser printers or plain paper copiers, and load them only in the built-in paper tray. u Colored paper. When selecting colored paper, make sure the paper does not have a clear or colored coating on it. Loading Paper in the Built-in Paper Tray Use these instructions to load paper - Epson EPL-N1200 | User Manual - Page 23
envelope or a special sheet of paper, you can feed it manually. Follow these steps: 1. From your application program, choose Print or Print Setup. 2. For the Paper Source or Paper tray, select Manual Feed. 3. For the Paper Size, select the size you want to use. - Epson EPL-N1200 | User Manual - Page 24
(an envelope, in this example). 7. Adjust the paper guides to fit the paper you loaded, if necessary. top of envelope 8. Select the Print command in your application program to send the print job. After a moment, the printer's control panel displays Manual Feed and the paper size you selected. The - Epson EPL-N1200 | User Manual - Page 25
document. The EPL-N1200 makes it easy by providing a Duplexing option in the non-PostScript printer driver. Note: If you're using the printer in the application. 2. From your application program, access the printer driver (see Chapter 2 for instructions). 3. Click the Paper tab. 4. Select either - Epson EPL-N1200 | User Manual - Page 26
Follow these steps to print on custom-size paper with the EPL-N1200 (non-PostScript) driver: 1. Load the custom-size paper in your printer. 2. From your application program, access the printer driver. (See Chapter 2 for instructions.) 3. Click the Paper tab. 4. Highlight an option in the Paper Size - Epson EPL-N1200 | User Manual - Page 27
. 9. Select the Print command in your application program to send a print job. When you're finished with your custom-size paper, access the printer driver and select your normal paper size. Your custom paper size is now one of the options available. Loading Paper in an Optional Paper Cassette If - Epson EPL-N1200 | User Manual - Page 28
2. Press down the bottom plate until it locks in place. 3. Fan a stack of paper and then tap the edges to even them up. 4. Holding the stack with the printable surface face up, insert the paper into the tray. Press down the edges so they lie beneath all four tabs. tabs tabs Paper Handling 1-9 - Epson EPL-N1200 | User Manual - Page 29
5. Slide the paper tray back into the paper cassette. 1-10 Paper Handling - Epson EPL-N1200 | User Manual - Page 30
With the Windows Printer Drivers Accessing the Printer Driver 2-2 From Windows Applications 2-3 From Windows 95 Printer Properties 2-3 From Windows 3.1 or Windows NT Control Panel . . . . . 2-4 Using the EPSONScript Driver in Windows 95 2-4 Using the EPL-N1200 Driver 2-7 2 Checking the - Epson EPL-N1200 | User Manual - Page 31
either driver. Instructions for using the EPSONScript driver start on page 2-4; instructions for using the EPL-N1200 driver start on page 2-7. Accessing the Printer Driver You can access the printer driver to check or change your print settings in two ways: u From your Windows application program - Epson EPL-N1200 | User Manual - Page 32
printer driver software: From Windows Applications 1. Open the application program's File menu. 2. Select Print Setup or Print. Then select Setup, Options, Properties, or another option as necessary (see your software program documentation for instructions). 3. You see the printer driver options - Epson EPL-N1200 | User Manual - Page 33
. 2. Double-click Printers. 3. Click EPSON EPL-N1200 or EPSON EPL-N1200 EPSONScript in the Installed Printers list. 4. Click the Setup button. 5. You see the printer driver options. . Using the EPSONScript Driver in Windows 95 Most of the options available for the EPL-N1200 printer in Windows 95 are - Epson EPL-N1200 | User Manual - Page 34
To change Printer features or Installable options, you must first select the option you want to change. Then click the down arrow next to Change setting for to display the list of available settings. Printing With the Windows Printer Drivers 2-5 - Epson EPL-N1200 | User Manual - Page 35
occurs, raise the level from 1 (the default) up to 5. Raising the protect level decreases printing speed. Sets the amount of toner used in your print job. If you're printing a draft copy, set to ON to use around 50% less toner for a lighter printout. 2-6 Printing With the Windows Printer Drivers - Epson EPL-N1200 | User Manual - Page 36
Using the EPL-N1200 Driver When you use your printer in the non-EPSONScript mode, you have a special set of driver options to choose from. The driver screen includes four "tabs" that each access a collection of settings, as shown on the following page. Printing With the Windows Printer Drivers 2-7 - Epson EPL-N1200 | User Manual - Page 37
help with the driver, click the Help button. Fonts Accesses the Font Manager program described in the Technical Information manual. Overlays Accesses the Overlay Manager and Softtray Manager programs described in the Technical Information manual. 2-8 Printing With the Windows Printer Drivers - Epson EPL-N1200 | User Manual - Page 38
Checking the Basic Settings The printer driver's default settings are suitable Printer Settings tab. Basic printer driver on top) You need to change the printer driver settings if you plan to make adjustments To get information while you're using the driver, do this: u Position the cursor over - Epson EPL-N1200 | User Manual - Page 39
EPL-N1200 driver settings Setting Options Printer Windows dither patterns Error diffusion Photographic images or equivalent drawings (not available if Graphics Mode is set to EPSON GL/2 on the Printer SelecType tab; see page 2-13 for details) 2-10 Printing With the Windows Printer Drivers - Epson EPL-N1200 | User Manual - Page 40
EPL-N1200 driver Monarch US half Paper Source Multi Purpose Tray Manual feed Auto Lower Cassette 2 Lower Cassette Tray is the built-in paper tray. For instructions on loading paper, see Chapter 1. (The Lower paper cassette option for Feeder on the Printer Options tab. See page 2-15.) Sets the - Epson EPL-N1200 | User Manual - Page 41
the list. You cannot restore deleted custom paper sizes. (For instructions on printing custom paper sizes, see Chapter 1.) Set the width, height, and measurement unit used to modify or create custom options for the Paper Size setting (described above). 2-12 Printing With the Windows Printer Drivers - Epson EPL-N1200 | User Manual - Page 42
EPL-N1200 driver settings (continued) Setting Options Printer SelecType tab * Graphics Mode Raster -internal fonts Description Sets the graphics printing mode used by the printer. (This setting affects the available Halftone options on the Print Settings tab; see page 2-10 for details.) Use - Epson EPL-N1200 | User Manual - Page 43
EPL-N1200 driver settings (continued) Setting Options Time-out Various settings from 5 to 300 seconds (60 sec. default) Toner Save ON Mode OFF Low Power ON Consumption OFF Auto Continue ON OFF Description Sets the amount of time the printer waits to receive data before terminating an - Epson EPL-N1200 | User Manual - Page 44
EPL-N1200 driver settings (continued) Setting Options Printer Options tab Memory 2, 3, 4, 5, 6, 7, 8, 10, 11, Cartridge Description Specifies the amount of memory installed in the printer. Increase the number if you add memory to your printer. Sets the printer the Windows Printer Drivers 2-15 - Epson EPL-N1200 | User Manual - Page 45
EPL-N1200 driver settings (continued) Setting Options Advanced StatusSheet FontSample Description Click this button and select a submenu option to print a status sheet or a list of font samples for the current printer operating mode * When you change the default settings on this tab and then - Epson EPL-N1200 | User Manual - Page 46
steps on pages 2-2 to 2-4. The EPL-N1200 driver for Windows NT gives you the same options as the other Windows drivers; see page 2-7 for details. The EPSONScript driver for Windows NT, however, offers a unique set of options for controlling your printer, such as smart underlining, printing thumbnail - Epson EPL-N1200 | User Manual - Page 47
screen. Installing the EPSONScript Driver for Windows NT Setting up your EPSONScript driver for Windows NT involves three separate procedures: u Installing the EPSONScript driver and screen fonts u Installing the EPSONScript Utility u Creating the printer driver in the Windows NT Control Panel Note - Epson EPL-N1200 | User Manual - Page 48
. 6. Click Yes to restart Windows and enable the utility. 7. From Program Manager, click the EPSONScript Utility icon in the EPSONScript group, and then click the Create Driver tab. 8. Select EPSON EPL-N1200 EPSONScript (LT) and click the Create button. Printing With the Windows Printer Drivers 2-19 - Epson EPL-N1200 | User Manual - Page 49
Printer Name box, select EPSON EPL-N1200 EPSONScript (LT) from the Driver list, and click OK. 5. Make any settings you want. When you're finished, click OK. 6. Choose Yes to make these settings the default for all your applications. When installation is completed, the Print Manager window appears - Epson EPL-N1200 | User Manual - Page 50
follow these steps to install the driver: 1. Insert the Windows NT EPL-N1200 driver diskette. 2. In the Program Manager, choose Run from the File menu. 3. Type a:\install (or b:\install). Then click OK. After a few minutes, you see a list of printers. 4. Choose EPL-N1200 and click OK. The program - Epson EPL-N1200 | User Manual - Page 51
2-22 Printing With the Windows Printer Drivers - Epson EPL-N1200 | User Manual - Page 52
Chapter 3 Using the Control Panel Reading the Indicator Lights 3-2 Using the Control Panel Buttons 3-3 Using OneTouch Modes 3-5 OneTouch Mode Settings 3-6 Using SelecType 3-7 Changing SelecType Settings 3-7 SelecType Menu Tables 3-9 Test Menu 3-9 Emulation Menu 3-10 Printing Menu - Epson EPL-N1200 | User Manual - Page 53
The EPL-N1200 control panel consists of a liquid crystal display, indicator lights, and buttons. The display and lights keep you informed about the printer's current status. You can use the buttons to select settings and functions. Most of the time you control your printer's functions using software - Epson EPL-N1200 | User Manual - Page 54
. See Chapter 6 for information about the messages. After you clear the problem, press the Continue button. Form Feed Comes on when the printer receives data. The light flashes when the printer is processing the data. If the light stays on, press the Form Feed button to print the data and clear - Epson EPL-N1200 | User Manual - Page 55
back on line after you have cleared a problem. You can also use the button to reset the printer back to the default settings. Press the ALT and Reset buttons until Reset appears on the control panel display. This clears all data in the printer's memory. Press ALT and Reset until Reset All appears - Epson EPL-N1200 | User Manual - Page 56
settings are described in the table on page 3-6. mode 1 settings mode 2 settings Follow these steps to change a setting using OneTouch modes: 1. Make sure the printer is turned on and the On Line light is on. 2. To change a mode 1 setting, press the SelecType button until the light next to the Paper - Epson EPL-N1200 | User Manual - Page 57
OneTouch mode setting options Setting Paper Source Page Size Manual Feed Orientation RITech Copies MP Tray Size Toner Save Options Auto MP (built-in tray) LC1 to be produced Turns manual feed mode on or off for the built-in paper tray; see Chapter 1 for instructions Selects the print direction - Epson EPL-N1200 | User Manual - Page 58
. Although you can set some of the SelecType options through your driver software, you need to use the printer's control panel to access functions like the following: u Checking the amount of toner remaining u Changing the memory buffer size u Configuring interface channels u Changing emulation - Epson EPL-N1200 | User Manual - Page 59
If you need to change SelecType settings, follow these steps: 1. Make sure the printer is turned on and the On Line light is on. 2. Press the Menu button and Value to scroll through selections in reverse order Used with Continue to reset the printer Exits SelecType mode 3-8 Using the Control Panel - Epson EPL-N1200 | User Manual - Page 60
to select on the Test menu. Select a menu item and press Enter to print the desired information. c Caution: Any user-defined data stored in the printer, such as downloaded fonts, may be erased after printing some of these information sheets. Using the Control Panel 3-9 - Epson EPL-N1200 | User Manual - Page 61
fonts Prints a page that illustrates EPSONScript features. Emulation Menu This menu allows you to select a different printer emulation mode for each available interface on your printer. The settings for each emulation mode are listed in tables beginning on page 3-17. Emulation menu items - Epson EPL-N1200 | User Manual - Page 62
the SelecType Printing menu settings can be set using your printer driver software and are overwritten by the software settings. You of copies to print: 1 to 999 Turns manual feed mode on or off for the built-in paper tray; see Chapter 1 for instructions Sets the print resolution to 600 dpi or 300 - Epson EPL-N1200 | User Manual - Page 63
's basic operations. Most of the menu items can be set using the Windows printer driver software and override the SelecType settings; see Chapter 2 for details. Config menu items Menu item RITech * Toner Save * Density Top Offset Left Offset Size Ignore Description Sets the RITech (Resolution - Epson EPL-N1200 | User Manual - Page 64
jobs take longer to print, but able to print without memory errors. Sets the printer to use Image Optimum mode so you can print complex, memory-intensive graphics. It Changing the Page Protect setting reconfigures your printer memory and may erase any downloaded fonts. Using the Control Panel 3-13 - Epson EPL-N1200 | User Manual - Page 65
to 25% E F None For instructions on replacing the imaging cartridge, see Chapter 5. Resets the toner counter; select this menu item and press the Enter button after installing a new imaging cartridge (see Chapter 5 for details) Displays the total number of pages printed by the printer to date Resets - Epson EPL-N1200 | User Manual - Page 66
across the interface channel Sets the memory allocation used for the printer's parallel interfaces: Maximum (more for receiving data), Minimum ( Information manual. To match the computer's baud rate or set a higher one than that supported by your computer, see the Technical Information manual (this - Epson EPL-N1200 | User Manual - Page 67
stop bits to send at the end of each character sent to the printer; 1 is the default Sets the XOn/XOff protocol to On, Off, or Robust (sends an XOn signal when the printer is ready for data); used with the DTR menu item below Turns the DTR ( - Epson EPL-N1200 | User Manual - Page 68
font source to Resident, SIMM, or Download Sets the default font number for the Roman-8 is the default (see the Technical Information manual for details on the available symbol sets) Sets the new line spacing settings to be stored in the printer; changes to the Page Size or Orientation settings in - Epson EPL-N1200 | User Manual - Page 69
Windows 95 printer driver software; see Chapter 2 for details. Menu item Err Sheet Protect Level Description Indicates whether the printer Selects a font by typeface; Courier is the default (see the Technical Information manual for details on the available fonts) Sets the pitch in cpi (characters - Epson EPL-N1200 | User Manual - Page 70
to use; PcUSA is the default (see the Technical Information manual for details on the available character tables) Country Selects an international (see the Technical Information manual for details on the available international symbol sets) AutoCR Sets the printer to automatically perform or not - Epson EPL-N1200 | User Manual - Page 71
want to use; 437 is the default (see the Technical Information manual for details on the available character tables) Specifies the margin from the Off Turns the alternate graphics option On or Off Sets the density the printer uses to print bit-mapped images to either Dark or Light density Selects - Epson EPL-N1200 | User Manual - Page 72
Chapter 4 Installing Options Available Options 4-2 Installing Optional Interfaces 4-2 Installing a LocalTalk/Serial Module 4-4 Installing an Interface Card 4-8 Using a Serial Interface 4-10 Installing Lower Paper Cassettes 4-12 Installing Memory Modules 4-13 4 Installing Options 4-1 - Epson EPL-N1200 | User Manual - Page 73
(C81263* for letter-size paper) u Optional memory modules to expand your printer's memory capacity You can purchase optional equipment, imaging cartridges, paper, parts, printed manuals, and accessories for EPSON products from EPSON Accessories at (800) 873-7766 (U.S. sales only). In Canada, call - Epson EPL-N1200 | User Manual - Page 74
card Ethernet™ card AppleTalk™ interface card GPIB interface card EPSON part number C82334* C82307* C82310* C82314* C82315* C82331* to a GPIB network ** When your printer uses an EPSON Twinax interface card, it can be used in place of these IBM system printers: 4210, 5224 (models 1 and 2), - Epson EPL-N1200 | User Manual - Page 75
Interface" on page 4-10 for instructions on configuring your computer and printer to work correctly with a serial connection. Installing a LocalTalk/Serial Module Follow these steps to install the EPSON LocalTalk/Serial module in your printer: 1. Turn off the printer and unplug the power cable from - Epson EPL-N1200 | User Manual - Page 76
2. Remove the four screws securing the controller board bracket on the printer's back panel. tabs 3. Pull on the plastic tabs to remove the controller board and place it on a clean surface. w Warning: Do not touch the electrical - Epson EPL-N1200 | User Manual - Page 77
RS-232C serial, current loop serial, or LocalTalk (default). c Caution: Make sure both slide switches are set to the same position or the printer will not operate correctly. 6. Position the module as shown below; then align its connector with connector CN4 on the controller board. Secure the module - Epson EPL-N1200 | User Manual - Page 78
7. Position the controller board so its components face the side panel of the printer and align it with the top and bottom guide rails in the printer. Then slide in the board. 8. Secure the controller board bracket with the four screws you removed earlier. 9. Connect the appropriate cable to the - Epson EPL-N1200 | User Manual - Page 79
is on); then press the Enter button twice. Installing an Interface Card Follow these steps to install an optional EPSON interface card in your printer: 1. Turn off the printer and unplug the power cable from the electrical outlet. w Warning: To avoid electrical shock, do not remove the interface - Epson EPL-N1200 | User Manual - Page 80
3. Position the optional interface card so its components face the center of the back panel. Then align its top and bottom grooves with the guide rails inside the printer and slide in the card, pushing it firmly to lock it in place. 4. Secure the card with the two screws you removed earlier. (Save - Epson EPL-N1200 | User Manual - Page 81
settings; see your computer manual for instructions. Optional serial interface default settings Setting Serial type Word length Baud rate Parity Stop bit DTR XON/XOFF Default RS-232C 8 9600 None 1 Off On You also need to set Windows to use a serial port with your printer, as described in the - Epson EPL-N1200 | User Manual - Page 82
the Epson EPL-N1200 EPSONScript (or EPL-N1200) icon. 5. Select Properties. 6. Click the Details tab. 7. Click the arrow in the Printer Port drop-down list and select a COM (serial) port to use. 8. Click OK to save your settings; then exit Printer Properties. Windows 3.1 or Windows NT instructions - Epson EPL-N1200 | User Manual - Page 83
or 1,250 sheets (with two lower paper cassettes). Follow these steps to install the cassettes on your printer. For instructions on loading paper in the cassettes, see Chapter 1. 1. Turn off the printer and unplug the power cord from the electrical outlet. 2. Disconnect any interface cables from the - Epson EPL-N1200 | User Manual - Page 84
; then plug the power cable into an electrical outlet. 7. Turn on the printer. 8. Now run the Windows printer driver to add the optional paper cassette(s) to your available paper source list. See Chapter 2 for instructions. Note: If you use the Remote Control Panel utility or SelecType to control - Epson EPL-N1200 | User Manual - Page 85
is turned off and unplugged from the electrical outlet. 2. Disconnect any interface cables from the printer. 3. Follow steps 2 and 3 on page 4-5 to remove the controller board from the printer. 4. Locate the two SIMM slots on the controller board. You can use either or both RAM slots, but do - Epson EPL-N1200 | User Manual - Page 86
Follow the steps on pages 4-7 to 4-8 to reinstall the controller board in the printer. If you ever need to remove a SIMM, pull back the metal clips on is listed under "Hardware Configurations." To do this, wait until the printer warms up (Ready appears on the control panel display and the On Line - Epson EPL-N1200 | User Manual - Page 87
Chapter 5 Maintenance Replacing the Imaging Cartridge 5-2 5 Adjusting the RITech Setting 5-5 Cleaning the Printer 5-8 Transporting the Printer 5-10 Maintenance 5-1 - Epson EPL-N1200 | User Manual - Page 88
. Be sure to install EPSON imaging cartridge #S051016 even if the cartridge you are removing has another part number. Follow these steps to replace the imaging cartridge: 1. Make sure the printer is turned on. 2. Open the printer's top cover. 3. Grasp the old imaging cartridge and pull it straight - Epson EPL-N1200 | User Manual - Page 89
c Caution: Do not turn the imaging cartridge upside down. Do not expose the imaging cartridge to light any longer than necessary. 5. Unpack the imaging cartridge and hold it level with the oval handle face up. Then shake the cartridge as shown to distribute the toner. oval handle 6. Grab the tab on - Epson EPL-N1200 | User Manual - Page 90
the toner. 8. Line up the cartridge pins with the green guides inside the printer; then slide in the cartridge until it stops. green guides 9. Close the top cover. 10. Select Toner Count Clear on the SelecType Setup menu to reset the toner counter. See Chapter 3 for instructions. 5-4 Maintenance - Epson EPL-N1200 | User Manual - Page 91
it doesn't come on, press the On Line button.) Note: Before proceeding, make sure Toner Save Mode is turned off or the status sheet will not print. See Chapter 2 for instructions on changing the setting using the printer driver. You can also turn it off using the control panel or the Remote Control - Epson EPL-N1200 | User Manual - Page 92
not change the RITech setting. If it looks incorrect, go to step 4. 4. Open an application program and access the printer driver (see Chapter 2 for instructions). Note: If you are using the Windows 3.1 EPSONScript driver, you must use the control panel to adjust the RITech setting; see Chapter 3 for - Epson EPL-N1200 | User Manual - Page 93
are using the Windows 3.1 EPSONScript driver, you must use the control panel to adjust the Density setting; see Chapter 3 for instructions. 13. Click the OK button. 14. When you see the prompt asking if you want to send your changes to the printer, select Yes. 15. Exit the printer driver. 16. Print - Epson EPL-N1200 | User Manual - Page 94
the top cover. 2. Remove the imaging cartridge and cover it with a soft cloth to avoid exposing it to light while you clean the printer. w Warning: Do not touch the fuser inside the printer; it is marked with the label CAUTION HOT SURFACE. 3. Remove any dirt or toner inside with a soft dry cloth - Epson EPL-N1200 | User Manual - Page 95
you use it. c Caution: If you get toner on your clothing, remove it with cold water. Do not use hot water; it may cause a permanent stain. 4. Clean the printer's lens by wiping it from end to end with a dry, lint-free cloth. 5. Replace the imaging cartridge. 6. Close the top cover and open the - Epson EPL-N1200 | User Manual - Page 96
bag. If you installed any lower paper cassettes, lift the printer off the cassettes. c Caution: Be sure to seal the cartridge in the bag to make sure the toner does not spill on the printer or your clothing. Then pack the printer, cartridge, and cassettes in their original packing materials, or the - Epson EPL-N1200 | User Manual - Page 97
Troubleshooting Diagnosing Problems 6-2 Reading Control Panel Display Messages 6-2 Using Hex Dump Mode 6-7 Paper Feeding Problems 6-8 Fixing Paper Jams in the Built-in Paper Tray 6-9 Fixing Paper Jams in an Optional Lower Paper Cassette . . 6-10 Printing Problems 6-10 Print Quality Problems - Epson EPL-N1200 | User Manual - Page 98
problem between your printer and computer, you can set the printer to in the printer driver is different from the size loaded in the printer. Check to printer from the specified feeder or has jammed on its way into the printer. Remove the jammed paper as described on page 6-8. 6-2 Troubleshooting - Epson EPL-N1200 | User Manual - Page 99
. The printer reduces the quality automatically so that it can continue printing. Check to see if the printout is acceptable. If not, add more memory (for a permanent solution) or set Resolution to 300 dpi and Page Protect to OFF (temporarily). See Chapters 2 and 3 for instructions. Manual Feed - Epson EPL-N1200 | User Manual - Page 100
manual feed mode, press Continue. The printer loads the paper as instructed by the Paper Source setting. (For details on using manual feed mode, see Chapter 1.) Mem Overflow The printer in the printer driver; see Chapter 2 for details. (If you are using the Windows 3.1 EPSONScript driver, change the - Epson EPL-N1200 | User Manual - Page 101
. If this message appears again, change the Page Protect setting in the driver or on the control panel; see Chapters 2 and 3 for instructions. Printer Open The printer cover is open; close it to continue printing. RAM Check The printer is checking the RAM; wait a moment for it to finish. ROM Check - Epson EPL-N1200 | User Manual - Page 102
EPSON Customer Care Center. Standby The printer is in its low power state. If the On Line light is on, it is still on line and you may send a print job. Toner Low The printer is almost out of toner. You should replace the imaging cartridge soon; see Chapter 5 for instructions. 6-6 Troubleshooting - Epson EPL-N1200 | User Manual - Page 103
cartridge as described in Chapter 5. You can press Continue to print one more page. Warming Up The printer is warming up; wait a few moments for it to finish. Using Hex Dump Mode Hex dump mode is a special feature that makes it easy for experienced users to find the cause of communication problems - Epson EPL-N1200 | User Manual - Page 104
paper jam problems, try . u Be sure to adjust the paper guides so that the paper can slide in freely. u in the output tray on top of the printer. u Try turning over the stack of paper you have selected to load from the cassette in the printer driver; see Chapter 2 for details. (Also make sure the - Epson EPL-N1200 | User Manual - Page 105
into the printer. 3. Open the printer's top cover and remove the imaging cartridge. Then remove any paper remaining inside the printer and replace the imaging cartridge. w Warning: Do not touch the fuser inside the printer; it is marked with the label CAUTION HOT SURFACE. c Caution: If toner gets on - Epson EPL-N1200 | User Manual - Page 106
you may encounter as you print. Many printer driver settings mentioned here can also be set using SelecType or the Remote Control Panel utility; if you want to use these utilities instead of the printer driver, see Chapter 3 or the Technical Information manual for details. 6-10 Troubleshooting - Epson EPL-N1200 | User Manual - Page 107
your printer and computer. If you are using the serial interface, set the baud rate, protocol, data bit, and related settings. See your computer manual for properly set up for your printer. The imaging cartridge may be empty; if necessary, replace it as described in Chapter 5. Troubleshooting 6-11 - Epson EPL-N1200 | User Manual - Page 108
manual). If the printer still does not print correctly, contact your dealer or an authorized EPSON Customer Care Center. The position of the printout on the page is incorrect. Make sure you are using the correct page length and margin settings in your application program. 6-12 Troubleshooting - Epson EPL-N1200 | User Manual - Page 109
blank pages. Make sure you have enough toner by checking the SelecType Toner option in the Setup menu; see Chapter 3 for instructions. Check that the imaging cartridge is installed correctly. Print out a status sheet by pressing the Enter button twice after the printer is warmed up and on line. If - Epson EPL-N1200 | User Manual - Page 110
with a clean, dry cloth; see Chapter 5 for instructions. To clean the internal printer components, try printing three pages containing only one character per page. If you still have dark output, there may be a problem with the imaging cartridge. Remove the cartridge, shake it from side to side, and - Epson EPL-N1200 | User Manual - Page 111
, dry cloth. Then clean the paper path inside the printer; see Chapter 5 for instructions. Try cleaning the internal printer components by printing three pages with only one character per page. If the problem persists, replace the imaging cartridge as described in Chapter 5. Troubleshooting 6-15 - Epson EPL-N1200 | User Manual - Page 112
, replace the imaging cartridge as described in Chapter 5. The printout is too dark. Lighten the Density setting in the printer driver; see Chapter 2 for details. If you're using the Windows 3.1 EPSONScript driver, use the SelecType Config menu to change the Density setting. 6-16 Troubleshooting - Epson EPL-N1200 | User Manual - Page 113
the imaging cartridge as described in Chapter 5. The back side of the printed page is smudged. Toner may have spilled in the paper feed path. Remove the imaging cartridge and then clean the paper path of the printer using a soft, lint-free cloth as described in Chapter 5. Troubleshooting 6-17 - Epson EPL-N1200 | User Manual - Page 114
A Specifications Paper A-2 Printer A-3 General A-3 Environmental A-4 Mechanical A-4 Electrical A-4 Interfaces A-5 Parallel B Interface A-5 Parallel C Interface A-6 Using ECP Mode in Windows 95 A-6 Serial Interface A-7 500 Sheet Lower Paper Cassette A-10 Imaging Cartridge (S051016 A-10 - Epson EPL-N1200 | User Manual - Page 115
of paper may be changed by the manufacturer at any time, EPSON cannot guarantee the quality of any type of paper. Always test conditions only. Poor quality paper may reduce print quality, cause paper jams and other problems. Paper weight: Plain paper Card stock Paper size: Paper Envelopes 60 to 90 - Epson EPL-N1200 | User Manual - Page 116
: Internal emulation: Resident fonts: RAM: Laser beam scanning and dry electrophotographic process 600 seconds at normal temperature Automatic or manual feed Center alignment for all sizes (GL2 mode) LQ 24-pin printer emulation (ESC/P 2) ESC/P 9-pin printer emulation (FX) IBM Proprinter emulation - Epson EPL-N1200 | User Manual - Page 117
: Weight: Durability: 10.4 inches (265 mm) 16.2 inches (411 mm) 19.0 inches (484 mm) 33.1 lb (15 kg) including the imaging cartridge 5 years or 300,000 sheets, whichever comes first Electrical Specification Voltage Rated frequency Rated current Power consumption Power consumption in Standby mode - Epson EPL-N1200 | User Manual - Page 118
Interfaces In the tables below, the column heading "Direction" refers to the direction of signal flow as viewed from the printer. Parallel B Interface The parallel B (IEEE 1284-I compliant) interface connector pin assignments are shown in the table below. Pin 1 2 3 4 5 6 7 8 9 10 11 12 13 14 15 - Epson EPL-N1200 | User Manual - Page 119
HostBusy ECP PeriphAck PeriphClk nPeriphRequest nAckReverse nReverseRequest HostAck Peripheral Logic High Using ECP Mode in Windows 95 To use the ECP mode with a Parallel C (IEEE 1284 level II compliant) connector, your computer must support the ECP mode. Note: The ECP mode is not available with - Epson EPL-N1200 | User Manual - Page 120
For details, see your computer manual.) 8. Click OK to save the settings. Serial Interface The printer's resident serial interface can be even Stop bits: 1 or 2 Printer ready protocol: Enabled (XON/XOFF protocol set to ON) Baud rate (bits per second): 300, 600, 1200, 2400, 4800, 9600, 19200, - Epson EPL-N1200 | User Manual - Page 121
rates over 2400 depends on your computer's hardware reliability (including the interface cable). EPSON does not recommend or guarantee the use of any particular brand of computer. Handshaking The printer's serial interface can use DTR (Data Terminal Ready) signal levels and XON/XOFF communication - Epson EPL-N1200 | User Manual - Page 122
function can be set on or off with the default-setting mode of the printer. Received data. This pin transmits serial data from the computer to the printer. Transmits data. This pin transmits serial data from the printer to the computer. Received data. This pin transmits serial data from the computer - Epson EPL-N1200 | User Manual - Page 123
pages per minute Plain paper, such as copier paper, and recycled paper DC 5 V supplied by the printer 4.2 inches (107 mm) 15.9 inches (405 mm) 18.9 inches (477 mm) 8.8 lb (4.0 kg) Imaging Cartridge (S051016) Storage temperature: 32 to 95°F (0 to 35°C) Storage humidity: 35 to 85% RH Shelf life - Epson EPL-N1200 | User Manual - Page 124
, removing, 4-5 Copies setting control panel, 3-6, 3-11 printer driver, 2-12 Customer support, Intro-5 to Intro-7 D Data dump, see Hex dump mode Density adjusting, 5-7 setting in printer driver, 2-7, 2-13 setting on control panel, 3-12 Download service, Intro-6 Duplexing option, see Printing, two - Epson EPL-N1200 | User Manual - Page 125
, 2-10 H Help from EPSON, Intro-5 to Intro-7 with printer driver, 2-9 Hex Dump message, 6-3 Hex dump mode, 6-2, 6-7 I Illegal AUX I/F Card message, 6-3 Illegal I/F Module message, 6-3 Image Optimum, 2-15, 3-13 Image Optimum message, 6-3 Imaging cartridge amount of toner, 3-14 replacing, 5-2 to - Epson EPL-N1200 | User Manual - Page 126
to 2-20, 3-18 PostScript fonts, see Fonts Print Overrun message, 6-5 Print quality, problems, 6-14 to 6-17 Printer cleaning, 5-8 to 5-9 control panel, 3-2 to 3-20 packing, 5-10 specifications, A-3 to A-4 Printer driver accessing, 2-2 to 2-4 basic settings, 2-9 copies setting, 2-12 creating groups of - Epson EPL-N1200 | User Manual - Page 127
3-10 Support services, Intro-5 to Intro-7 T Technical assistance, Intro-5 to Intro-7 Telephone numbers, Intro-5 to Intro-7 Test menu, 3-9 Time Out setting control panel, 3-14 printer driver, 2-14 Toner amount remaining, 3-14 removing spilled, 5-9 replacing imaging cartridge, 5-2 to 5-4 Toner Density - Epson EPL-N1200 | User Manual - Page 128
Toner Out message, 6-7 Toner Save setting control panel, 3-6, 3-12 printer driver, 2-6, 2-14 Transparencies, 1-3 Tray size menu, 3-11 to 3-12 Troubleshooting, 6-2 to 6-17 V Value button, 3-8 W Warming Up message, 6-7 Windows ECP mode, A-6 to A-7 serial interface settings, 4-11 Windows control panel,
-
 1
1 -
 2
2 -
 3
3 -
 4
4 -
 5
5 -
 6
6 -
 7
7 -
8
-
9
-
10
-
11
-
12
-
13
-
14
-
15
-
16
-
17
-
18
-
19
-
20
-
21
-
22
-
23
-
24
-
25
-
26
-
27
-
28
-
29
-
30
-
31
-
32
-
33
-
34
-
35
-
36
-
37
-
38
-
39
-
40
-
41
-
42
-
43
-
44
-
45
-
46
-
47
-
48
-
49
-
50
-
51
-
52
-
53
-
54
-
55
-
56
-
57
-
58
-
59
-
60
-
61
-
62
-
63
-
64
-
65
-
66
-
67
-
68
-
69
-
70
-
71
-
72
-
73
-
74
-
75
-
76
-
77
-
78
-
79
-
80
-
81
-
82
-
83
-
84
-
85
-
86
-
87
-
88
-
89
-
90
-
91
-
92
-
93
-
94
-
95
-
96
-
97
-
98
-
99
-
100
-
101
-
102
-
103
-
104
-
105
-
106
-
107
-
108
-
109
-
110
-
111
-
112
-
113
-
114
-
115
-
116
-
117
-
118
-
119
-
120
-
121
-
122
-
123
-
124
-
125
-
126
-
127
-
128
 |
 |
Laser Printer
U s e r ’ s
G u i d e
All rights reserved. No part of this publication may be reproduced, stored in a retrieval
system, or transmitted in any form or by any means, electronic, mechanical, photocopying,
recording, or otherwise, without the prior written permission of Seiko Epson Corporation.
No patent liability is assumed with respect to the use of the information contained herein.
Neither is any liability assumed for damages resulting from the use of the information
contained herein.
Neither Seiko Epson Corporation nor its affiliates shall be liable to the purchaser of this
product or third parties for damages, losses, costs, or expenses incurred by purchaser or
third parties as a result of: accident, misuse, or abuse of this product or unauthorized
modifications, repairs, or alterations to this product, or (excluding the U.S.) failure to
strictly comply with Seiko Epson Corporation’s operating and maintenance instructions.
Seiko Epson Corporation shall not be liable against any damages or problems arising from
the use of any options or any consumable products other than those designated as
Original EPSON Products or EPSON Approved Products by Seiko Epson Corporation.
EPSON and EPSON ESC/P are registered trademarks and EPSON ESC/P 2 is a trademark
of Seiko Epson Corporation.
Swiss and Dutch are trademarks of Bitstream Inc.
CG Times and CG Omega are registered trademarks of Miles, Inc.
Univers is a registered trademark of Linotype AG and/or its subsidiaries.
Antique Olive is a trademark of Fonderie Olive.
Arial and Times New Roman are registered trademarks and Albertus is a trademark of
Monotype Corporation plc.
Coronet is a trademark of Ludlow Industries (UK) ltd.
General Notice: Other product names used herein are for identification purposes only and
may be trademarks of their respective owners. EPSON disclaims any and all rights in
those marks.
Copyright © 1996 by Epson America, Inc.
8/96
Printed on recycled paper with at least 10% post-consumer content
®